This page provides the basics to start editing the Waze Map. Because Waze is a navigation tool and not a topographic map, some things are drawn differently than expected. Our advice is to choose one type of edit and first familiarize yourself with all aspects of that edit. Otherwise, you might as well get overfeed with information. Your [[User:Moweez/Verbeter_je_vaardigheden#Communicatie_en_informatie|Community]] is happy to help you make your edits work.<br />
This page provides the basics to start editing the Waze Map. Because Waze is a navigation tool and not a topographic map, some things are drawn differently than expected. Our advice is, after reading this page, to choose one type of edit and first familiarize yourself with all aspects of that edit. Otherwise, you might as well get overfeed with information. Your [[User:Moweez/Verbeter_je_vaardigheden#Communicatie_en_informatie|Community]] is happy to help you make your edits work.<br />
{{anchor|TOC}}
{{anchor|TOC}}
Line 20:
Line 18:
<translate>
<translate>
==How to get to the Waze Map Editor (WME)==
=How to get to the Waze Map Editor (WME)=
</translate>
</translate>
<translate>
<translate>
Line 44:
Line 42:
<div style="text-align: right; direction: ltr; margin-left: 1em;">[[#TOC|<small>''<translate>back to the Table of Content</translate>''</small>]]</div>
<div style="text-align: right; direction: ltr; margin-left: 1em;">[[#TOC|<small>''<translate>back to the Table of Content</translate>''</small>]]</div>
==<translate>Start in Practice Mode</translate>==
=<translate>Start in Practice Mode</translate>=
<translate>
<translate>
Before editing the map for real, you may first want to practice editing. Go to the [http://www.waze.com/editor/?env=row WME server] and choose Practice Mode. If you are already logged into WME, log out first to be able to enter Practice Mode.<br />
Before editing the map for real, you may first want to practice editing. Go to the [http://www.waze.com/editor/?env=row WME server] and choose Practice Mode. If you are already logged into WME, log out first to be able to enter Practice Mode.<br />
Line 56:
Line 54:
<!-- note to the editor: following part should be a link on the introduction page
<!-- note to the editor: following part should be a link on the introduction page
== <translate>
= <translate>Starting Editors </translate> =
Starting Editors </translate> ==
<translate>
<translate>
Line 79:
Line 76:
</translate>
</translate>
-->
-->
=== <translate>Editing the map</translate> ===
= <translate>Editing the map</translate> =
Let's start edit the map!
Let's start edit the map!
====<translate>Create a Road</translate>====
==<translate>Create a Road</translate>==
<translate>
<translate>
# Hover the mouse over the [[File:DrawRoads.jpg]] button on the toolbar at the top of the page and click "Road" (''[[Shortcut keys|Shortcut key]]: '''i'''; [[User:Moweez/BeNeLux_Map_Editing_Quick-start_Guide#Create_a_roundabout|Roundabouts]] are explained in another section)
# Hover the mouse over the [[File:DrawRoads.jpg]] button on the toolbar at the top of the page and click "Road" (''[[Shortcut keys|Shortcut key]]: '''i'''; [[User:Moweez/BeNeLux_Map_Editing_Quick-start_Guide#Create_a_roundabout|Roundabouts]] are explained in another section)
Line 100:
Line 97:
</translate>
</translate>
====<translate>Create a Place</translate>====
==<translate>Create a Place</translate>==
<translate>
<translate>
Hover over this [[File:DrawPlace.jpg]] button to show Place categories. Choose one and click on the map to add it. This will add a point place. Use the [[Map_Editor_Interface_and_Controls#Left_Pane_when_a_Place_is_selected|left pane]] to change it to an area and to change other information about the place. For an area place, use [[#Geometry_node|geometry nodes]] of the place to change its shape.
Hover over this [[File:DrawPlace.jpg]] button to show Place categories. Choose one and click on the map to add it. This will add a point place. Use the [[Map_Editor_Interface_and_Controls#Left_Pane_when_a_Place_is_selected|left pane]] to change it to an area and to change other information about the place. For an area place, use [[#Geometry_node|geometry nodes]] of the place to change its shape.
Line 108:
Line 105:
<div style="text-align: right; direction: ltr; margin-left: 1em;">[[#TOC|<small>''<translate>back to the Table of Content</translate>''</small>]]</div>
<div style="text-align: right; direction: ltr; margin-left: 1em;">[[#TOC|<small>''<translate>back to the Table of Content</translate>''</small>]]</div>
==== <translate>Changing elements on the map</translate> ====
== <translate>Changing elements on the map</translate> ==
<translate>
<translate>
To change existing roads or Places, select the object you want to change. Now you can change the shape or appearance by adjusting the road geometry.
To change existing roads or Places, select the object you want to change. Now you can change the shape or appearance by adjusting the road geometry.
<div style="text-align: right; direction: ltr; margin-left: 1em;">[[#TOC|<small>''<translate>back to the Table of Content</translate>''</small>]]</div>
<div style="text-align: right; direction: ltr; margin-left: 1em;">[[#TOC|<small>''<translate>back to the Table of Content</translate>''</small>]]</div>
====<translate>Connecting roads</translate>====
==<translate>Connecting roads</translate>==
<translate>
<translate>
When drawing new segments, or moving segments around, the editor will automatically make junctions.
When drawing new segments, or moving segments around, the editor will automatically make junctions.
Line 135:
Line 132:
</translate>
</translate>
===== <translate>Bridging roads</translate> =====
=== <translate>Bridging roads</translate> ===
<translate>
<translate>
# Select two adjacent segments which should be joined together
# Select two adjacent segments which should be joined together
Line 146:
Line 143:
</translate>
</translate>
===== <translate>Crossing roads</translate> =====
=== <translate>Crossing roads</translate> ===
<translate>
<translate>
When two roads cross each other at the same elevation level, they can be joined together easily. This is useful if you draw several new roads for a neighborhood by drawing segments from end-to-end and allowing new segments to cross each other. Once drawn, you can junction them using this method.
When two roads cross each other at the same elevation level, they can be joined together easily. This is useful if you draw several new roads for a neighborhood by drawing segments from end-to-end and allowing new segments to cross each other. Once drawn, you can junction them using this method.
Line 160:
Line 157:
<div style="text-align: right; direction: ltr; margin-left: 1em;">[[#TOC|<small>''<translate>back to the Table of Content</translate>''</small>]]</div>
<div style="text-align: right; direction: ltr; margin-left: 1em;">[[#TOC|<small>''<translate>back to the Table of Content</translate>''</small>]]</div>
See the section [[Creating and editing road segments#Set_allowed_turns_.28connections.29|set allowed turns]] for more information.
See the section [[Creating and editing road segments#Set_allowed_turns_.28connections.29|set allowed turns]] for more information.
</translate>
</translate>
=====<translate>Keyboard Shortcuts for turn instructions</translate>=====
===<translate>Keyboard Shortcuts for turn instructions</translate>===
<translate>
<translate>
* Press '''s''' to separate overlapping arrows.
* Press {{Key press|s}} to separate overlapping arrows.
* Press '''a''' to make arrows transparent or opaque, so you can see beneath them or click items under them
* Press {{Key press|a}} to make arrows transparent or opaque, so you can see beneath them or click items under them
* Press '''q''' to disallow all turns
* Press {{Key press|q}} to disallow all turns
* Press '''w''' to allow all turns
* Press {{Key press|w}} to allow all turns
* Press '''Shift+z''' to toggle between seeing the turns for one segement, or seeing all resticted turns (red arrows) for all junctions in your screen.
* Press {{Key press|Shift|z}} to toggle between seeing the turns for one segement, or seeing all resticted turns (red arrows) for all junctions in your screen.
</translate>
</translate>
<div style="text-align: right; direction: ltr; margin-left: 1em;">[[#TOC|<small>''<translate>back to the Table of Content</translate>''</small>]]</div>
<div style="text-align: right; direction: ltr; margin-left: 1em;">[[#TOC|<small>''<translate>back to the Table of Content</translate>''</small>]]</div>
====<translate>Create a roundabout</translate>====
==<translate>Create a roundabout</translate>==
<gallery>
<gallery>
File:FixRAB-03.png|1
File:FixRAB-03.png|1
Line 216:
Line 213:
<div style="text-align: right; direction: ltr; margin-left: 1em;">[[#TOC|<small>''<translate>back to the Table of Content</translate>''</small>]]</div>
<div style="text-align: right; direction: ltr; margin-left: 1em;">[[#TOC|<small>''<translate>back to the Table of Content</translate>''</small>]]</div>
====<translate>Create a loop road</translate>====
==<translate>Create a loop road</translate>==
<translate>
<translate>
When drawing a road which connects to the same segment at both ends, only one junction is created. To create the other junction:
When drawing a road which connects to the same segment at both ends, only one junction is created. To create the other junction:
Line 229:
Line 226:
<div style="text-align: right; direction: ltr; margin-left: 1em;">[[#TOC|<small>''<translate>back to the Table of Content</translate>''</small>]]</div>
<div style="text-align: right; direction: ltr; margin-left: 1em;">[[#TOC|<small>''<translate>back to the Table of Content</translate>''</small>]]</div>
[[Benelux_Roads#Non-drivable|Non-drivable roads]] should rather <b>NOT</b> be added to the map. They are often not necessary to use, because Waze is solely meant for drivers. They should only be added when it improves navigation for the driver!<br />
[[Benelux_Roads#Non-drivable|Non-drivable roads]] should rather <b>NOT</b> be added to the map. They are often not necessary to use, because Waze is solely meant for drivers. They should only be added when it improves navigation for the driver!<br />
General exceptions for drawing non-drivable roads:
===General exceptions for drawing non-drivable roads:===
* If navigation is unclear without them
* If navigation is unclear without them
* If there aren't alternative ways leading to the destination
* If there aren't alternative ways leading to the destination
Line 243:
Line 240:
</translate>
</translate>
=====<translate>BeNelux convention on using walking trail</translate>=====
===<translate>BeNelux convention on using walking trail</translate>===
<translate>
<translate>
:(only if one of the above arguments count)
:(only if one of the above arguments count)
Line 249:
Line 246:
</translate>
</translate>
=====<translate>BeNelux convention on using Pedestrian Boardwalk</translate>=====
===<translate>BeNelux convention on using Pedestrian Boardwalk</translate>===
<translate>
<translate>
:(only if one of the above arguments count)
:(only if one of the above arguments count)
Line 260:
Line 257:
<div style="text-align: right; direction: ltr; margin-left: 1em;">[[#TOC|<small>''<translate>back to the Table of Content</translate>''</small>]]</div>
<div style="text-align: right; direction: ltr; margin-left: 1em;">[[#TOC|<small>''<translate>back to the Table of Content</translate>''</small>]]</div>
==== <translate>Parking lots</translate> ====
== <translate>Parking lots</translate> ==
<translate>
<translate>
Parking Lot Places are always drawn as an Area [[User:Moweez/BeNeLux_Map_Editing_Quick-start_Guide#Create_a_Place|Place]] and should cover only Parkings that are distinctive and significant, and for general purpose and public use. For an extensive description, please read the [[Benelux_Places#Parking_Lots|Places page]].
Parking Lot Places are always drawn as an Area [[User:Moweez/BeNeLux_Map_Editing_Quick-start_Guide#Create_a_Place|Place]] and should cover only Parkings that are distinctive and significant, and for general purpose and public use. For an extensive description, please read the [[Benelux_Places#Parking_Lots|Places page]].
Line 266:
Line 263:
<div style="text-align: right; direction: ltr; margin-left: 1em;">[[#TOC|<small>''<translate>back to the Table of Content</translate>''</small>]]</div>
<div style="text-align: right; direction: ltr; margin-left: 1em;">[[#TOC|<small>''<translate>back to the Table of Content</translate>''</small>]]</div>
--UNTIL HERE---
== <translate>Housenumbers</translate> ==
==== <translate>Housenumbers</translate> ====
<translate>
<translate>
Since november 2014 it is possible to search for housenumbers in the Waze database. To support this functionality, Waze imported housenumber data from external sources, in multiple countries, like The Netherlands. This was not the case in Belgium or Luxemburg.
Since november 2014 it is possible to search for housenumbers in the Waze database. To support this functionality, Waze imported housenumber data from external sources, in multiple countries, like The Netherlands. This was not the case in Belgium or Luxemburg.
Line 282:
Line 276:
''Note: Be aware that, in the app, old search records should be removed to get an updated result.''
''Note: Be aware that, in the app, old search records should be removed to get an updated result.''
</translate>
</translate>
<div style="text-align: right; direction: ltr; margin-left: 1em;">[[#TOC|<small>''<translate>back to the Table of Content</translate>''</small>]]</div>
==== <translate>How to make a permalink</translate> ====
== <translate>How to make a permalink</translate> ==
<translate>
<translate>
The permalink icon has two functions -- to refresh the browser window and to create Permalinks to share and communicate with other editors. A permalink is a URL used to take you or someone else directly to a specific map location. It contains latitude, longitude, zoom level, visible layers, and optionally a junction or a place or one or more segments.
The permalink icon has two functions -- to refresh the browser window and to create Permalinks to share and communicate with other editors. A permalink is a URL used to take you or someone else directly to a specific map location. It contains latitude, longitude, zoom level, visible layers, and optionally a junction or a place or one or more segments.
Line 293:
Line 288:
To include a single place, junction, or segment in the permalink, click on it before using the permalink icon. To include several segments and/or objects, use {{Key press|ctrl|click}} (MAC: {{key press|command|click}}).
To include a single place, junction, or segment in the permalink, click on it before using the permalink icon. To include several segments and/or objects, use {{Key press|ctrl|click}} (MAC: {{key press|command|click}}).
</translate>
</translate>
<div style="text-align: right; direction: ltr; margin-left: 1em;">[[#TOC|<small>''<translate>back to the Table of Content</translate>''</small>]]</div>
== <translate>Take the next step</translate> ==
= <translate>Take the next step</translate> =
<translate>
<translate>
The sequel to this Quick Start Guide can be found in in the [[Benelux Advanced Guide|BeNeLux Advanced Guide]]</translate>.
The sequel to this Quick Start Guide can be found in in the [[Benelux Advanced Guide|BeNeLux Advanced Guide]]</translate>.
<div style="text-align: right; direction: ltr; margin-left: 1em;">[[#TOC|<small>''<translate>back to the Table of Content</translate>''</small>]]</div>
{{Benelux Footer|Sort=Beginner Guide}}
{{Benelux Footer|Sort=Beginner Guide}}
Revision as of 06:54, 27 February 2015
This new page is currently undergoing modifications. The information presented should be considered a draft, not yet ready for use. This content is open to changes from anyone during construction. If you would like to make changes or have questions, please send a private message to this user.
Welcome editor!
This page provides the basics to start editing the Waze Map. Because Waze is a navigation tool and not a topographic map, some things are drawn differently than expected. Our advice is, after reading this page, to choose one type of edit and first familiarize yourself with all aspects of that edit. Otherwise, you might as well get overfeed with information. Your Community is happy to help you make your edits work.
How to get to the Waze Map Editor (WME)
Log in to www.waze.com. If prompted to login, use the same username and password as you do on the Waze client app and the rest of the Waze website.
Choose you location at the right of the top bar
Click 'live map'
Click 'edit the map'
Or, go directly to www.waze.com/editor/?env=row.
After logging in, you will see the following page:
However, the top bar layout has just changed in the new version of WME:
If you want to learn more about the controls and functions of WME (Waze Map Editor), you can find more details on the WME Interface and Controls page.
Before editing the map for real, you may first want to practice editing. Go to the WME server and choose Practice Mode. If you are already logged into WME, log out first to be able to enter Practice Mode.
The Waze Map Editor has a Practice mode in which you can perform nearly every action available when logged into the Editor, except that you cannot save any changes. In order to save changes, you must log in. Practice mode is helpful to new and existing editors and should be used to try out new or complicated edits before executing them.
More information can be found on Practice Mode.
Hover the mouse over the button on the toolbar at the top of the page and click "Road" (Shortcut key: i; Roundabouts are explained in another section)
Click the mouse on the map at the point where you want to start the new road segment.
Move the mouse cursor along the path of the road and click the mouse to add a geometry node for each point that changes direction along the road.
When finished, double-click (or shift-click) the last point to end the segment.
Select the segment again, and fill in the details of the segment in the menu pane on the left.
Each segment that is added must have a Country, City, and Street name, under the "Edit" link left. If there is no City and/or Street name available, then the "None" box(es) must be selected, or the segment will stay as an unfinished red line.
Be sure the road actually exists before creating it.
Hover over this button to show Place categories. Choose one and click on the map to add it. This will add a point place. Use the left pane to change it to an area and to change other information about the place. For an area place, use geometry nodes of the place to change its shape.
More information about Places can found in the BeNeLux Places page.
To change existing roads or Places, select the object you want to change. Now you can change the shape or appearance by adjusting the road geometry.
Geometry nodes
Segment geometry nodePlaces geometry nodeWhen editing a segment or Area Place, large white circles appear where the segment changes direction ultimately altering its shape. Click and drag them individually to alter the geometry of the segment or Place. Press the d key while the mouse is hovered over them to delete the geometry node. Alternately, hold the d key and then move the mouse over the nodes you want to delete.
The smaller white circles between the geometry nodes are "inter"-geometry nodes. When you click and drag an inter-geometry node, it becomes a larger geometry node and two more inter-geometry nodes appear halfway between each side again.
TIP: Under the Layer icon at the top right of the Map Editor Tool Bar, you can turn off the road layer , to have a better view on the road structure and Satellite Image. TIP: Press "Del" to delete a selected segment, Place, or junction´´
When drawing new segments, or moving segments around, the editor will automatically make junctions.
For new roads, if you start and/or end the new segment on an existing segment, a junction is created at the location were you start/end the new segment
For existing roads, if you move the start or the end of a segment onto an existing segment, a junction is created
If you move a junction to an existing segment or junction, all roads connected will be part of the junction.
Bridging roads
Select two adjacent segments which should be joined together
Click the icon over the junction
The properties of the segments to be bridged must be identical or you will not see the bridge icon
Bridging automatically increases the level of the new merged segment by 1 more than the highest level of the two segments. You can change it, of course, if it needs to be a different level.
Generally, if two segments can be joined, you can also select the junction and press the trash can icon to have them join as well. If the trash can icon does not appear, the segments are different in some way. This might be the reason there is a junction in the first place. For more detail, see Overpasses, Underpasses and Bridges.
Crossing roads
When two roads cross each other at the same elevation level, they can be joined together easily. This is useful if you draw several new roads for a neighborhood by drawing segments from end-to-end and allowing new segments to cross each other. Once drawn, you can junction them using this method.
Click the which should appear above the intersection
A junction is added
The sign won't appear if the roads cross each other multiple times, or when elevation levels differ. You can often use this method with unconfirmed (red) roads, but sometimes the editor will refuse to do this process until the roads are confirmed. Additionally, changing zoom level sometimes helps to get the sometimes-stubborn junction creator icon to appear. For further information, see Overlapping road junctions.
Be sure to check the turn restrictions for your newly created junctions.
When you select a segment, you can set the turn instructions by clicking the arrows at the junction(s) with other segments.
In General:
A green arrow means Allowed
A yellow arrow with a clock means Partially Restricted (scheduled or vehicle-type based)
A red arrow with the circle-slash icon means Restricted
Clicking an arrow toggles between Allowed and Restricted (or, between Partially and Fully Restricted).
NOTE: The slashed-circle icon for Restricted and clock icon for Partial turn restrictions are put in place to allow editors with various forms of color blindness differentiate between the three different types of turn arrows.
Each arrow must be set correctly for Waze to route correctly. Initial turn restrictions on roads that are impported by Waze, are set automatically by the Waze routing engine. Automatically set turns can be altered by the routing engine, but manually set turns cannot. Unfortunately, both automatic and manually set restricted turns are represented by red arrows and cannot be distinguished. Currently, when you use the option to enable all turns, it will not fully change the routing from automatic to manual instructions, leaving possible so called RevCons. To clear these, select the junction with the mouse. Then, in the left menu pane, click the link to "Disallow all connections" and then "Allow all connections". Alternately you can use the keyboard shortcuts, by pressing the letter 'q' to disallow all connections, followed by 'w' to allow all connections.
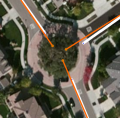
Draw single road segments that will lead to the roundabout and ensure they extend into the center of the roundabout area. Use the visual map or gps points to align the roads.
Hover the mouse over the button on the toolbar at the top of the page and click "Roundabout" (Shortcut key: o).
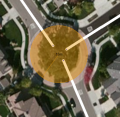
Click the mouse on the map at the center of the roundabout area.
Move the mouse cursor outside, up to the middle of where the roundabout road should be, and single-click.
Roundabouts should not get a Streetname to enable proper routing. Enter the City name in the "Edit" menu left. Check the "None" box of the Streetname.
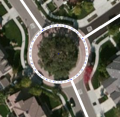
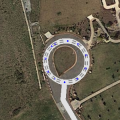
Roundabouts in WME will yield specific routing instructions to drivers, such as "at the roundabout, take the third exit". If those routing instructions could confuse drivers, the Roundabout tool should not be used.
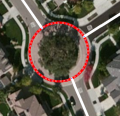
Improper use
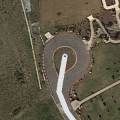
Correct use
Roundabouts should never be used for cul-de-sacs or other dead end streets, regardless of how round they are. A single road segment leading to a cul-de-sac should be drawn as a dead end. With very large roads it might be advisable to create a loop, but not a roundabout.
Traffic circles without roundabout signs neither should be drawn as a roundabout. In some cases, a roundabout is not used even if there is a roundabout sign, to create the best possible instructions for the situation.
When drawing a road which connects to the same segment at both ends, only one junction is created. To create the other junction:
Move the end of the new segment away from where it is
Drop it
Move it back to where you want the junction to be
When the start and end of a road segment ends at the same junction, the above may not work. Cut the looping segment somewhere, following the instructions in Cutting a segment. Then join the remaining segment end to the common junction and apply normal turn restrictions.
Please note, this form of loop road should only be sparsely used with care. For more information, see the article Loops in the Junction Style Guide.
Non-drivable roads should rather NOT be added to the map. They are often not necessary to use, because Waze is solely meant for drivers. They should only be added when it improves navigation for the driver!
General exceptions for drawing non-drivable roads:
If navigation is unclear without them
If there aren't alternative ways leading to the destination
to prevent automatic Map Problems (MP’s), because of cyclists, walkers or travellers with public transport who use Waze (Aaargh).
To separate different speed tracks, for keeping speed data accurate.
the segment contains housenumbers.
Both Walking Trails and Pedestrian Boardwalks, as all non-drivable roads, should generally not be connected to drivable roads. Although the penalty in the routing calculation is high, if these roads would be connected, it can generate wrong routes.
BeNelux convention on using walking trail
(only if one of the above arguments count)
Walking trails are used for a specific purpose in the BeNeLux. Unlike its name is suggesting, it is only used for public transport like rail roads and bus lanes. Segments should be locked at level 5.
BeNelux convention on using Pedestrian Boardwalk
(only if one of the above arguments count)
If you think a Pedestrian Boardwalk is needed to help the driver finding it's way, than they can be used for Bicycle paths, Walking paths, and Pedestrian zones. They are generally set to driving direction Unknown and are not connected to driveable roads.
However, non-drivable segments containing housenumbers should be connected, and the driving direction is set to two-way. All necessary Pedestrian Boardwalks are locked at a minimum level 3.
Be aware that adding Walking Trails and Pedestrian Boardwalks can even generate the use of Waze by cyclists and walkers, which would lead to corrupt data! Walking trails and Pedestrian Boardwalks that are not necessary should be deleted, even if they do not disturb the routing. Its presence will encourage other editors to add even more!
When you have any doubt on using one of these segment types, just ask your Community.
Parking Lot Places are always drawn as an Area Place and should cover only Parkings that are distinctive and significant, and for general purpose and public use. For an extensive description, please read the Places page.
Since november 2014 it is possible to search for housenumbers in the Waze database. To support this functionality, Waze imported housenumber data from external sources, in multiple countries, like The Netherlands. This was not the case in Belgium or Luxemburg.
When searching for an address in the Waze app or Livemap, Waze will use the following order to present the results:
Manual created housenumbers
Google Maps database
Imported housenumber data
Imported housenumbers can be recognized for there is no editor linked to the housenumber in the housenumber screen. For the best working of Waze follow this guideline: if you notice a wrongly positioned address/housenumber in the app or livemap, add the housenumber or correct the housenumber in the Waze Map Editor. If the housenumber looks correct, but there is no editor linked to it yet, just give it a nudge and Save. Now you should see your name linked to the housenumber when you select it.
Note: Be aware that, in the app, old search records should be removed to get an updated result.
The permalink icon has two functions -- to refresh the browser window and to create Permalinks to share and communicate with other editors. A permalink is a URL used to take you or someone else directly to a specific map location. It contains latitude, longitude, zoom level, visible layers, and optionally a junction or a place or one or more segments.
To refresh the browser and "remember" the current editing window information, simply click on the permalink icon. Any unsaved edits will be lost, and the chat window will be cleared. The current map permalink will be copied to the address bar, and may be copied for sharing with other editors.
To create a permalink without refreshing the browser, zoom and pan the map to show what you want to show. Next, hover the mouse over the permalink icon on the right side of the bottom bar until a message pops up to use ctrl-C. Then use Ctrl+C to copy the permalink. Or simply right-click on the permalink icon and choose the browser menu option to copy the link, address, or URL.
To include a single place, junction, or segment in the permalink, click on it before using the permalink icon. To include several segments and/or objects, use ctrl+click (MAC: ⌘ Command+click).


 button on the toolbar at the top of the page and click "Road" (Shortcut key: i; Roundabouts are explained in another section)


 icon over the junction
 which should appear above the intersection