<div style="text-align: right; direction: ltr; margin-left: 1em;">[[#TOC|<small>''<translate>back to the Table of Content</translate>''</small>]]</div>
<div style="text-align: right; direction: ltr; margin-left: 1em;">[[#TOC|<small>''<translate>back to the Table of Content</translate>''</small>]]</div>
==<translate>
==<translate>Start in Pratice Mode</translate>==
Start in Pratice Mode</translate>==
<translate>
Before editing the map for real, you may first want to practice editing. Go to the [http://www.waze.com/editor/?env=row WME server] and choose Practice Mode. If you are already logged into WME, log out first to be able to enter Practice Mode.
Before editing the map for real, you may first want to practice editing. Go to the [http://www.waze.com/editor/?env=row WME server] and choose Practice Mode. If you are already logged into WME, log out first to be able to enter Practice Mode.
The Waze Map Editor has a Practice mode in which you can perform nearly every action available when logged into the Editor, except that you cannot save any changes. In order to save changes, you must log in. Practice mode is helpful to new and existing editors and should be used to try out new or complicated edits before executing them.
</translate>
</translate>
<!-- note to the editor: this part should be a link on the introduction page
== <translate>
== <translate>
Starting Editors </translate> ==
Starting Editors </translate> ==
Line 52:
Line 53:
De beste kaartaanpassingstechnieken met correcte navigatie en uiterlijk leren maken vraagt wat tijd en oefening, maar het kan een leuke en bevredigende ervaring zijn. Je mag er trots op zijn dat je de ervaring van alle Waze gebruikers verbetert. De details in latere secties van deze pagina zijn belangrijk om te leren, maar voor simpele edits, zetten we je hieronder alvast graag op weg.
De beste kaartaanpassingstechnieken met correcte navigatie en uiterlijk leren maken vraagt wat tijd en oefening, maar het kan een leuke en bevredigende ervaring zijn. Je mag er trots op zijn dat je de ervaring van alle Waze gebruikers verbetert. De details in latere secties van deze pagina zijn belangrijk om te leren, maar voor simpele edits, zetten we je hieronder alvast graag op weg.
<!--T:13-->
# Zorg dat je al eens met Waze hebt rondgereden, zodat je een [[WME#Editable_Area|bewerkbare zone]] krijgt waar je gereden hebt.
# Zorg dat je al eens met Waze hebt rondgereden, zodat je een [[WME#Editable_Area|bewerkbare zone]] krijgt waar je gereden hebt.
# Check ook de weg naar ons [https://www.waze.com/forum/viewforum.php{{?}}f{{=}}473&sid{{=}}819f94c2f65a17b7b7c87c2bc63c1e63 Benelux-forum] eens :
# Check ook de weg naar ons [https://www.waze.com/forum/viewforum.php{{?}}f{{=}}473&sid{{=}}819f94c2f65a17b7b7c87c2bc63c1e63 Benelux-forum] eens :
# Hover the mouse over the [[Image:wme_button_add.png]] button in the toolbar at the top of the page and click '''Road'''.
# Hover the mouse over the [[Image:wme_button_add.png]] button in the toolbar at the top of the page and click '''Road'''.
Line 85:
Line 84:
</translate>
</translate>
* [http://www.youtube.com/watch?&v=_Dlt7131dkc&hd=1 <translate>View a step-by-step video on how to add a road from an existing intersection</translate>]
* [http://www.youtube.com/watch?&v=_Dlt7131dkc&hd=1 <translate>View a step-by-step video on how to add a road from an existing intersection</translate>]
<translate>
For more detail on creating road segments, see [[Creating and editing road segments]].
For more detail on creating road segments, see [[Creating and editing road segments]].
</translate>
====<translate>Create a Place</translate>====
<translate>
add text
</translate>
==== <translate>Changing elements on the map</translate> ====
<translate>
To change existing roads of Places, select the object you want to change. Now you can change the shape or appearance by adjusting the road geometry.
</translate>
=====<translate>Geometry node</translate>=====
<translate>
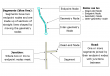
:[[Image:Segments Nodes Junctions.png|right|110px]][[Image:Segment_geometry_node.png|left|Segment geometry node]][[Image:Landmark_node.png|left|Landmark geometry node]]When editing a segment or Area Place, large white circles appear where the segment changes direction ultimately altering its shape. Click and drag them individually to alter the geometry of the segment or Place. Press the '''d''' key while the mouse is hovered over them to delete the geometry node. Alternately hold the '''d''' key and then move the mouse over the nodes you want to delete.
==== <translate><!--T:20-->
:[[Image:Segment_intergeometry_node.png|left]][[Image:Landmark_intergeometry_node.png|left]]The smaller white circles between the geometry nodes are "inter"-geometry nodes. When you click and drag an inter-geometry node, it becomes a larger geometry node and two more inter-geometry nodes appear halfway between each side again.
Changing segments on the map</translate> ====
<translate>
<!--T:21-->
Je kan ook bestaande mapdelen veranderen of verwijderen.
Zodra je een object selecteert, kun je zijn vorm, locatie of eigenschappen veranderen. Wat mogelijk is, hangt af van het objecttype. In de [[Waze Map Editor#Editing_Manual|Editing Manual]] vind je alle nodige details om de werking van de editor te begrijpen.
<!--T:22-->
<u>Usefull hotkeys:</u>
<u>Usefull hotkeys:</u>
* de '''Del'''-toets verwijdert een geselecteer segment of een junction-knooppunt
* de '''Del'''-toets verwijdert een geselecteer segment of een junction-knooppunt
<!--T:23-->
'''TIP: Schakel af en toe de wegenlaag uit met 'Shift-r' tijdens het aanpassen voor een beter zicht'''
'''TIP: Schakel af en toe de wegenlaag uit met 'Shift-r' tijdens het aanpassen voor een beter zicht
:See [[Creating and editing road segments#Editing existing roads|Editing existing roads]] for more information.
</translate>
</translate>
Revision as of 09:07, 24 February 2015
This new page is currently undergoing modifications. The information presented should be considered a draft, not yet ready for use. This content is open to changes from anyone during construction. If you would like to make changes or have questions, please send a private message to this user.
Welcome editor !
This page provides the basics to start editing the Waze Map.
How to get to the Waze Map Editor (WME)
Log in to www.waze.com. If prompted to login, use the same username and password as you do on the Waze client app and the rest of the Waze website.
Choose you location at the right of the top bar
Click 'live map'
Click 'edit the map'
Or, go directly to www.waze.com/editor/?env=row.
After loggin in, you will see the following page:
Before editing the map for real, you may first want to practice editing. Go to the WME server and choose Practice Mode. If you are already logged into WME, log out first to be able to enter Practice Mode.
Template:Transclude:Waze Map Editor
The Waze Map Editor has a Practice mode in which you can perform nearly every action available when logged into the Editor, except that you cannot save any changes. In order to save changes, you must log in. Practice mode is helpful to new and existing editors and should be used to try out new or complicated edits before executing them.
Editing the map
Let's start edit the map!
Create a Road
Hover the mouse over the button in the toolbar at the top of the page and click Road.
Click the mouse on the map at the point where you want to start the road segment.
Move the mouse cursor along the path of the road and click the mouse to add a geometry node for each point that changes direction along the road.
When finished, double-click (or shift-click) the last point to end the segment.
Pressing ESC will abort the road segment creation.
Be sure the road actually exists before creating it.
Each segment that is added must minimally have the Country, City, and Street information added to it or it will stay as an unfinished red line. If there is no City and/or Street then the "None" box(es) must be selected.
To change existing roads of Places, select the object you want to change. Now you can change the shape or appearance by adjusting the road geometry.
Geometry node
Segment geometry nodeLandmark geometry nodeWhen editing a segment or Area Place, large white circles appear where the segment changes direction ultimately altering its shape. Click and drag them individually to alter the geometry of the segment or Place. Press the d key while the mouse is hovered over them to delete the geometry node. Alternately hold the d key and then move the mouse over the nodes you want to delete.
The smaller white circles between the geometry nodes are "inter"-geometry nodes. When you click and drag an inter-geometry node, it becomes a larger geometry node and two more inter-geometry nodes appear halfway between each side again.
Usefull hotkeys:
de Del-toets verwijdert een geselecteer segment of een junction-knooppunt
TIP: Schakel af en toe de wegenlaag uit met 'Shift-r' tijdens het aanpassen voor een beter zicht
Vergeet ook niet om alle pijltjes in de correcte kleuren te zetten! Tenslotte willen we vooral in de juiste richting gestuurd worden. Meer informatie over het corrigeren van deze pijltjes vind je hier.
Lees ook even de uitleg over zachte en harde richtingen na!
Some shortcuts:
q - schakelt alle richtingen voor het geselecteerde kruispunt uit waardoor alle pijlen rood worden.
w - laat alle richtingen voor het geselecteerde kruispunt toe waardoor alle pijlen groen worden. Wel opletten: 'w' zal alleen die richtingen toestaan welke niet voorheen reeds automatisch door de Waze routing server toegestaan werden (zogenaamde zachte groene pijlen). De zacht groene pijlen hebben een hogere 'penalty' dan richtingen toegelaten door een editor. Aangezien zachte en geëdite pijlen dezelfde groene kleur hebben, is het beter om eerst alle richtingen rood te forceren met 'q' en daarna de 'w' om ze groen te maken.
De beste manier is vaak om een 'qw' uit te voeren en eventuele niet-toegelaten richtingen handmatig aan te klikken vanuit elk segment. Besef dat een nog onaangeroerd kruispunt, eens aangeraakt door een editor, niet meer 'zacht' kan worden en 'hard' blijft. Om deze reden check je best alle richtingen van een kruispunt zodat je weet dat je het correct achterlaat in alle segmenten en richtingen.
Deadend streets
Om een correcte navigatie naar of van een bestemming in een doodlopende straat te kunnen verzekeren, heeft Waze een 'end node' nodig op het einde van het segment. Indien dit er niet is, kun je dit maken door een extra segment aan het uiteinde van de straat te koppelen, en dit extra segment te selecteren en weer te verwijderen. Er blijft dan een oranje bolletje over die na het opslaan klein en blauw kleurt (staat hier uitgebreider uitgelegd.)
Cul-de-Sacs : de uitgebreidere uitleg kun je lezen als je de bovenstaande link volgt, maar in het kort:
Voor navigatie is het beter om geen rotonde te tekenen op het einde van een doodlopende straat. Daarom wordt hier gewoon een doodlopende straat getekend.
U-turns
Wanneer je besluit om een andere route te volgen, wens je dat je gps een alternatieve route geeft, in plaats van : "draai 180° en keer terug!!!", of "draai deze doodlopende straat in en draai op het einde". De meeste mensen willen een alternatieve route gepresenteerd krijgen, en niet een terugkeer-commando - meestal is er een goede reden geweest om af te wijken van de initiële route, bv. een blokkade van de weg.
Wanneer je tijdens het rijden toch beslist om terug te keren in een U-vorm, dan berekent de gps dadelijk een nieuwe route. Dat is 'gewenst gedrag'! Maar de beslissing om veilig een U-draai te maken, willen we volledig aan de chauffeur overlaten, niet aan de navigatiesysteem Waze.
Dus om vervelende gps-instructies te vermijden dien je de U-pijl op het einde van een segment rood te maken, zeker ook in een doodlopende straat. Ook cul-de-sacs (of straten in een lus) die toch ingetekend zijn, reageren als een 'groene end-U-turn'.
Loops
Soms komt het toch voor dat u op het einde van een segment een lus wilt inbouwen, bijvoorbeeld als er meer dan 11 huizen op deze lus aansluiten. De WME laat het maken van deze lus echter niet toe. Hier staat beschreven hoe u dit kunt oplossen.
Bridges
Het maken van bruggen staat hier beschreven.
Mogelijke valkuil:
Beide segmenten moeten dezelfde kenmerken hebben
Making crossroads
Deze techniek staat hier beschreven.
Mogelijke valkuil:
Beide segmenten moeten op hetzelfde hoogteniveau liggen
Walking Trails / Pedestrian Boardwalks
Non-drivable roads should rather NOT be added to the map. They are often not necessary to use, because Waze is solely meant for drivers. They should only be added when it improves navigation for the driver!
General exceptions for drawing non-drivable roads:
If navigation is unclear without them
If there aren't alternative ways leading to the destination
to prevent automatic Map Problems (MP’s), because of cyclists, walkers or travellers with public transport who use Waze (Aaargh).
To separate different speed tracks, for keeping speed data accurate.
the segment contains housenumbers.
Both Walking Trails and Pedestrian Boardwalks, as all non-drivable roads, should generally not be connected to drivable roads. Although the penalty in the routing calculation is high, if these roads would be connected, it can generate wrong routes.
BeNelux convention on using walking trail(only if one of the above arguments count):
Walking trails are used for a specific purpose in the BeNeLux. Unlike its name is suggesting, it is only used for public transport like a bus lane. Segments should be locked at level 5.
BeNelux convention on using Pedestrian Boardwalk (only if one of the above arguments count):
Pedestrian Boardwalk are used for Bicycle paths, Walking paths, and Pedestrian zones. They are generally set to driving direction Unknown, except for non-drivable segments containing housenumbers: they should be connected with the driving direction on two-way. All are locked at a minimum level 3.
Be aware that adding Walking Trails and Pedestrian Boardwalks can even generate the use of Waze by cyclists and walkers, which would lead to corrupt data! Walking trails and Pedestrian Boardwalks that are not necessary should be deleted, even if they do not disturb the routing. Its presence will encourage other editors to add even more!
When you have any doubt on using one of these segment types, just ask in the forum.
Since november 2014 it is possible to search for housenumbers which are inputted via the Waze Map Editor and saved in the Waze database.
To support this functionality, Waze imported housenumber data from external sources, in multiple countries, like The Netherlands. This was not the case in Belgium or Luxemburg.
When searching for an address in the Waze app or Livemap, Waze will use the following order to present the results:
1. Manual created housenumbers
2. Google Maps database
3. Imported housenumber data
Bottom line: if you notice a wrongly positioned address/housenumber in the app or livemap, you can change it via the Waze Map Editor. This will result to a primarly suggested, correct, location.
Making a permalink
Om hulp te vragen in het forum is het vaak handig als je een permalink in je forumpost kunt zetten. Als je bijvoorbeeld een bewerking wilt uitvoeren aan een weg die hoger dan jouw level gelocked is, dan kun je een unlock request aanvragen. Vermeld zeker de reden van de unlock en een Permalink naar de segmenten die je graag geunlocked wilt zien.
Zo'n permalink is eigenlijk een URL van de lokatie, en bevat lokatie, zoomniveau, zichtbare lagen, en geselecteerde objecten.
selecteer alle segmenten die je wilt veranderen
Om meerdere segmenten te selecteren, klik je ze aan terwijl je tegelijkertijd de 'Command'(Mac) of 'Ctrl'(Windows/Linux)-toets ingedrukt houdt
klik op
In de WME is een kleine tekst-knop in de rechter onderhoek, genaamd 'Permalink'
Door hier te klikken, verschijnt er een link naar de huidige lokatie in de adresbalk van je browser.
kopieer de link van de adresbalk
en plak deze in chat, het forum, ...
Andere gebruikers moeten slechts op jouw link klikken, om de betreffende mapzone te openen. Zo kunnen zij jouw aanvraag makkelijk behandelen.
Benelux Advanced Guide
Het vervolg van deze guide is terug te vinden op de volgende pagina:


 button in the toolbar at the top of the page and click Road.


