Geen bewerkingssamenvatting |
(Added short user manual) |
||
| Regel 11: | Regel 11: | ||
</translate> | </translate> | ||
__NOTOC__ | __NOTOC__ | ||
Below follows a synopsis of the explanation on how to use the script located on the forum thread's first page, as it is not particularly straight forward to use. | |||
The dialog of advanced closures is opened by clicking on the button on the closure tab of a segment. There are two section of the dialog. | |||
==== Top section ==== | |||
[[File:AC1.png|alt=Advanced Closures - Top Section|right|frameless|400x400px|Advanced Closures - Top Section]] | |||
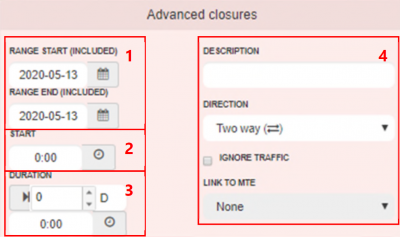
===== 1. Range ===== | |||
Range of two dates between the closure(s) should be applied. | |||
===== 2. Start ===== | |||
Start time of the closure in hh:mm | |||
===== 3. Duration ===== | |||
Duration of the closure. Top field is days, bottom field is hours. | |||
===== '''4. Other properties of the closure''' ===== | |||
<br /> | |||
==== Bottom Section ==== | |||
{| class="wikitable" | |||
|'''Repeat''' | |||
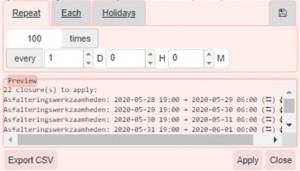
When you want to add the closure x amount times, every day/hour/minute. Amount is limited by the range in the top section. Frequency must be more than the duration entered in the top section. | |||
|[[File:AC2.png|alt=Advanced Closures - Bottom Section - Repeat|frameless]] | |||
|- | |||
|'''Each''' | |||
When you want to add a closure only on certain weekdays. | |||
|[[File:AC3.png|alt=Advanced Closures - Bottom Section - Each|frameless]] | |||
|- | |||
|'''Holidays''' | |||
Should allow you to load public holidays within the set date range, but this is currently not working. | |||
| | |||
|- | |||
|'''Load Settings''' | |||
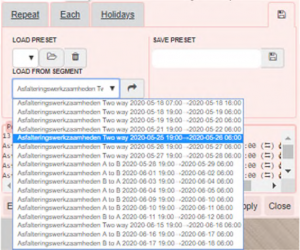
Gives you the opportunity to copy the top section from another segment with a closure. If there are multiple closures on a segment, you can select the one you want to copy from the dropdown. | |||
|[[File:AC4.png|alt=Advanced Closures - Bottom Section - Load settings|frameless]] | |||
|- | |||
|'''Preview''' | |||
The preview shows the closures the will be put on a selected segment when you click apply. It allows you to verify data has been entered correctly and that the closures will appear as intended. An orange exclamation mark icon will appear at the end of each line if there’s an issue. You can see what the issue is by hoovering over the icon with your cursor. After you click apply, a green “OK” will appear for closures successfully added. | |||
| | |||
|} | |||
Note that if you add more than a handful of closures, it will take a good few minutes to process this. Meanwhile some closures may show in a single direction only, also when they have been entered as dual direction closures. Please wait and refresh the view to check whether all goes well. | |||
Pro-tip: adding a lot of closures to multiple segments is not always working great. If at all possible, it’s better to apply multiple closures to one segment at the time. | |||
{{Bottomline}} | {{Bottomline}} | ||
Versie van 13 mei 2020 15:24
WME Advanced Closures
Waze Map Editor (WME) script that handles recurrent and imported closures.
Below follows a synopsis of the explanation on how to use the script located on the forum thread's first page, as it is not particularly straight forward to use.
The dialog of advanced closures is opened by clicking on the button on the closure tab of a segment. There are two section of the dialog.
Top section

1. Range
Range of two dates between the closure(s) should be applied.
2. Start
Start time of the closure in hh:mm
3. Duration
Duration of the closure. Top field is days, bottom field is hours.
4. Other properties of the closure
Bottom Section
Note that if you add more than a handful of closures, it will take a good few minutes to process this. Meanwhile some closures may show in a single direction only, also when they have been entered as dual direction closures. Please wait and refresh the view to check whether all goes well.
Pro-tip: adding a lot of closures to multiple segments is not always working great. If at all possible, it’s better to apply multiple closures to one segment at the time.


