(New page: The waze live map is user-generated and corrected; any user can edit any of the roads they've wazed (driven with waze running). Users who've earned more points can edit any area of the map...) |
No edit summary |
||
| Line 8: | Line 8: | ||
* Click the Update Map tab | * Click the Update Map tab | ||
* From the View panel, choose Archive. <br /><br />[[Image:ViewPanel.gif]]<br /><br />You'll get an overlay layer listing all your journeys, latest first.<br /><br />[[Image:Archive.gif]] | * From the View panel, choose Archive. <br /><br />[[Image:ViewPanel.gif]]<br /><br />You'll get an overlay layer listing all your journeys, latest first.<br /><br />[[Image:Archive.gif]]<br /> | ||
* To see the route of a journey, click on its icon. The map for that journey will be displayed. Choose the route you want to edit by clicking the icon in the column labeled Report. | * To see the route of a journey, click on its icon. The map for that journey will be displayed. Choose the route you want to edit by clicking the icon in the column labeled Report. | ||
* Zoom in to the section of the route you want to edit. | * Zoom in to the section of the route you want to edit. | ||
| Line 17: | Line 17: | ||
* After logging in, choose the LiveMap tab: [[Image:LiveMapTab.gif]] | * After logging in, choose the LiveMap tab: [[Image:LiveMapTab.gif]] | ||
* Enter the name of the street and city – for instance, Van Ness, San Francisco. <br />[[Image:AdressTab.gif]] <br /><br />You'll get a list of all the possible streets. <br />[[Image:PossibleStreets.gif]]<br /> Choose the one you want to edit. | * Enter the name of the street and city – for instance, Van Ness, San Francisco. <br /><br />[[Image:AdressTab.gif]] <br /><br />You'll get a list of all the possible streets. <br /><br />[[Image:PossibleStreets.gif]]<br /><br />Choose the one you want to edit. | ||
* Alternatively, you can search by zip code and then choose the first result on the list of results. You'll get a street map of the area selected. | * Alternatively, you can search by zip code and then choose the first result on the list of results. You'll get a street map of the area selected. | ||
* Click the Update Map to switch to the updating/editing function. | * Click the Update Map to switch to the updating/editing function. | ||
| Line 26: | Line 26: | ||
* You can zoom in and out via the zoom bar on the left hand side of the screen or using the scroll button of your mouse | * You can zoom in and out via the zoom bar on the left hand side of the screen or using the scroll button of your mouse | ||
* You can scroll to new areas using the direction arrows above the zoom bar. | * You can scroll to new areas using the direction arrows above the zoom bar. | ||
* To see the road map without the satellite view of the houses, select Background from the bottom of the Layers panel – this toggles the plain-color background on and off. When it's on, you can't see the satellite picture.<br />[[Image:LayersPanel1.gif]]<br />[[Image:LayersPanel2.gif]]<br /> | * To see the road map without the satellite view of the houses, select Background from the bottom of the Layers panel – this toggles the plain-color background on and off. When it's on, you can't see the satellite picture.<br /><br />[[Image:LayersPanel1.gif]]<br />[[Image:LayersPanel2.gif]]<br /><br /> | ||
* The other layer options on that menu are also on-off toggles to display the relevant information; so you can adjust the map to show exactly what you want to see.<br />[[Image:LayersPanel1.gif]]<br />[[Image:LayersPanel3.gif]] | * The other layer options on that menu are also on-off toggles to display the relevant information; so you can adjust the map to show exactly what you want to see.<br /><br />[[Image:LayersPanel1.gif]]<br />[[Image:LayersPanel3.gif]]<br /> | ||
== '''How to Edit''' == | == '''How to Edit''' == | ||
| Line 33: | Line 33: | ||
To edit a feature on a route you've driven, click the feature to select it, then choose one of the options from the Edit panel in the top right-hand corner of the map. | To edit a feature on a route you've driven, click the feature to select it, then choose one of the options from the Edit panel in the top right-hand corner of the map. | ||
==== '''An intersection'''==== | ==== '''An intersection'''==== | ||
click it to select it; a circle will appear around it: <br /><br />[[Image: | click it to select it; a circle will appear around it: <br /><br />[[Image:intersection.gif]]<br /><br /> Then choose the relevant selection from the Edit panel:<br /><br />[[Image:EditPanel.gif]]<br /> | ||
* Choose "'''Turn into a roundabout'''" if there's a roundabout there and not a simple intersection. | * Choose "'''Turn into a roundabout'''" if there's a roundabout there and not a simple intersection. | ||
** The map will display the intersection in black, and suggest a size (radius) for the roundabout. | ** The map will display the intersection in black, and suggest a size (radius) for the roundabout. | ||
| Line 41: | Line 41: | ||
* Choose "'''Move intersection'''" if it's displayed on the map in the wrong place. Then drag the circle marking the intersection to its new position and click Save Changes. | * Choose "'''Move intersection'''" if it's displayed on the map in the wrong place. Then drag the circle marking the intersection to its new position and click Save Changes. | ||
==== '''A single road segment''' ==== | ==== '''A single road segment''' ==== | ||
click it to select it; it will be marked in color <br />[[Image:SingRoadSeg.gif]]<br /><br /> and the available options will be shown on the Edit Panel:<br /><br />[[Image:EditPanel2.gif]] | click it to select it; it will be marked in color <br /><br />[[Image:SingRoadSeg.gif]]<br /><br /> and the available options will be shown on the Edit Panel:<br /><br />[[Image:EditPanel2.gif]]<br /> | ||
* Choose "Edit road details" to add information about the road. The Edit panel will display the types of information you can add or change, mostly via drop-down menus. <br /><br />[[Image:EditPanel3.gif]]<br /> You can change the name of the street by typing it in. When you're done, click Save Changes. | * Choose "Edit road details" to add information about the road. The Edit panel will display the types of information you can add or change, mostly via drop-down menus. <br /><br />[[Image:EditPanel3.gif]]<br /><br /> You can change the name of the street by typing it in. When you're done, click Save Changes. | ||
** '''If you've marked a road as one-way''', when you save the changes it will be marked in one of the two possible directions. If the traffic actually flows in the other direction, you can now choose to switch the direction of flow. | ** '''If you've marked a road as one-way''', when you save the changes it will be marked in one of the two possible directions. If the traffic actually flows in the other direction, you can now choose to switch the direction of flow. | ||
** '''To cancel the edit''', just choose Cancel, or "Deselect all", <br />[[Image:Deselect.gif]]<br /> or click again on the road to deselect it. | ** '''To cancel the edit''', just choose Cancel, or "Deselect all", <br /><br />[[Image:Deselect.gif]]<br /><br /> or click again on the road to deselect it. | ||
The Edit Road Details menu also includes some information you can't change, such as the length of the road, the user who first wazed it, and the last user who updated it. If several wazers have driven the segment, the average speed to drive it will also appear. | The Edit Road Details menu also includes some information you can't change, such as the length of the road, the user who first wazed it, and the last user who updated it. If several wazers have driven the segment, the average speed to drive it will also appear. | ||
* '''Edit road geometry ''' – lets you make several changes to a road segment: | * '''Edit road geometry ''' – lets you make several changes to a road segment: | ||
** To remove an existing node (intersection) on a road segment: press 'd' or the Delete key while hovering above it.<br /><br />[[Image:Road1.gif]] | ** To remove an existing node (intersection) on a road segment: press 'd' or the Delete key while hovering above it.<br /><br />[[Image:Road1.gif]]<br /> | ||
** To lengthen the end of a road which is too short on the map, drag the end of it to the right place. (This will only work if the end of the road is not connected to any other segment). | ** To lengthen the end of a road which is too short on the map, drag the end of it to the right place. (This will only work if the end of the road is not connected to any other segment). | ||
** To change the exact path of a road segment – for instance, it's shown straight but it should be curved – click on the road and a circle will appear on it. Drag this circle in the relevant direction. | ** To change the exact path of a road segment – for instance, it's shown straight but it should be curved – click on the road and a circle will appear on it. Drag this circle in the relevant direction. | ||
| Line 65: | Line 65: | ||
** After saving this change, check that the turn permissions between the two roads are accurate and correct them if not, as described below. | ** After saving this change, check that the turn permissions between the two roads are accurate and correct them if not, as described below. | ||
* '''Adding and correcting turn restrictions: ''' | * '''Adding and correcting turn restrictions: ''' | ||
** '''Select''' two connected roads. Again, the order in which you select the roads is important – turns are always from the first road selected, into the second. <br /><br />[[Image:Road4.gif]] | ** '''Select''' two connected roads. Again, the order in which you select the roads is important – turns are always from the first road selected, into the second. <br /><br />[[Image:Road4.gif]]<br /> | ||
** '''Choose from the Edit panel:''' <br /><br />[[Image:EditPanel4.gif]]<br /><br /> | ** '''Choose from the Edit panel:''' <br /><br />[[Image:EditPanel4.gif]]<br /><br /> | ||
** Choose "create turn restriction" to indicate that you cannot turn from the first road selected, into the second. | ** Choose "create turn restriction" to indicate that you cannot turn from the first road selected, into the second. | ||
| Line 78: | Line 78: | ||
* Check you're viewing the Live Map; if you're not, click the Live Map tab to move to it. | * Check you're viewing the Live Map; if you're not, click the Live Map tab to move to it. | ||
* Search for a route or area as described above. | * Search for a route or area as described above. | ||
* Click a point on the map displayed. You'll see a message balloon giving a short description (e.g. street name, one way or two-way) and a link labeled "Found a Mistake?" <br /><br />[[Image:Mistake.gif]] | * Click a point on the map displayed. You'll see a message balloon giving a short description (e.g. street name, one way or two-way) and a link labeled "Found a Mistake?" <br /><br />[[Image:Mistake.gif]]<br /> | ||
* Click the link to get an overlay layer displaying a fill-in form where you can choose the type of mistake and suggest a correction. Give your name and email (anonymous corrections aren't accepted) and click Submit. <br /><br />[[Image:ReportMistake.gif]]<br /><br /> Then close the overlay window. | * Click the link to get an overlay layer displaying a fill-in form where you can choose the type of mistake and suggest a correction. Give your name and email (anonymous corrections aren't accepted) and click Submit. <br /><br />[[Image:ReportMistake.gif]]<br /><br /> Then close the overlay window. | ||
Revision as of 14:42, 14 May 2009
The waze live map is user-generated and corrected; any user can edit any of the roads they've wazed (driven with waze running). Users who've earned more points can edit any area of the map.
To make any changes on the map, log in (upper right-hand corner of the home page). Your username and password are the ones you received when you installed waze on your mobile phone.
![]()

Finding the roads you've driven
- Click the Update Map tab
- From the View panel, choose Archive.

You'll get an overlay layer listing all your journeys, latest first.
- To see the route of a journey, click on its icon. The map for that journey will be displayed. Choose the route you want to edit by clicking the icon in the column labeled Report.
- Zoom in to the section of the route you want to edit.


Searching for a route section
If you remember which routes you've wazed, you can go to them directly rather than via the archive.
- After logging in, choose the LiveMap tab:

- Enter the name of the street and city – for instance, Van Ness, San Francisco.

You'll get a list of all the possible streets.
Choose the one you want to edit. - Alternatively, you can search by zip code and then choose the first result on the list of results. You'll get a street map of the area selected.
- Click the Update Map to switch to the updating/editing function.


Setting your viewing preferences for updating
The Update Map view shows you a satellite map of the area with the roads superimposed.
- You can zoom in and out via the zoom bar on the left hand side of the screen or using the scroll button of your mouse
- You can scroll to new areas using the direction arrows above the zoom bar.
- To see the road map without the satellite view of the houses, select Background from the bottom of the Layers panel – this toggles the plain-color background on and off. When it's on, you can't see the satellite picture.
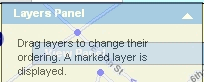
- The other layer options on that menu are also on-off toggles to display the relevant information; so you can adjust the map to show exactly what you want to see.


How to Edit
To edit a feature on a route you've driven, click the feature to select it, then choose one of the options from the Edit panel in the top right-hand corner of the map.
An intersection
click it to select it; a circle will appear around it: ![]()
Then choose the relevant selection from the Edit panel:
- Choose "Turn into a roundabout" if there's a roundabout there and not a simple intersection.
- The map will display the intersection in black, and suggest a size (radius) for the roundabout.
- The size is taken from GPS points and is usually accurate, so just accept the suggestion.
- When the roundabout is displayed, check if the size looks right. If not, enter a different value for the size to update the display.
- When it looks right, choose Save Changes.
- Choose "Move intersection" if it's displayed on the map in the wrong place. Then drag the circle marking the intersection to its new position and click Save Changes.
A single road segment
click it to select it; it will be marked in color 
and the available options will be shown on the Edit Panel:
- Choose "Edit road details" to add information about the road. The Edit panel will display the types of information you can add or change, mostly via drop-down menus.
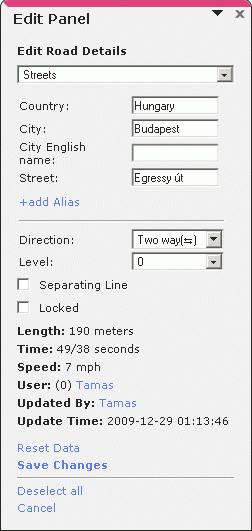
You can change the name of the street by typing it in. When you're done, click Save Changes.- If you've marked a road as one-way, when you save the changes it will be marked in one of the two possible directions. If the traffic actually flows in the other direction, you can now choose to switch the direction of flow.
- To cancel the edit, just choose Cancel, or "Deselect all",

or click again on the road to deselect it.


The Edit Road Details menu also includes some information you can't change, such as the length of the road, the user who first wazed it, and the last user who updated it. If several wazers have driven the segment, the average speed to drive it will also appear.
- Edit road geometry – lets you make several changes to a road segment:
- To remove an existing node (intersection) on a road segment: press 'd' or the Delete key while hovering above it.

- To lengthen the end of a road which is too short on the map, drag the end of it to the right place. (This will only work if the end of the road is not connected to any other segment).
- To change the exact path of a road segment – for instance, it's shown straight but it should be curved – click on the road and a circle will appear on it. Drag this circle in the relevant direction.
- To remove an existing node (intersection) on a road segment: press 'd' or the Delete key while hovering above it.
- Split to two one-way roads: if a single two-way road appears on the map but on the ground there are really two parallel one-way roads, select the road and choose this option.
- The map will still display one road as before, but with two direction arrows on it, one in each direction: < and >, indicating two one-way roads. Actually what's really in the map at this point is two one-way roads, one displayed on top of the other so you can only see the top one.
- To display this as two separate roads, drag the one you can see (the top one) slightly up, and save the change. The map will be redrawn with one road slightly above the other, and one arrow on each.
- Check that the arrows displayed match the actual direction of traffic on each road. If the arrow directions don't match the real situation (i.e. traffic actually flows along them in the reverse direction to that shown), drag the top road down to place it below the other one. Click "Save changes" to see the effect.
- Split road at a point: Choose this option to add an intersection not shown on the map and/or when adding a new road not shown on the map, which connects with this one. Then click the road segment at the point where the intersection should be:

And click "Save changes"
Two road segments
Selecting two road segments displays, in the Edit panel, a list of changes you can make to the relationship between them:
- A divided highway: sometimes these are marked as two parallel one-way roads by mistake.
- Select both lanes
 and choose "Merge to one road" from the Edit panel to mark them as a two-way road instead of two one-way roads.
 - This correction is only possible if the distance between the two roads/lanes is about 30 feet (10 meters) or less, and the roads are the same length.
- Select both lanes
- Correcting small inaccuracies:
- if two road segments are connected but the map shows them as if they're not, select both and choose ""Connect roads by order of selection". The order in which you select the roads is important – the first road selected will be adjusted so that it joins up with the second. Again, this correction is only possible if the distance between them is not more than about 30 feet (10 meters).
- After saving this change, check that the turn permissions between the two roads are accurate and correct them if not, as described below.
- Adding and correcting turn restrictions:
- Select two connected roads. Again, the order in which you select the roads is important – turns are always from the first road selected, into the second.
- Choose from the Edit panel:

- Choose "create turn restriction" to indicate that you cannot turn from the first road selected, into the second.
- Choose "Cancel turn restriction" to remove an indication that currently appears, forbidding turns from the first road selected into the second.
- In both cases you'll get a request for confirmation – "are you sure?" You can choose "No" to cancel the change or "Yes" to implement it.
- If you selected the wrong road first, the turn restriction you entered may be wrong. In that case just cancel it, deselect the roads, and select them again in the preferred order.
- Select two connected roads. Again, the order in which you select the roads is important – turns are always from the first road selected, into the second.


More than two road segments:
- Select any number of roads or road segments to edit common information about them.
- For instance, to change the name of a road, you can select all the relevant segments and then choose Edit Road details and enter the new name.
To suggest a correction to the waze team:
- Check you're viewing the Live Map; if you're not, click the Live Map tab to move to it.
- Search for a route or area as described above.
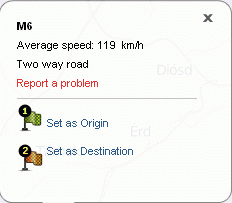
- Click a point on the map displayed. You'll see a message balloon giving a short description (e.g. street name, one way or two-way) and a link labeled "Found a Mistake?"
- Click the link to get an overlay layer displaying a fill-in form where you can choose the type of mistake and suggest a correction. Give your name and email (anonymous corrections aren't accepted) and click Submit.

Then close the overlay window.

