Diese Hilfedatei beschreibt die waze Touch-Screen-Version. Es sind leichte Unterschiede zwischen den Versionen für verschiedene Handys vorhanden. Die meisten Features sehen jedoch gleich aus und funktionieren nach dem gleichen Prinzip.
waze starten und ein Benutzerkonto erstellen
Um das Programm zu öffnen, drücke auf das waze-Symbol auf deinem Handy-Desktop.
Wenn du ein neuer Benutzer bist, siehst du jetzt eine Willkommensnachricht sowie die Nutzungsbedingungen. Wähle "Übernehmen" um fortzufahren.
Nachdem du die Nutzungsbedingungen akzeptiert hast, kannst du im nächsten Schritt dein Benutzerkonto erstellen.
Du wirst nun aufgefordert einen Benutzernamen, ein Passwort sowie deine Emailadresse anzugeben. Außerdem kannst du optional einen waze-Spitznamen angeben, der in deinen Berichten sowie auf der Karte zu sehen ist. Du kannst festlegen, inwiefern man dich identifizieren kann - lese dazu den Abschnitt "Einstellungen".
Klicke auf die erste Zeile des Formulars (Benutzername). Eine virtuelle Tastatur wird sichtbar.
Gebe einen Benutzernamen an und tippe auf die Schaltfläche "weiter" um ein Passwort anzugeben.
Nachdem du deine Daten eingetragen hast, wird dir das ausgefüllte Formular mit deinem Benutzernamen und dem Passwort angezeigt. (Das Passwort wird mit fünf Sternen angezeigt, egal wie lang es tatsächlich ist).
Wenn die Informationen korrekt sind, tippe auf "Erstellen" um dein Benutzerkonto zu erstellen. Wenn nicht, tippe auf die Zeile die du ändern möchtest.
Nachdem du dein Benutzerkonto erstellt hast, kannst du dich bei waze auf deinem Handy einloggen. Das Login-Fenster siehst du nur ein einziges mal, es sei denn:
dein Benutzername ist bereits vergeben,
du benutzt den Benutzernamen und das Passwort auch auf einem anderen Handy und hast einen Fehler beim Login gemacht, (In diesem Fall wird dir eine Fehlermeldung angezeigt und du kannst den Benutzernamen sowie das Passwort ändern)
jemand hat sich mit deinem Konto auf einem anderen Handy angemeldet. In diesem Fall wird keine Fehlermeldung angezeigt. Die Internetverbindung bleibt erhalten und schaltet dann automatisch ab. (Wir empfehlen, deine Login-Daten nicht an Freunde weiter zu geben).
Sobald du dich mit deinem Konto erfolgreich eingeloggt hast, siehst du bei allen zukünftigen Logins den waze-Hauptbildschirm.
Um den Akku deines Handys zu schonen, ist es ratsam waze zu beenden wenn du aus dem Auto steigst, oder das Display auszuschalten wenn du es nicht benötigst.
Übersicht: Was siehst du?
Der waze Hauptbildschirm hat folgende Bereiche:
Die obere Statuszeile
Die Hauptseite hier wird die Karte angezeigt
Kartensteuerung mit 2 Symbolen: Rein- und Rauszoomen , Ein Kompass und ein "Karte bearbeiten" Symbol
Schaltflächen im unteren Bereich des Hauptbildschirm für die vier Funktionen:
Wo bin ich? (zeigt deinen derzeitigen Aufenthaltsort). Bei einigen Versionen siehst du nur ein Bulls-Eye Symbol ohne Text
Fahre zu (wähle eine Adresse aus deinen Favoriten, suche nach Adressen via Google, wähle Adressen aus deinem Suchverlauf oder aus gespeicherten Orten).
Real-time Warnungen (schaue wieviele Warnungen es derzeit in deiner Nähe gibt. Die Zahl vor dem Ausrufezeichen zeigt die Anzahl der Real-time Warnungen)
Meldung (Melde Radarkontrollen, Unfälle, Staus oder Kartenfehler selber)
"Wo bin ich?" Zeigt deinen derzeitigen Standort und ein Autosymbol. Dies wird nur angezeigt, wenn du über einen guten GPS-Empfang verfügst. Wenn du in einem Gebiet mit schlechten GPS-Empfang fährst, ändert sich das Autosymbol in einen Cursor, der dir den ungefähren Standort anzeigt (basierend auf Netzinformationen). Falls gar kein GPS-Empfang vorhanden ist, wird dir der letzte bekannte Standort auf der Karte angezeigt.
Die Hauptseite
Standardmäßig wird dir die Hauptseite mit deinem derzeitigen Standort und deiner näheren Umgebung angezeigt. Du kannst die Informationen der Hauptseite mehrfach verändern:
Ziehe den Bildschirm um die Karte in die gewünschte Richtung zu bewegen. Du kannst auch den Trackball, Rad oder die Pfeiltasten benutzen.
Tippe auf den Bildschirm Kurz tippen um ein weiteres kleines Menü zu öffnen (lese dazu weiter unten), gedrückt halten um einen Standort zu markieren.
Tippe und halte den Bildschirm zum Beispiel auf einer Straße oder Autobahn um weitere Optionen aufzurufen, wie:
long tap
Als Ausgangspunkt festlegen - Wähle diesen Ort als Ausgangspunkt für deine Navigation.
Als Ziel festlegen – Wähle diesen Ort als Ziel für deine Navigation. Du brauchst keine Adresse mehr für den Zielort eingeben.
Eigenschaften - Zeigt dir einige Informationen über die gewählte Straße wie z.B.: Länge, Durchschnittsgeschwindigkeit, Art der Straße (Landstraße, Autobahn, Schnellstraße), und den Namen des Ortes in dem sich die markierte Strecke befindet.
Kartensteuerung
Die Kartensteuerung ermöglicht einen einfachen Zugriff auf die Funktionen die beim Fahren am häufigsten verwendet werden. Im Standard wird die Kartensteuerung auf der Karte angezeigt. Die Einstellung kann aber auch verändert werden das sie nur erscheint wenn auf die Karte getippt wird.
Um die Anzeigeeinstellung der Kartensteuerung zu verändern (immer anzeigen/nach Tippen aufs Display anzeigen), gehe zu Einstellungen >> Karte >> Kartensteuerung mit Tap anzeigen.
Das Kompass Icon
Das Kompass Icon erlaubt durch Antippen das Umschalten zwischen zwei möglichen Anzeigeeinstellungen:
In der Standardeinstellung bewegt sich der Pfeil beim Fahren und die Karte dreht sich. So bleibt die Karte immer in der Richtung in die gefahren wird. Der Pfeil zeigt dabei immer nach Norden.
Nach dem Antippen verändert sich der Kompass zu einem Pfeil und dem Buchstaben N. Die Karte ist jetzt fixiert (Norden ist immer oben) und sie dreht sich nicht mehr mit.
Die Zoom Icons
Das zoom in / out Icon
- um die Karte zu vergrößern oder verkleinern. Auf einigen Geräten kann das mittels Gesten gesteuert werden.
Das Karte bearbeiten Icon
Das Karte bearbeiten Icon erlaubt Updates an der Karte vorzunehmen.
Tippe das Icon um ein Menü der möglichen Aktionen anzuzeigen.
Mögliche Aktionen:
Neue Straßen aufzeichnen - Fährst du auf einer noch nicht eingetragenen Straße, so kannst du diese einfach durch das Fahren auf dieser hinzufügen. Wähle diese Option, um die Aufzeichnung zu starten und wähle sie erneut, um zu stoppen. (Die besten Ergebnisse erziehlt man, in dem man von einem existierenden Wegpunkt aus beginnt; beispielsweise von einer Kreuzung aus).
Nach dem Auswählen dieser Option wird dir der aktuelle Status (an oder aus) angezeigt. Drücke OK zum Bestätigen.
Hausnummer aktualisieren – Die Hausnummer das nächstgelegenen Hauses wird mit einem Hoch-/Runter-Pfeil zur Änderung jener angezeigt. (Während der Fahrt wird das Haus ausgewählt, welches zum Zeitpunkt der Auswahl am nächsten war.) Bestätige mit OK, wenn die korrekte Hausnummer angezeigt wird.
Kartenfehler melden – gives you a sub-menu for reporting the most common mistakes on the map.
Select the appropriate mistake
Optional: if you want to add any text, select "more details"
Press Send to send the report, or Cancel to exit the report
Map problem categories are:
Incorrect turn - the map shows that you can make a turn at that point which in fact isn't allowed
Incorrect address – the name of the street is incorrect
Incorrect route – the navigation instructions here are incorrect
Missing Roundabout
General Map Error - here you'll usually want to use the virtual keyboard to key in the details before you press Send.After you press Send you get a message that the report was sent correctly.
The Command Buttons (bottom)
The buttons at the bottom of the screen give you access to all waze functions:
Me on Map
displays the map of your current location, with an icon representing your car (you can change the icon for your car via the Settings > Profile menu). This is the default state of waze's main screen provided you have GPS connectivity in your current location (green or orange GPS icon on the status bar). Whenever the car icon isn't displayed, just press "Me on Map" to update the map to your current location. If you don't have a good enough GPS connection (grey GPS icon with an X on it), the "me on map" button isn't highlighted and you can't use it, because if you don't have a GPS connection, waze can't determine even an approximate location for you.
Search
to find the best route to a location, and to access locations you've searched for or saved in the past.
Pressing the Search button brings up a menu: Favorites; New Address; History; and Marked Locations:
Favorites – press this to get a list of locations you've added to your Favorites in the past. Select one to calculate the best route to it from where you are now. If you selected a location, waze will calculate the route and return you to the map to start driving to it.
New Address – pressing this brings up a virtual on-screen keyboard to type in the address.
Key in the address you want to drive to, or part of it. Press the ABC/123 key to switch the keyboard between upper-case, lower-case and numbers/punctuation. You don’t have to enter a city: waze will search for a street matching that address near your current location, starting with the city you are in. If your destination is not close to you, you might want to add a city as well. You don't have to include a house number: if you don't, or if you include one that isn't yet on the map although the street itself is, waze will find the mid-point of the street.
Press the [search] button to search for that location. Waze will display a list of one or more possible locations.
To calculate the best route to one of the displayed locations, touch its name/address (text). Waze will find the route, and display the map together with the distance to destination and the expected time to drive there. You might get a message that waze has insufficient data to calculate the route. This doesn't mean that waze can't calculate any route, only that waze isn't sure it's been able to find the optimal route. In this case you have two options:
Try Route - to get navigation guidance for the route that waze knows.
Teach waze - if you yourself know the route, you can teach waze the best route just by driving it.
To do anything else, touch the arrow button next to the name. This brings up a menu where you can choose to:
Navigate – calculate the best route as above
Show location on map – waze displays the location (and you can zoom in and out) but does not calculate the best route to it.
Add this location to favorites - waze displays a virtual keyboard and asks you to key in a short name for this location (e.g. "home", "work", "school", "mall" and so on). Press Done to add the location to your Favorites with this name. You'll be returned to the main waze screen; next time you access your Favorites, that location will be there. Note that if you choose this option, the location won't appear on the Search History list because it has not been displayed on a map.
Cancel - to exit the menu without doing anything. In this case, the location won't appear on the Search History list.
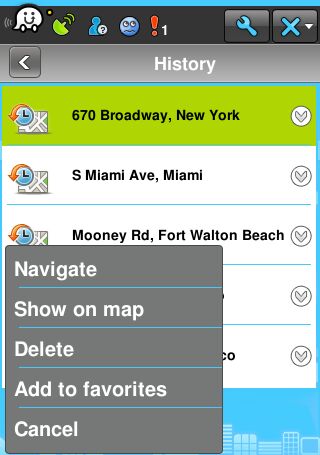
History - displays a list of the places you've searched for in the past and have displayed on a map (either by calculating a route to them or by choosing "display on map" after searching for them). Touch the name of a location to calculate the best route to it, or the arrow button next to it to display the menu of what to do with it: the choices are, as before: Navigate; Show on map; Delete (from list); Add to favorites; Cancel.
Marked Locations - displays a list of the places you've saved to your list of My Locations. As before, you touch the name of a location to calculate the best route to it, or the arrow button next to it to display the menu of what to do with it. This menu is the same as the menu for the History list.
Events
Simply by driving around with waze running on their smartphones, drivers share real-time information that waze translates into road and traffic conditions. You can also actively report to the community on traffic, accidents and incidents, speed cameras, police traps, blocked roads and more. These are called "events". This information about events is collected and analyzed in real time to provide all wazers with the optimal route to their destination at any given moment.
The Events button displays a menu, organized by type of event, of the real-time live reports by wazers about problems in your area:
All - gives you a list of all events reported in your area, listed by distance
Police - displays only reports of police cars/traps , listed by distance
Traffic - displays only reports of traffic loads in your area (light / moderate / heavy / standstill) listed by distance
Accidents - displays only reports of accidents in your area.
Other - any reports of events that aren't in one of the above 3 categories.
From the list of displayed events, you can:
Touch an event to display its location on the map together with the full text of the report. To add your own comment to the report of this event (where allowed): touch the Comment button that appears under the text of the report. You'll get a virtual keyboard: type in your comment and press Done. Your comment will also be sent directly to the wazer who reported the event originally. If he or she replies, you'll get a message on your screen: "responding to you" with his or her reply.
Touch the arrow beside an event to bring up a menu of possible actions:
Display it on the map (the same option as touching the report of the event rather than the arrow beside it)
Report irrelevant – if you're in that location and the event reported no longer exists there
Add comment – brings up the virtual keyboard; type in your comment and then press Done.
Sort by recency - if you would rather see results by chronological order (latest first).
Report
This is where you yourself report an event. Tapping the Report button displays a menu of several different types of events: reporting can be as simple as choosing the type of event and pressing Send. The event will be marked at the location you were in when you chose the type of event.
The types are:
Polizeikontrollen - . Andere Nutzer werden dieses Symbol auf der Karte sehen
Stau - . Auf der Karte
Unfall - . Auf der Karte
Gefahr - . Auf der Karte
Fest montierte Blitzer - . Auf der Karte
Chat - . Auf der Karte
Check in mit Foursquare - let's you check in to a foursquare location nearby. See the profile section for more details.
After choosing a type of event you get a screen were you can indicate:
A text description of the event (disabled while car is moving)
Whether it's on your side of the road (default) or the other side. Click once to change.
A smiley to show how you feel about the event – happy , sad , mad , bored , and so on.
A photo of the event – choose the "Add image" icon and your phone switches to camera mode; point and shoot, and the picture appears instead of the "Add image" icon
At the bottom of ‘report event’ page you will notice three options:
You can choose to ‘hide’ the event description. This will take you back to a map with a pin in it, representing where your report will be shown. To go back and approve the event, hit the small icon on the right side of the map.
When the report is the way you want it, choose Send; or to back out without sending it, choose Cancel.
If you've input your Twitter account details and chosen to send your reports as tweets to your followers, the report will also appear as a status update in your Twitter account.
The Top Status Bar
The waze logoDatei:Logo white.jpg click to see the about screen, including the version number.
GPS Connectivity: The satellite icon
shows you have GPS connectivity and its strength. means you have good connectivity and your location is known. means a low-power connection, until it improves only your rough location is known. means your GPS connection is bad or non-existent, and your location is unknown. To improve it, try to give your phone a clear line of sight to the sky and wait a few minutes.
Mood icon The smiley shows the mood you're in at the moment. If you've chosen to be visible to other wazers (green privacy icon), your mood is also displayed to them; and if you've chosen to tweet your reports to your Twitter followers, they'll see your current mood as part of the tweet. You can change it via the Settings > Profile menu. Current options are: - you’re happy – other wazers will see your avatar on the map as - you’re sad – and your avatar - you’re tired – and your avatar - you’re mad – and your avatar - you’re bored – and your avatar - you’re starving – and your avatar
More moods coming soon!!
Stars and points Ticker
This icon, on the right-hand side of the main screen below the status bar, allows you to view the number of points you have accumulated and your current rank.
To open the ticker, tap on the little green arrow and the ticker will slide out.
To close the ticker – tap the green arrow again.
If you accumulate points while driving (by sending reports or driving on roads that are dotted), the green ticker will automatically slide out, and your new points will be shown under “gained points.” The ticker will slide back in after a few seconds.
If you don't want to display the points ticker icon on your screen, you turn it off (or on again) via Settings > General > 'Show points ticker' and choosing "on" or "off".
No Internet Connectivity icon
This only appears if your phone has no connection to the Internet. Note that you might see this icon when launching waze as it could take a few seconds for waze to connect.
Without internet connectivity (active data), you'll be able to continue driving along routes that have already been downloaded to your phone; you will not be able to see reports or new sections of the map. For instance: if you've requested a "best route" and it's been downloaded to your phone, you can continue to drive along it, but if you decide to turn off from it along the way, you won't get that new section of the map without Internet connectivity.
The Live Reports icon
This is an exclamation point together with a small number representing the number of events that have been reported in your area. As long as you have Internet connectivity this number is constantly updated.
To view details of these reports, tap the Events button at the bottom of the screen.
If you've stopped, the reports will also be displayed in rotation on the main screen, on your map.
No Sound icon
You can choose whether you want to hear voice instructions on your route. When this option is "on", no icon is displayed on the status bar. When it's "off", you will see this icon of a speaker with an X on it. You turn it on or off via Settings > Navigation guidance.
The settings Button
Takes you to the settings screen where you can modify and personalize waze. See all settings in the next section of this guide.
The Power Button
This lets you set how waze runs and therefore how much power it's consuming. Tap it to display the available options. They are:
Resume manually - minimize waze but keep it running in the background. To switch back to waze, click on the waze icon on your phone's desktop, and you'll be back in it right away.
Resume in 30 seconds - Waze will be minimized for 30 seconds and then automatically come back up.
Exit – turn off the application completely.
Cancel – go back to Waze main screen without taking any of the above options.
Settings
The settings allow you to view and personalize your waze experience. Tap it to enter the Settings menu. Here you define:
Navigation guidance (on/off) – whether you want voice instructions in addition to the map display when following a route
Display – to display the map in either 2D (default) or 3D.
Light – whether the screen lighting should be adjusted for day or night viewing. By default, the display will automatically switch to night mode when it gets dark. You can choose to keep this option manual by setting "automatic night mode" to Off from the General settings menu.
General Settings
This menu lets you set:
The backlighting (on/off): by default it's "on", and the backlight will remain on as long as waze is running.
Speaker volume - to choose the volume level for voice directions
Auto zoom of maps (on/off) – by default it's "on", so the map will zoom in and out while you're navigating, based on the distance to your next decision point (e.g. place where you have to turn). You can disable this feature by selecting "off".
Whether to display the points ticker ("on" to display it, "off" to hide it)
Automatic night mode (on/off) – the default is "on": waze switches between day and night mode automatically. To disable this automatic switching, choose "off". You can still switch manually between day and night modes from the main Settings screen.
The measurement system - you can choose to display distances in miles or in kilometers.
Profile Menu
Displays your account details: username, five stars representing your password (no matter how long your password is) and nickname; and lets you change your nickname. To change your username and password, first go to the waze.com site, log in, and make the changes, and only then update it on your phone.
Displays a car icon which will represent your car on the map you see. You can choose from a large number of cars of different types and colors (more cars coming soon!!)
Displays the icon for your current mood – you can change it to one of the others.
Twitter – lets you choose whether to tweet your waze reports to your twitter followers; if you choose to do so, enter your Twitter username and password. Your current mood will be included in the tweet. You can disable and re-enable tweeting at any time without affecting your Twitter credentials.
FourSquare - lets you set up your foursquare account to use with waze, and set tweets about your foursquare activity.
What is Foursquare? It's a cool way to discover and promote cool places in your city and be rewarded for doing so. You can check foursquare and check in to locations around you using waze.
First thing you'll need is to create an account on foursquare - this can be done on http://www.foursquare.com
Then, make sure you are logged in to waze (with your waze user name) and go to settings >> profile. Under 'Foursquare' enter your foursquare user name and password. Hit back or enter (depending on phone) and wait for the message confirming that you were able to connect to your foursquare account. Note that sometimes it takes a few times before it is able to connect.
Once connected, you can use waze and at any given point - when you position is known (GPS icon is green) - you can check in to locations on foursquare. Go to "report" - where you would usually report traffic jams, accidents, etc. - the last option is to check in with foursquare. Choosing this option will bring up a list of all the foursquare locations around you. Click on one to check in to it. Then visit http://www.foursquare.com to see the full details of this check in.
Routing Menu
Here you tell waze how to calculate the optimal route for you. The options are:
Route preference – you prefer the calculation to choose either the shortest route, or the fastest taking into account current event reports along that route. The default is "fastest".
Dirt roads – you can choose to allow their inclusion in your route, to forbid it, or to allow short ones but avoid long ones where possible.
Minimize turns (on/off) – if this is "on", waze calculates a route that will require you to turn from one street into another as few times as possible.
Avoid highways (on/off) – the default is "off". If you prefer to spend as little time on highways as possible, choose "on". (It isn't always possible, of course, to avoid highways altogether, but waze will do its best, taking into account your other routing preferences).
Privacy Menu
This menu displays a screen headed "Display my location on mobile and web" with the options "when driving" and "when reporting". Waze always respects your privacy, and your location will never be shared against your will. This is where you define the degree of privacy you'd like:
When driving - choose between:
Anonymous: your location is shown but not your identity (neither username nor nickname): you appear as an "anonymous user". This is the default. The top Status bar shows this by displaying your avatar in blue with a question mark on it.
Nickname and avatar: other wazers will see your location on the map, and your avatar will display your current mood (as described regarding the Status bar avatar, above). If you've chosen this option, your status bar displays a green avatar.
Don't show me: your location won't be shown at all – you're there but invisible, like a ghost! The top Status bar shows this displaying a ghost avatar.
When reporting - choose between:
Using my nickname: your reports are identified by your nickname
Anonymous: your reports are sent anonymously, no information identifying their sender is displayed
About - this displays information about the waze program, including which version you're currently running.


 , Ein Kompass
  und ein "Karte bearbeiten" Symbol
 ohne Text
 . Die Karte ist jetzt fixiert (Norden ist immer oben) und sie dreht sich nicht mehr mit.


 - gives you a list of all events reported in your area, listed by distance
 - displays only reports of police cars/traps , listed by distance
 - displays only reports of traffic loads in your area (light / moderate / heavy / standstill) listed by distance
 - displays only reports of accidents in your area.
 - any reports of events that aren't in one of the above 3 categories.


 . Auf der Karte
 . Auf der Karte
 . Auf der Karte

 , sad
, sad  , mad
, mad  , bored
  , and so on.


 which will represent your car on the map you see. You can choose from a large number of cars of different types and colors (more cars coming soon!!)


