This page provides the basics to start editing the Waze Map in India. Most of the paragraphs include links to pages with elaborate information, in case you want to know more. Because Waze is a navigation tool and not a topographic map, some things are drawn differently than expected. Our advice is, after reading this page, to choose one type of edit and first familiarize yourself with all aspects of that edit. Otherwise, you might as well get overfed with information. Your Community is happy to help you make your edits work. A definition of the used terms can be found in the glossary.
How to get to the Waze Map Editor (WME)
Log in to www.waze.com. If prompted to login, use the same username and password as you do on the Waze client app and the rest of the Waze website.
Search for your location
Click 'live map'
Click 'edit the map'
Or, go directly to www.waze.com/editor/?env=row.
After logging in, you will see the following page:
If you want to learn more about the controls and functions of WME (Waze Map Editor), you can find more details on the WME Interface and Controls page.
If you're a first time editor, it can be useful to start in Practice Mode. In Practice Mode you can practice editing without risking damaging the map, since your edits and changes are not saved. For more experienced editors this can also be useful to test out complicated or new road constructions.
To edit in Practice Mode, you go to the editor, and without logging in, click on "Practice Mode".
Most starting editors at first try to match the map of Waze perfectly to the satellite image. They split roads, add walking trails, make the roads very fluently and draw detailed places. However, Waze is NOT a topografical map, but a navigation system that routes you to your destination in the best/fastest way. Therefore, keep the Waze map simple: The lesser the detail, the clearer the map, lesser data use, faster calculations, and easier maintainance. With that in mind, let's start edit the map!
Indian cities have been growing rapidly, with lots of roads being made and connected to existing roads. We can add roads from the app (the Pave function) as well as in WME. Please only add roads when you are sure they exist. More info will be available on the page about Roads (in preparation).
Next part goes to page on Roads: If you notice any roads on the satellite layer that has not been added to the base map, please first confirm that they exist before adding them. Do NOT add any roads without either:
Clear GPS tracks following the aerial when the GPS Points layer is turned on.
Seeing the road in the Street View feature, where that's available.
Local knowledge, or confirmation by a local host.
If you doubt an existing road is drivable, please DON'T delete them without prior discussion with the local area manager or one of the champs. And if you're extending an existing road, please ensure that you always verify that the road has been completed and properly connected before extending it.
If you turn on the GPS layer, you can see if the road has been driven on. If the layer doesn’t show any GPS arrows, it’s possible that the road hasn’t been opened for the public, or is just a road that has not been driven on by a Wazer yet.
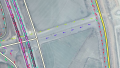
On the left of the image, running alongside the Yamuna Expressway, there is a service lane that hasn’t been driven on. Leave it like this, if you live in the region, pay the location a visit to see if the road is open and drivable.
Hover the mouse over the button on the toolbar at the top of the page and click "Road"
Click the mouse on the map at the point where you want to start the new road segment.
Move the mouse cursor along the path of the road and click the mouse to add a geometry node for each point that changes direction along the road.
When finished, double-click the last point to end the segment.
Select the segment again, and fill in the details of the segment in the menu pane on the left.
Each segment that is added must have a Country, City, and Street name, under the "Edit" link left. If there is no City and/or Street name available, then the "None" box(es) must be selected, or the segment will not be used in navigation. In the editor, you will see a red outline around the segment (see picture-to be added).
Be sure the road actually exists before creating it. If you turn on the GPS layer, you can verify if the road has been driven on already. Of course it's also possible that the road exists, but hasn't been driven on by a Wazer yet.
Always try and find as much detail about the road as you can. Arguably the best source would be the Eicher City Map of the area, if you have it. If you don’t, buy one. It’s a worthwhile resource for a Wazer in India.
Tip: * You can change your settings to draw roads as two-way streets.
Segment geometry nodePlaces geometry nodeWhen editing a segment or Area Place, large white circles appear where the segment changes direction ultimately altering its shape. Click and drag them individually to alter the geometry of the segment or Place. Press the d key while the mouse is hovered over them to delete the geometry node. Alternately, hold the d key and then move the mouse over the nodes you want to delete.
The smaller white circles between the geometry nodes are "inter"-geometry nodes. When you click and drag an inter-geometry node, it becomes a larger geometry node and two more inter-geometry nodes appear halfway between each side again.
Tips: * Under the Layer icon at the top right of the Map Editor Tool Bar, you can turn off the road layer , to have a better view on the road structure and Satellite Image.
In practice:
There are roads with unnecessary Junction Nodes and Geometry Nodes. Junction Nodes that aren’t connected to other streets and are a part of the same road and elevation can be removed. You can click on it and press the trash can icon on the top right of the screen
(or press ‘Delete’ on the keyboard).
Geometry Nodes
You will see Geometry Nodes as white circles when you select a segment. You can delete unnecessary ones by hovering the mouse over it and pressing d on your keyboard.
All road properties that can be changed are visible in the left pane when you select a segment.
Menu in left pane
Name
Click on the pencil next to the name of the road. Clicking this will allow you to edit the address information. We try to keep the names uniform, which is important for the display as well as for routing purposes. Please use the abbreviations when you enter road names.
Menu after clicking the pencil
If you do not know the name of the road, check None on the right side of the Street or City box (see picture on the right); otherwise the road will remain red and this makes it difficult to use in routing.
DO NOT FORGET to click Apply after entering the street and city name.
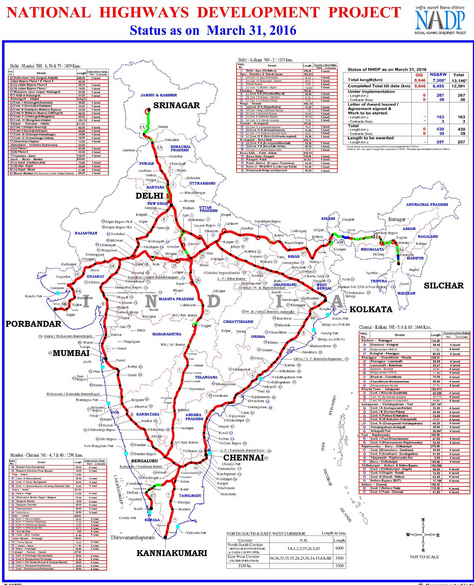
National Highways that are referenced in the map below.
Major Highway (MH)
National Highways that aren’t seen in the map above
Minor Highway (mH)
All State Highways and Arterial Roads within Indian Metro Cities
Primary Street
Busy Roads within Cities, and/or Feeder Roads to Arterial Roads
Street
Residential Roads
Parking lot roads
Used for Petrol Stations, Car Parks
Dirt road / 4X4 Trail
Unpaved Roads
Non-drivable
Walking Trail
Avoid using -- can cause strange routing effects.
Pedestrian Boardwalk
Not usually necessary
Stairway
Not usually necessary
Railroad
Elevation level as is. DO connect to drivable roads if they actually cross, and disallow turns to and from drivable roads
Runway/Taxiway
---
India Freeway network
Concerning Non-Drivable roads: Most aren't worth adding, as Waze is an app aimed at commuters who drive. If you think they are necessary for navigation (like to orientate yourself), DO NOT connect these roads to drivable roads. Waze has been known to route people along walking trails and the like! The only exception is Rail Roads, which should be connected, with turns to and from the drivable roads restricted (red). Elevation levels should be conform they are in reality.
For more information about road types, see Road Types in India (page in need of update).
Two-way, one-way or unknown. ALWAYS choose 1 of these 3 options, NEVER leave it blank.
Speed limit
Here you can enter the speed limit for each direction. Make sure you are entering in metric units (kilometers) and NOT in imperial units (miles). If you do not know the speed limits, leave it blank.
Elevation
This is for the elevation of the road if roads overlap without crossing. For example a bridge or overpass.
This determines what level editors need in order to edit the segment.
You cannot edit roads locked by a higher level editor than you. To get it unlocked you should post on the India Forum or on Slack.
Roads are locked to prevent breaks in the routing. Depending on the state of the map and the road type, often the roads are locked to specific locking standard (link to new roads page to be added). A summary is shown in the table below. Only lock them (or ask for a lock) if it is needed and if you are sure the roads and their connections are correct - check routing in the live map!
If you work in areas that need further development, make sure the road contain stubs (link to be added).
Road type
Lock level
Freeway
5
Ramp
5
Major Highway
4
Minor Highway
3
Primary Street
2
• • • • Ferry • • • •
5
Sometimes it is necessary for a road to be locked higher than the standard, because there are special conditions, like the map does not match the satellite imagery.
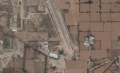
There may be roads that have been drawn in the base-map but may not be in the satellite images, or they may not exist in real life at all. Again, the GPS points will help you determine their status. If the satellite image shows an incomplete road with no GPS points (Pic 2), leave the road in the base map. If it’s already drawn, disconnect the junction nodes to valid roads (Pic 2b). If no road has been drawn (see Pic. 3), go ahead and add the road with the name “Road Under Construction”. Do not connect it to any other roads. The road can then be easily found and completed once the road is opened.
Hover over this button to show Place categories. Choose one and click on the map to add it. This will add a point place. Use the left pane to change it to an area and to change other information about the place. For an area place, use geometry nodes of the place to change its shape.
Only actual "Places" or Points of Interests (POIs) should be mapped, i.e. those which help the driver to find their way.See the extended guidelines on Places for more information.
URs ( Update Requests; map problems reported by waze users) and MPs ( automatically generated Map Problem reports) show where the map needs work. We must solve them to fix the map. URs also give us a way to contact our fellow wazers, who may become interested in editing. It is important to handle them with care and attention. Please read the Indian guidelines on URs and MPs.
A permalink is a URL used to take you or someone else directly to a specific location on the map. It contains all information necessary to discuss that location, like latitude, longitude, zoom level, visible layers, and optionally a junction or a place, or one or more segments.
To create a permalink, zoom and pan the map to show what you want to show. Next, hover the mouse over the permalink icon on the right side of the bottom bar until a message pops up. Then use Ctrl+C to copy the permalink. You can paste this link anywhere you need it.
To include a single place, junction, or segment in the permalink, click on it before using the permalink icon. To include several segments and/or objects, use ctrl+click (for MAC:⌘ Command+click).
This page is only intended as a Quickstart and is not intended to answer all of your questions. If you only intend to add a few street names, or allow a turn, then this is aimed at you. Before you start any serious editing please also read the India Editing Best Practice.
The sequel to this Quick-Start Guide will be presented in the Advanced Guide (under construction)
Helpfull tips and often encountered problems when starting editing are described in the page to Improve your skills (page under construction)
Don't forget to join your fellow Wazers in your community, who will be happy to meet you!


 button on the toolbar at the top of the page and click "Road"