Items for HOV wiki would expect to link High Occupancy Vehicle with HOV, High Occupancy Toll, HOT, Express Lanes. Clean Air Vehicle
High Occupancy Vehicle (HOV)
Intro
Waze has HOV routing! This feature puts Waze out in front of the other navigation systems, but we need to know how to properly configure the map for a great user routing experience. There are a lot of considerations for getting all the options included, so please take your time and read it through the entire article prior to editing. If you have questions, then please reach out to your State Manager or Regional Coordinator and we’ll get you some help.
Definitions
HOV
HOV – High Occupancy Vehicle. Has more than one person in the vehicle. It is often posted with a number after the acronym; HOV-2 or HOV2+. The number specifies the number of people to meet the HOV requirements; ex. HOV-3 means that three or more people need to be in the vehicle.
HOT
HOT – High Occupancy Toll. This is a combination of toll road and HOV. Sometimes called “Lexus Lanes” since people can buy their way onto roads with less congestion. Electronic toll roads often require a special transponder set to HOV which broadcasts that the car meets the requirements so that a toll is not charged.
Express Lanes
Express Lanes – There are three main types of Express Lanes on the interstate system. They can either be HOT lanes, lanes that have limited entrances/exits, or toll road to speed people willing to pay. This wiki section will just deal with the HOT type of Express Lanes and the segments should follow the guidance for HOT below. Express Lanes that have limited entrances/exits are just mapped as normal freeways. Express Lanes that are just toll roads and don't have different HOV rates are just mapped as a toll road freeway.
Clean Air Vehicle
Clean Air Vehicles – future feature These vehicles meet the requirements for low emissions for the state that the person is operating the vehicle. The vehicles are normally either a hybrid or electric or natural gas vehicle. Note some states require special permits or license plates to qualify.
Toll attribute
The toll attribute has moved from under the road segment name to the first page of a Time Based Segment Restriction (TBSR). It is in the bottom left corner of the first TBSR popup window.
Mark a road segment as a toll segment only if the segment has a toll booth, transponder reader, or other tolling device. See Toll road for additional information.
Two ways to mark toll:
Toll attribute in first TBSR popup
Toll free restriction is enabled in second TBSR popup
Note if there is not a restriction then Add restrictions is shown; if there are TBSRs then Edit restrictions (#) is shown.
Once a segment is selected as a toll segment, the toll attribute is displayed under the road segment name. You have to go to the TBSR to deselect the attribute. Additionally the toll free restrictions can not be added if the segment is marked with the toll attribute.
If at least one restriction is marked toll free, then it is assumed that all other vehicles not meeting the toll free requirements has to pay a toll.
Note the toll attribute is not shown on the segment if toll free is selected, but it is assumed that there is a toll for the other vehicles.
Next to carpool/HOV/bus lane attribute
The Next to carpool/HOV/bus lane attribute is a check box that is used for designating roads that are close to the HOV lane so that Waze’s algorithm can differentiate between the varying speeds
The Next to carpool/HOV/bus lane attribute is under the road type selection when a segment is selected
DO NOT SELECT this attribute on the actual HOV road segments. Especially for road segments that have regular and HOV lanes on the same segment. (i.e. the segment has an HOV lane that is separated by dashed line.)
Ensure the Next to carpool/HOV/bus lane attribute is selected on all parallel road segments going the same direction as the HOV traffic that are within (XXX feet) of an HOV segment.
Note for reversible HOV lanes there may be road segments on both sides of the HOV lane that require the Next to carpool/HOV/bus lane attribute to be checked.
Toll Transponder Companies supported
The following companies’ toll transponders are supported in Waze:
Sunpass
Flexpass
TxDOTTolltag
Leeway
O-Pass
NC Quick Pass
Peachpass
METROHOTtag
NEXUS
K-TAG
PIKEPASS
Fastrak
GeauxPass
Good To Gous:Express Toll
RiverLink
E-Pass
I-Pass
Pay BY PLATE
TxTAGTolltag
DallasNTTATolltag
Palmetto Pass
E-ZPass (E-ZPassFlex - see if can get Flex added separately for HOV routing)
HarrisEZtag
How to map HOV lane segments
There are four types of HOV lanes
Dashed line separation HOV - HOV lane that is part of the road and can be accessed or exited at any time
Solid/double solid line HOV - HOV lane that is part of the road but can only be accessed or exited at certain places
Separate parallel segment HOV - HOV lane that is physically separated from the rest of the road by a wall, cement barrier, flexible barrier, or land; only accessed from ramp segments other than initial entrance or final exit.
Whole road HOV - HOV is entire road and there is no parallel path for non-HOV drivers
Enter/exit anywhere HOV
HOV lanes that can be accessed or exited the entire time since drivers can cross the dashed line (or some areas a single solid white line) separations at any time. Usually the lane with be noted with the white triangle painted on the road way and have regulatory signs on the shoulder. Example is US-95 HOV in Las Vegas, NV.
Bottom line up front - The HOV lane is mapped on the same segment(s) as the regular lanes.
Remember DO NOT mark any road segment(s) with the Next to carpool/HOV/bus lane attribute.
Map the applicable road segment(s) for the road
The road segments for a dashed line separation HOV look the same as a road without HOV.
HOV restrictions are added per the restrictions section below
Limited enter/exit (transition zone) HOV
Separated by solid or double solid lines from the normal lanes with periodic transition zones. Note for areas where it is legal to cross the single solid white line refer to Enter/exit anywhere HOV section above.Non-HOV travel is available on an adjacent parallel path (lane or segment). Waze will only route on this road if the person acknowledges that they meet the HOV requirement for this trip. Example is need location with this set up.
Bottom line up front: separate road segment(s) for the HOV with transition zone to/from regular lanes using ramps
Map the applicable regular lane road segments
Map parallel road segments for HOV lanes that have transition zones with the regular lanes
HOV restrictions are added per the restrictions section below
Add ramps for the transition zone as follows:
Add a set of entrance/exit ramps to make a V at the entrance to HOV lanes
Add a ramp with to [Road name/Route number] HOV coming from the regular lanes to the start of the transition zone (Prompts user to enter the HOV lane). Ramp should be about 6-7 m long and flow traffic into the HOV lane at the start of the transition zone (start of dashed white lines).
Add a ramp with to Return to [Road name/Route number] Regular Lanes (Prompts user to exit HOV lane either for upcoming exit or if traffic is faster in regular lanes). Ramp should originate at the start of the transition zone and be about 6-7 m long.
Add another set of entrance/exit ramps to make a V at the end of the transition zone, if the zone is over 0.5 miles/xxxx meters long
Add a ramp with to [Road name/Route number] HOV coming from the regular lanes to the end of the transition zone (Prompts user to enter the HOV lane). Ramp should be about 6-7 m long and flow traffic into the HOV lane at the end of the transition zone (start of solid white lines).
Add a ramp with to Return to [Road name/Route number] Regular Lanes (Prompts user to exit HOV lane either for upcoming exit or if traffic is faster in regular lanes). Ramp should originate at the end of the transition zone and be about 6-7 m long.
For a very long transition zone, other set(s) of entrance/exit ramps to make a V can be added every 0.5 miles/xxxx meters
Separate parallel segment HOV
HOV only on the separate road segment; separated by a physical distance from the normal lanes (ex. land, curbs, shoulders), a concrete barrier, or a flexible barrier from the normal lanes. Non-HOV travel is available on an adjacent parallel path (lane or segment). Waze will only route on this road if the person acknowledges that they meet the HOV requirement (and transducer if required) for this trip. Example is I-395 by the Pentagon (Arlington, VA).
Bottom line up front: separate road segment(s) for separate parallel HOV
Map the applicable regular lane road segments
Map parallel road segments for HOV lanes
Add applicable entrance and exit ramps
HOV restrictions are added per the restrictions section below
Whole road HOV
All travel is HOV only on the road. Non-HOV travel is not available adjacent parallel path (lane or segment). Waze will only route on this road if the person acknowledges that they meet the HOV requirement (and transducer if required) for this trip. There are not very many implementations of this type of set up. Example is I-66 inside the beltway in Northern Virginia; morning rush hour traffic is HOV-2+ only for eastbound traffic.
Bottom line up front: separate road segment(s) for whole road HOV
Map the applicable road segment(s) for the road
The road segments for a whole road HOV look the same as a road without HOV.
HOV restrictions are added per the restrictions section below
Entering HOV restrictions
Enter/exit anywhere HOV lane
To add an enter/exit anywhere HOV lane on an existing segment, follow these steps:
Select the applicable road segment(s).
Click the Add restrictions button in the sidebar. The following screen appears:
Click Add new below the appropriate direction (A>B, B>A, or TWO WAY) on the popup screen.
Second restriction popup screen appears.
Select the appropriate lane (Left lane/Middle lane/Right lane) in the Applies to section.
Select HOV in the Applies to section.
Select appropriate Days and Hours for time-based HOV lanes, or leave all day checked for 24-hour HOV lanes.
Ensure that Every week is selected (except in the rare case that future HOV schedule changes might be planned).
Select "allowed" in Driving is _____ for.
Add the HOV allowance by clicking the + button on the green banner, then clicking Minimum passengers in the drop down menu.
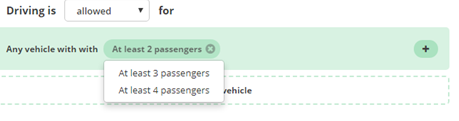
The HOV allowance will default to At least 2 passengers:
If the HOV lane requires more than 2 persons, change the requirement by clicking At least 2 passengers and selecting the appropriate option in the drop-down (At least 3 passengers or At least 4 passengers).
If a particular transponder or tag is needed to enter the HOV lane, click the + button on the same line and select Requires a pass.
The default setting is the first transponder in the list (Sunpass at time of writing). If a different pass is needed, click Sunpass and select the appropriate transponder from the drop-down list:
If any vehicle types are allowed (motorcycles, clean air vehicles, taxis, etc.) without meeting the number of persons requirement for private cars,
Click + Add new rule below the rule you just added.
Click the + button on the new green banner, then select Vehicle type. The default value is Private car.
Click on the button that says Private car and select the allowed vehicle type (e.g., Motorcycle, Clean air vehicle, Electric, or Public transportation).
Repeat for as many vehicle types as necessary. Note that these vehicle types will be allowed even with only one occupant.
Click Add in the bottom right corner.
To add additional HOV time periods or days, click Add new under the HOV-allowed period you just added, and repeat steps XXXX – YYYY.
If the HOV lane is open to all traffic at other times of the day, skip to step ZZZZ.
If the HOV lane is closed to all traffic at other times of the day:
Click Add new under the restriction you just added.
Select the same lane (Left lane/Middle lane/Right lane) in the Applies to section.
Select HOV in the Applies to section.
Select the Days and Hours during which the lane is closed.
Note, restrictions may need to be adjusted by one minute so that the restriction does not overlap the HOV allowed period. For example, if an HOV lane is open from 4:00 a.m. to 1:00 p.m. and closed at all other times, the HOV lane will be set from 4:00 to 13:00, and the restriction should be set from 13:01 to 3:59.
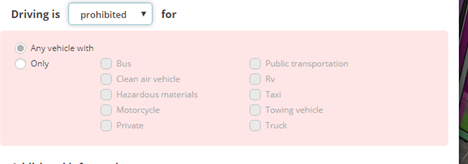
Select "prohibited" in Driving is _____ for, and leave "Any vehicle" selected:
Once all restrictions have been added, click Apply in the bottom right of the restrictions panel.
If the HOV lane is a reversible center lane and the segment is a two-way segment, then add the appropriate time and restrictions for the opposite direction.
Note be sure to add the Driving is Prohibited period(s) if a reversible lane does not allow traffic to prevent misrouting.
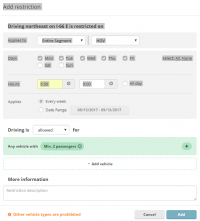
To mark a segment for HOV use including the required number of passengers:
Select the applicable road segment(s).
Click the Add restrictions button in the side panel.
If a toll is required for all vehicles, then check the toll road attribute check box in the bottom left corner.
Click Add new below the appropriate direction (A>B, B>A, or TWO WAY) on the popup screen:
The add restrictions dialog box appears:
Select Entire segment in the Applies to section:
Select HOV in the Applies to section.
Select appropriate Days and Hours for time-based HOV lanes, or leave all day checked for 24-hour HOV lanes.
Ensure that Every week is selected (except in the rare case that future HOV schedule changes might be planned).
Select allowed in Driving is _____ for.
Add the HOV allowance by clicking the + button on the green banner, then clicking Minimum passengers in the drop down menu.
The HOV allowance will default to At least 2 passengers:
If the HOV lane requires more than 2 persons, change the requirement by clicking At least 2 passengers and selecting the appropriate option in the drop-down (At least 3 passengers or At least 4 passengers).
If a particular transponder or tag is needed to enter the HOV lane, click the + button on the same line and select Requires a pass.
The default setting is the first transponder in the list (Sunpass at time of writing). If a different pass is needed, click Sunpass and select the appropriate transponder from the drop-down list:
Click Add in the bottom right corner.
To add additional HOV time periods or days, click Add new under the HOV-allowed period you just added, and repeat steps XXXX – YYYY.
If the HOV lane is open to all traffic at other times of the day, skip to step ZZZZ.
If the HOV lane is closed to all traffic at other times of the day:
Click Add new under the restriction you just added.
Select Entire segment in the Applies to section.
Select HOV in the Applies to section.
Select the Days and Hours during which the lane is closed.
Note, restrictions may need to be adjusted by one minute so that the restriction does not overlap the HOV allowed period. For example, if an HOV lane is open from 4:00 a.m. to 1:00 p.m. and closed at all other times, the HOV lane will be set from 4:00 to 13:00, and the restriction should be set from 13:01 to 3:59.
Select "prohibited" in Driving is _____ for, and leave "Any vehicle" selected:
Once all restrictions have been added, click Apply in the bottom right of the restrictions panel.
If the HOV lane is a reversible center lane and the segment is a two-way segment, then add the appropriate time and restrictions for the opposite direction.
Note be sure to add the Driving is Prohibited period(s) if a reversible lane does not allow traffic to prevent misrouting.
Entering HOT/Express lane restrictions (HOV or toll allowed)
Enter/exit anywhere HOT/Express lanes
This type of configuration only occurs at the start or finish of the HOT/Express lanes. No restriction is required.
Reason for not having dashed line separation in the middle of the HOT/Express lane segments is that there is no way of charging a toll to the non-HOV compliant vehicles.
Limited enter/exit (transition zone) HOT/Express lane / Separate parallel segment HOT/Express lane / Whole road HOT/Express lane
Normally the HOV vehicle is allowed to use the lane for free while other vehicles have to pay a toll. The toll rate can be variable with surge pricing to control the number of vehicles that are not HOV on the road. Therefore this is setting up or statements. A vehicle can use the road for free if meeting the HOV requirements or the vehicle has to pay a toll.
Where to mark toll segments
Mark a road segment with a toll free restriction only if the segment has a toll booth, transponder reader, or other tolling device
Do not mark the toll attribute; which would prohibit adding a toll free restriction
Non-toll collecting segments should not have the the toll free restriction
Normally one does not mark the final toll booth, transponder reader, or other tolling device for toll free. Mark this final segment if it is the only segment marked toll free for at least one route on the toll road.
Note Waze assigns a large penalty for each road segment that is assumed to collect tolls if a user has avoid toll roads selected. Marking each toll booth/transponder for applicable segments helps to route the user off at the nearest exit if the user selected avoid tolls but allows them to take a short toll road if it is the only reasonable route.
Adding HOT/Express lane restrictions
Validate if all segments need to be marked or just the ones with toll booth or transponder
Select a segment that has a toll booth, transponder reader, or other tolling device
Do not select a segment with the final toll booth, transponder reader, or other tolling device, unless at least one route does not have one previously marked
Click Add restrictions in the left panel when the segment is selected to open the restrictions panel.
Ensure that the toll road attribute checkbox in the bottom left corner of the popup box is not checked.
Allowing toll-free HOV traffic
Click Add new below the appropriate direction (A>B, B>A, or TWO WAY) in the restrictions panel.
The Add restriction dialog appears:
Select Entire segment and HOT in the Applies to section
Select appropriate Days and Hours for time-based HOT lanes, or leave all day checked for 24-hour HOT lanes.
Select toll free on the Driving is ____ for section:
Select Minimum passengers by clicking the + on the green add restriction banner and a drop down menu will appear:
The default setting for number of persons required is At least 2 passengers:
If the HOT lane requires more than 2 persons for a toll-free HOV, change the requirement by clicking At least 2 passengers and selecting the appropriate option in the drop-down (At least 3 passengers or At least 4 passengers).
If a particular transponder or tag is needed to enter the HOV lane, click the + button on the same line and select Requires a pass.
The default setting is the first transponder in the list (Sunpass at time of writing). If a different pass is needed, click Sunpass and select the appropriate transponder from the drop-down list:
If any other non-HOV vehicle types are allowed (motorcycles, clean air vehicles, taxis, etc.) without paying a toll,
Click + Add new rule below the rule you just added.
Click the + button on the new green banner, then select Vehicle type. The default value is Private car.
Click on the button that says Private car and select the allowed vehicle type (e.g., Motorcycle, Clean air vehicle, Electric, or Public transportation).
Repeat for as many vehicle types as necessary. Note that these vehicle types will be allowed even with only one occupant.
Click the Apply button in the bottom right corner.
Allowing non-HOV toll traffic
Click Add new under the restriction you just added.
A new add restriction dialog appears:
Select Entire segment and HOT in the Applies to section:
Select allowed in Driving is _____ for.
Add the toll for other vehicles by clicking the + button on the green banner, then clicking Requires a pass in the drop down menu.
The default setting is the first transponder in the list (Sunpass at time of writing). If a different pass is needed, click Sunpass and select the appropriate transponder from the drop-down list:
If more than one type of transponder can be used on this road, click + Add new rule below the rule you just created, then repeat the previous step as needed.
Once all transponder types are added , click Add in the bottom right corner.
Further steps
To add additional HOT time periods or days, click Add new under the HOT period you just added, and repeat steps XXXX – YYYY for different times and dates.
If the HOT lane is toll-free and open to all traffic at other times of the day, skip to step ZZZZ.
If the HOV lane is closed to all traffic at other times of the day:
Click Add new under the restriction you just added.
Select Entire segment in the Applies to section.
Select HOT in the Applies to section.
Select the Days and Hours during which the lane is closed.
Note, restrictions may need to be adjusted by one minute so that the restriction does not overlap the HOT allowed period. For example, if an HOT lane is open from 4:00 a.m. to 1:00 p.m. and closed at all other times, the HOT lane will be set from 4:00 to 13:00, and the restriction should be set from 13:01 to 3:59.
Select "prohibited" in Driving is _____ for, and leave "Any vehicle" selected:
If the HOV lane is a reversible center lane and the segment is a two-way segment, then add the appropriate time and restrictions for the opposite direction.
Once all restrictions have been added, click Apply in the bottom right of the restrictions panel, and then Save your work.
Note be sure to add the Driving is Prohibited period(s) if a reversible lane does not allow traffic to prevent misrouting.