Kentsmith9 (talk | contribs) m (Kentsmith9 moved page Turn Instruction Overrides/USA to Turn Instruction Overrides: USA Sub no longer required) |
Kartografer (talk | contribs) (capitalization and formatting changes in accordance with the Wikipedia Manual of Style) |
||
| Line 3: | Line 3: | ||
{{TOC}} | {{TOC}} | ||
== | ==Creation== | ||
{{mbox|type=neweditor|text=Before you set a Turn Instruction Override, It is highly recommended that you consult with a State Manager or other senior editor.}} | {{mbox|type=neweditor|text=Before you set a Turn Instruction Override, It is highly recommended that you consult with a State Manager or other senior editor.}} | ||
<br /> | <br /> | ||
[[File:Wme_turn_override_hover2.png|left]] | [[File:Wme_turn_override_hover2.png|left]] | ||
When in WME and you click on a segment and hover over a | When in WME and you click on a segment and hover over a green or yellow turn connection/restriction arrow, both the Time-based Turn Restriction (TBTR) clock AND the Turn instruction Override speaker icon will appear. If the turn is red (restricted), then the override icon will not appear. | ||
{{clear}} | {{clear}} | ||
==Available | ==Available options== | ||
When you click on the ''' | When you click on the '''speaker''', you have the following choices: | ||
[[File:Wme_turn_override_list.png]] | [[File:Wme_turn_override_list.png]] | ||
{{clear}} | {{clear}} | ||
*Waze Selected (default) (this gives the default voice prompt turn, exit, keep right/left, which is defined by street names, angles, road types, etc) | *Waze Selected (default) (this gives the default voice prompt turn, exit, keep right/left, which is defined by street names, angles, road types, etc) | ||
*None (No verbal instruction is given) | *None (No verbal instruction is given) | ||
*Turn | *Turn left (The instruction "turn left" is given) | ||
*Turn | *Turn right (The instruction "turn right" is given) | ||
*Keep | *Keep left (The instruction "keep left" is given) | ||
*Keep | *Keep right (The instruction "keep right" is given) | ||
*Continue ({{Red| | *Continue ({{Red|not currently available}}) | ||
*Exit | *Exit left (The instruction "exit left" is given) | ||
*Exit | *Exit right (The instruction "exit right" is given) | ||
* | *U-turn (The instruction "make a U-turn" is given) | ||
When something other than "Waze Selected" is the selected option, the Instruction | When something other than "Waze Selected" is the selected option, the Instruction override speaker icon changes from [[Image:Wme_override_speaker_icon.png]] (cyan) to [[Image:Wme_override_speaker_icon_active.png]] (orange). This icon is shown when you hover over a turn arrow. | ||
==When to | ==When to use== | ||
===Exit | ===Exit left=== | ||
[[File:Exit_left_bgs_example1.png|left]]When there is a the Big Green Sign (BGS) indicating an exit left. Discuss with your Regional Coordinator(s) and/or State Manager(s) to see if they want it added to locations where a HOV or HOT/Express Lane is separated from the regular freeway, highway, etc. | [[File:Exit_left_bgs_example1.png|left]]When there is a the Big Green Sign (BGS) indicating an exit left. Discuss with your Regional Coordinator(s) and/or State Manager(s) to see if they want it added to locations where a HOV or HOT/Express Lane is separated from the regular freeway, highway, etc. | ||
[[File:Wme turn override set hover.png|left]] | [[File:Wme turn override set hover.png|left]] | ||
| Line 41: | Line 41: | ||
[[File:Wme slight right overriden.png|left]]When streets meet at some kind of diagonal, the default turn instruction may end up being a "stay to the left/right" even though the driver would consider it a left or right turn. Allow the segments to meet at their actual angles and create an instruction override so that the instruction the driver is expecting will be given. | [[File:Wme slight right overriden.png|left]]When streets meet at some kind of diagonal, the default turn instruction may end up being a "stay to the left/right" even though the driver would consider it a left or right turn. Allow the segments to meet at their actual angles and create an instruction override so that the instruction the driver is expecting will be given. | ||
{{clear}} | {{clear}} | ||
''also consider'': The departure angle in Waze Map Editor is also shown in the app closure interface. Angles which are too close, under 20° can overlap in the app, and so should be avoided. | |||
===Simple | ===Simple wayfinder=== | ||
[[File:Wme_instruction_override_left_and_right.png|right]] Simple wayfinders use a turn instruction override where an instruction would not normally be voiced. This is most often a "stay right" or "stay left." A basic example is a roadway with a split where left lanes turn left and right lanes go straight ahead. To ensure the driver is kept on the correct side of the roadway to stay on the expected route, we create an instruction override to ensure the driver is given enough advance noticed to make sure they are on the correct side | [[File:Wme_instruction_override_left_and_right.png|right]] Simple wayfinders use a turn instruction override where an instruction would not normally be voiced. This is most often a "stay right" or "stay left." A basic example is a roadway with a split where left lanes turn left and right lanes go straight ahead. To ensure the driver is kept on the correct side of the roadway to stay on the expected route, we create an instruction override to ensure the driver is given enough advance noticed to make sure they are on the correct side | ||
The image here is a composite showing both turns with the override set and which instruction has been applied in this specific case. Drivers continuing straight, the app will give the driver the instruction "stay to the right to El Cajon Blvd." For drivers getting into the on-ramp, the app will say, "turn to the left to I-8 W." | The image here is a composite showing both turns with the override set and which instruction has been applied in this specific case. Drivers continuing straight, the app will give the driver the instruction "stay to the right to El Cajon Blvd." For drivers getting into the on-ramp, the app will say, "turn to the left to I-8 W." | ||
===Continue onto | ===Continue onto on-ramp=== | ||
{{Red| | {{Red|not currently available}} | ||
To reduce confusion, it is advised to use the "Continue" instruction in situations like a street heading directly onto a highway or freeway onramp, such as shown here. | To reduce confusion, it is advised to use the "Continue" instruction in situations like a street heading directly onto a highway or freeway onramp, such as shown here. | ||
| Line 56: | Line 56: | ||
{{clear}} | {{clear}} | ||
===At- | ===At-grade connector=== | ||
Depending on the length of an at-grade connector, it may make sense for it to either instruct "keep right/left" or "turn right/left." Use a | Depending on the length of an at-grade connector, it may make sense for it to either instruct "keep right/left" or "turn right/left." Use a TIO to ensure the app voices the most appropriate instruction to the driver. An example of an at-grade connector using an instruction override is shown below: | ||
[[File:Wme_agc_override_turn_instruction.png]] | [[File:Wme_agc_override_turn_instruction.png]] | ||
| Line 63: | Line 63: | ||
==When | ==When not to use== | ||
===Complex | ===Complex wayfinder=== | ||
A complex wayfinder is one where the legs ( | A complex wayfinder is one where the legs (s-out) are named differently than the subsequent segments. The wayfinder segments are named for the Big Green Sign (BGS) verbiage for clarity. | ||
For these kinds of wayfinders, a turn instruction override does not have the required functionality and should not be used. | For these kinds of wayfinders, a turn instruction override does not have the required functionality and should not be used. | ||
==Identifying | ==Identifying overrides on the map== | ||
#The default way to determine that a turn has an | #The default way to determine that a turn has an override set is to hover over the turn arrow. | ||
#[[Plugins#WME_Toolbox|Toolbox]] helps to make identifying turns with override instructions set. | #[[Plugins#WME_Toolbox|Toolbox]] helps to make identifying turns with override instructions set. | ||
Revision as of 15:03, 18 April 2017
| There is to be no campaign to replace existing wayfinders, micro-dog-legs, or any other segment-based structure with a Turn Instruction Override. |
Creation
| Before you set a Turn Instruction Override, It is highly recommended that you consult with a State Manager or other senior editor. |
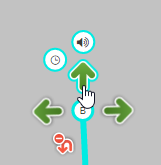
When in WME and you click on a segment and hover over a green or yellow turn connection/restriction arrow, both the Time-based Turn Restriction (TBTR) clock AND the Turn instruction Override speaker icon will appear. If the turn is red (restricted), then the override icon will not appear.
Available options
When you click on the speaker, you have the following choices:
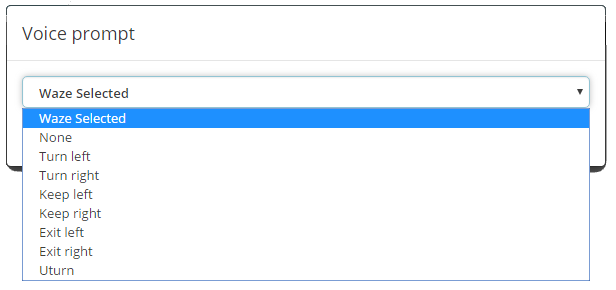
- Waze Selected (default) (this gives the default voice prompt turn, exit, keep right/left, which is defined by street names, angles, road types, etc)
- None (No verbal instruction is given)
- Turn left (The instruction "turn left" is given)
- Turn right (The instruction "turn right" is given)
- Keep left (The instruction "keep left" is given)
- Keep right (The instruction "keep right" is given)
- Continue (not currently available)
- Exit left (The instruction "exit left" is given)
- Exit right (The instruction "exit right" is given)
- U-turn (The instruction "make a U-turn" is given)
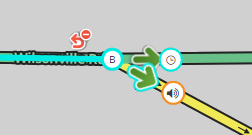
When something other than "Waze Selected" is the selected option, the Instruction override speaker icon changes from ![]() (cyan) to
(cyan) to ![]() (orange). This icon is shown when you hover over a turn arrow.
(orange). This icon is shown when you hover over a turn arrow.
When to use
Exit left
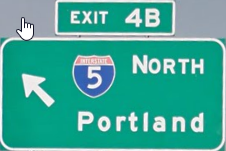
When there is a the Big Green Sign (BGS) indicating an exit left. Discuss with your Regional Coordinator(s) and/or State Manager(s) to see if they want it added to locations where a HOV or HOT/Express Lane is separated from the regular freeway, highway, etc.
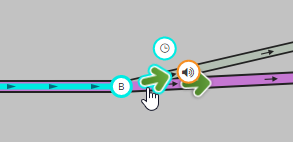
U-turn
This works well for one way segments that have a u-turn only lane. You can post a "u-turn" verbal prompt on the first left turn and "None" on the second one.
Streets not meeting at right angles
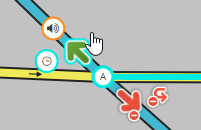
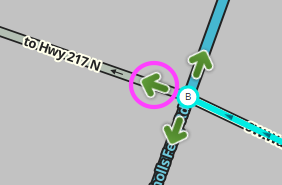
When streets meet at some kind of diagonal, the default turn instruction may end up being a "stay to the left/right" even though the driver would consider it a left or right turn. Allow the segments to meet at their actual angles and create an instruction override so that the instruction the driver is expecting will be given.
also consider: The departure angle in Waze Map Editor is also shown in the app closure interface. Angles which are too close, under 20° can overlap in the app, and so should be avoided.
Simple wayfinder
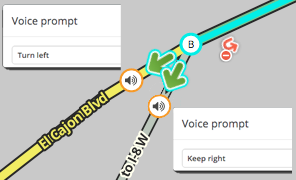
Simple wayfinders use a turn instruction override where an instruction would not normally be voiced. This is most often a "stay right" or "stay left." A basic example is a roadway with a split where left lanes turn left and right lanes go straight ahead. To ensure the driver is kept on the correct side of the roadway to stay on the expected route, we create an instruction override to ensure the driver is given enough advance noticed to make sure they are on the correct side
The image here is a composite showing both turns with the override set and which instruction has been applied in this specific case. Drivers continuing straight, the app will give the driver the instruction "stay to the right to El Cajon Blvd." For drivers getting into the on-ramp, the app will say, "turn to the left to I-8 W."
Continue onto on-ramp
not currently available
To reduce confusion, it is advised to use the "Continue" instruction in situations like a street heading directly onto a highway or freeway onramp, such as shown here.
At-grade connector
Depending on the length of an at-grade connector, it may make sense for it to either instruct "keep right/left" or "turn right/left." Use a TIO to ensure the app voices the most appropriate instruction to the driver. An example of an at-grade connector using an instruction override is shown below:
When not to use
Complex wayfinder
A complex wayfinder is one where the legs (s-out) are named differently than the subsequent segments. The wayfinder segments are named for the Big Green Sign (BGS) verbiage for clarity.
For these kinds of wayfinders, a turn instruction override does not have the required functionality and should not be used.
Identifying overrides on the map
- The default way to determine that a turn has an override set is to hover over the turn arrow.
- Toolbox helps to make identifying turns with override instructions set.
