m (Copying text of wiki page for coparison with the "Waze Map Editor/Chat" page) |
m (Copying text of wiki page for coparison with the "Map Editor Interface and Controls" page) |
||
| Line 17: | Line 17: | ||
#####-----#####-----#####-----#####-----#####-----#####-----#####-----#####--> | #####-----#####-----#####-----#####-----#####-----#####-----#####-----#####--> | ||
[[ | {{SelectionBar}} | ||
Waze Map Editor | {{Mbox|type=neweditor|text=New editors, please first [[Waze_Map_Editor/Welcome|visit our WME Welcome page]].}} | ||
This is a comprehensive reference guide to the waze map editing interface. [[Best map editing practice|Best Practices]] and [[Map Editing Quick-start Guide|tutorials for beginners]] are available in other articles. Waze Map Editor was introduced in September 19, 2011 to replace the [[Cartouche]] map editor, and has been continuously modified since. The Waze Map Editor is officially supported only on the [http://www.google.com/chrome/browser/ Chrome browser]. It may or may not work on other browsers. | |||
{{TOC limit|4}} | |||
==Starting the Editor== | |||
Begin at [http://www.waze.com/editor http://www.waze.com/editor]. Choose the correct part of the world from the [[#Top Bar|top bar]]. | |||
== | [[File:Wme login splash screen.png|thumb|Wme login splash screen.png]] | ||
Either log in or choose practice Mode. | |||
===Practice Mode=== | |||
From the splash screen, click "practice mode". You can try out most of the features of the Waze Map Editor. WME chat will not be available. You cannot respond to map Update Requests. The edit count will not go up, and you will not be able to save. | |||
==Map Editor Layout== | |||
There are five main areas of the Map Editor: | |||
<div style="-webkit-column-count: 3; /* Chrome, Safari, Opera */ | |||
-moz-column-count: 3; /* Firefox */ | |||
column-count: 3;"> | |||
# [[#Top Bar|Top Bar]] | |||
# [[#Map Editor Tool Bar|Toolbar]] | |||
# [[#Left Pane|Left Pane]] | |||
# [[#Map Display Area|Map display area]] | |||
# [[#Bottom Bar|Bottom Bar]]</div> | |||
[[File: | [[File:wme whole window blank.jpg|700px]] | ||
===Top Bar=== | |||
* The very top-right corner of the window has two important drop-down menus: | |||
** Language: The language you want the editor interface to display | |||
** Where in the World: Select whether you are editing in Israel, US & Canada, or the rest of the World | |||
===Map Editor Tool Bar=== | |||
[[File:wme_top_toolbar.jpg|700px]] | |||
At the top of the Waze Map Editor you will see the main tool bar. It includes the primary control buttons for the editor. | |||
====Search box==== | |||
[[File:wme31 757 mohawk columbus oh search results.jpg|left|300px]] | |||
In the wide search box, you can enter an address, city, state, country, landmark, point of interest, or a combination of those. After hitting Enter or clicking the Find button, you will either be taken to the only result, or be given a list of matches from which to select. | |||
For example, entering "757 Mohawk St, Columbus, OH" will center the map and drop a search marker directly on that address. | |||
{{clear}} | |||
[[File:wme31 main st newyork search results.jpg|right]] | |||
However, searching for "main st, new york" is less specific and will therefore give you a list of matches from which to select. | |||
{{clear}} | |||
====Draw places menu==== | |||
{{anchor|Draw Menu}} | |||
[[File:DrawPlace.jpg|left]] Hover over this button to show place categories. Hover over the place category you want, then choose the point [[File:Point.png]] or area [[File:Area.png]] button to add the place. Use the [[##Left_Pane_when_a_Place_is_selected|left pane]] to change information about the place. For an area place, use [[#Geometry|geometry]] nodes of the place to change its shape. For an area place, set the [[Places#Area_placement|stop point]] using the [[File:wme_place_stop_point.png]]. | |||
====Draw segments menu==== | |||
[[File:DrawRoads.jpg|left]] [[Shortcut keys]]: {{key press|<code>I</code>}} or {{key press|O}} | |||
Hover over this button to choose between a single segment and a roundabout. | |||
* {{key press|<code>I</code>}} (a straight segment)- [[Map_Editing_Quick-start_Guide#Create_a_Road|Road]]. Click on the map to start, click to add a geometry node. Double click to end. | |||
* {{key press|O}} (a circle)- [[Map_Editing_Quick-start_Guide#Create_a_roundabout|Roundabout]]. Click on the map at the center of the roundabout. Drag a circle of the correct size. Click to end the roundabout. | |||
* Camera<!--related: Cameras#From_The_Map_Editor --> - Click on the map where the camera is to be located. See [[#(Speed)_Cameras|Speed Cameras]] for editing instructions. | |||
See the [[Map_Editing_Quick-start_Guide|Editing Manual Quick Start Guide]] for more information. | |||
====Save Button==== | |||
[[File:wme_button_save.png|left]] [[File:wme_button_save_pending_red.png]] Shortcut key: {{key press|Ctrl|S}} | |||
{{clear}} | |||
The Save button serves two purposes: 1) it displays the current number of changes pending to be saved, and 2) when clicked, it saves all the current changes you have made. | |||
As you make changes, the counter in the Save button increases. The number in the icon is shown to red as a warning that many unsaved changes may be difficult to save if there is a single error among the changes. (This counter is the number of changes you've made which can be undone, NOT the number of edits you get credit for.) | |||
When the button is clicked (or the shortcut key used), the editor saves all of the current changes you have made. This process is a little more complex than this sounds, but that is what it does. In order to save properly, your browser receives messages back from the Waze server in the event of any errors. If there is an error when saving, the editor will try to give you a detailed error message and a suggestion to fix it. The map view will typically try to show the error area highlighted in a bright circle. | |||
''Once the save operation completes successfully, you cannot Undo previous changes with the Undo button.'' | |||
====Undo Button==== | |||
[[File:wme_button_undo.png|left]] Shortcut key: {{key press|Ctrl|Z}} | |||
{{clear}} | |||
The Undo button will undo '''unsaved''' successive previous changes with each click. | |||
{{mbox|type=important|text=IMPORTANT: Once the Save button is clicked and the save operation is complete, the Undo button has no affect on previous changes.}} | |||
A change can be deleting a geometry node from a segment or renaming a landmark. It can also be a change to multiple objects at once. For example, if you select 25 street segments at once and change them from one-way to 2-way, that is a single change. Therefore, one click on Undo will undo that change for all 25 segments. | |||
{{clear}} | |||
====Redo Button==== | |||
[[File:wme_button_redo.png|left]] Shortcut key: {{key press|Ctrl|Shift|Z}} | |||
{{clear}} | |||
The Redo button will re-apply any changes which have been recently undone with the Undo button. | |||
{{clear}} | |||
====Delete button==== | |||
[[File:wme_button_delete.png|left]] Shortcut key: '''Delete {{key press|Del}}''' | |||
{{clear}} | |||
The Delete (trashcan) button will delete, or trash, any currently selected objects. If you have multiple objects selected, you will be prompted to confirm the multiple deletion. The only object you can currently multi-select is segments. | |||
Objects are not actually deleted until the Save button is clicked. Once the save button is pressed, you cannot Undo any edits or deletes. | |||
{{clear}} | |||
==== Layers ==== | |||
[[File:wme_layers_expanded.png|right|border]][[File:layers.png]] Hover or click to show the layers available for display on the main map. When the box next to the layer name is checked, then that layer is active and being displayed. There is a default [[Keyboard shortcuts|shortcut key]] defined for each layer, and to make it easy to remember, with two exceptions: The shortcut is {{key press|shift|{{color|X|lightgray}}}} (first letter of the layer name). The two exceptions are the satellite/aerial imagery, which uses the letter {{key press|<code>I</code>}} as the shortcut key for '''I'''magery, and Places which uses the letter {{key press|L}} because it was previously called '''L'''andmarks. | |||
{{clear}} | {{clear}} | ||
[[File: | ===== Refresh or Reload Layers ===== | ||
[[File:Reload-layers.png|border]] The small curved arrow at the top right of the Layers list will reload all layers (excluding Satellite Imagery, Cities, and GPS layers) in the current view without reloading the whole page. This is a great way to see changes recently made by another editor in the area without losing the Chat history. | |||
===== Reorder ===== | |||
[[File:Reorder-Layers.png|left|border]]The six small dots to the left of a layer selector box is a drag handle which enables those layers to be reordered changing the visibility of one layer above another. Only a few layers can be reordered. PLEASE NOTE: The layer order is reversed so layers at the bottom of the list appear above layers higher up in the list. Therefore Satellite Imagery will always appear below all other layers. | |||
{{clear}} | {{clear}} | ||
== | ===== Satellite Imagery ===== | ||
[[File:Aerial_skinny.png|260px]] Shortcut key: {{key press|Shift|<code>I</code>}} | |||
Waze uses aerial and satellite photography provided by Google. | |||
{{clear}} | |||
===== Cities ===== | |||
[[File:cities_skinny.png|260px]] Shortcut key: {{key press|shift|C}} | |||
City boundaries as defined by segments assigned to that city are shown in different colors. This layer is helpful in finding segments which are set to the wrong city. Until an area is heavily edited an updated, some city boundaries are likely to be overlapping or appear to be unassociated with any segments. | |||
Changing the name of the city for a road is done through the WME interface documented in [[Map Editor Interface and Controls#Segment Edit Detail|segment edit detail]]. If after fixing the city names you still have incorrect city boundaries, review the article on [[Smudged city#Updating the city layer|Updating the city layer]]. | |||
{{clear}} | {{clear}} | ||
=== | ===== Roads ===== | ||
[[File: | [[File:Road_segments_skinny.png|260px]] Shortcut key: {{key press|Shift|R}} | ||
Roads are all of the streets, alleys, highways, and freeways which make up the drivable street system in Waze. Depending on the [[#Zoom Control|zoom level]], some street types are not displayed so that the map is not too cluttered. | |||
{{clear}} | |||
===== GPS points ===== | |||
[[File:Gps_tracks_straight_skinny.png|260px]] Shortcut key: {{key press|Shift|G}} | |||
This layer will show tracks from Waze users as they drive with Waze running. Waze records and plots the GPS coordinate of drivers. This layer is useful for relatively accurate placement of new or moved roads when aerial photography is not yet updated. GPS points appear in the map editor as colored arrows. The direction of travel for a GPS point determine its color, so that all drivers going the same direction will show their points in the same color. This makes it easier to determine errant GPS points, or where a road on the map doesn't follow the actual path of vehicles. | |||
{{clear}} | |||
===== Area Managers ===== | |||
[[File:Wme3 area managers layer skinny.png|260px]] Shortcut key: {{key press|Shift|A}} | |||
The Area Managers layer shows overlapping colored, named rectangles. These areas represent the areas those users have Area Manager permissions. This layer allows you to identify a user you may wish to send a PM in the forums about a specific issue you noticed in their area, but do not have rights to fix. | |||
{{clear}} | {{clear}} | ||
===== Places ===== | |||
[[File:Places_skinny.jpg|260px]] Shortcut key: {{key press|Shift|L}} | |||
[[Places]] are also known as POIs (Points of Interest). These can really be just about anything, but tend to be things like parks, gas stations, cemeteries, transit stations, etc. There are two types of Places: Area and Point. Point Places are for most small business, shops, etc. Area Places are for large stores, malls, parks, etc. | |||
See [[Places]] for more information on this topic. | |||
{{clear}} | {{clear}} | ||
=== | ===== (Speed) Cameras ===== | ||
[[File: | [[File:camera2false.png]] [[File:camera2true.png]] [[File:camera4false.png]] [[File:camera4true.png]] Shortcut key: {{key press|Shift|S}} | ||
Speed cameras, red-light cameras and dummy cameras are shown on this layer. Drivers report camera location and type, and a map editor is required to confirm the existence of the camera, precise location and direction the camera is point before it will appear on the client. Confirmed cameras will pop up a visual and audible alert in the Waze app when approaching a speed or red light camera. | |||
See [[Cameras]] for more information. | |||
{{clear}} | |||
===== Map Problems ===== | |||
[[File:Problem_pin_open-low.png|left]][[File:Problem_pin_open-med.png]] [[File:Problem_pin_open-high.png]] [[File:Problem_pin_not-identified.png]] Shortcut key: '''no default''' | |||
{{clear}} | |||
The Waze servers are constantly analyzing driver's GPS tracks to determine when there might be a problem with the map and uses the Problems layer to alert the editors. Some types of problems tracked are missing roads, incorrect turns allowed at intersection, wrong direction of road. | |||
You can toggle visibility of closed Map Problems by using the "Show/Hide closed" link next to the Map Problems text. | |||
See [[Map Problems in Waze Map Editor|Map problems]] for more information. | |||
{{clear}} | |||
===== Update Requests ===== | |||
[[File:Request_pin_open-low.png|left]][[File:Request_pin_open_conversation-med.png]] [[File:Request_pin_open-high.png]][[File:Request_pin_solved_conversation.png]] Shortcut key: {{key press|Shift|U}} | |||
{{clear}} | |||
These are user-submitted map issues while on the road or from LiveMap. This marker shows the location the user reported the issue from. The user's driven route for a distance before and after the reported location will be shown in bright green. If Waze was in navigation mode at the time of the report, the requested route for a distance before and after the reported location will be shown in purple, with markers along the route with the turn direction given to the user. | |||
You can toggle visibility of closed Update Requests by using the "Show/Hide closed" link next to the Update Requests text. | |||
See [[Update Requests in Waze Map Editor|Update requests]] for more information. | |||
{{clear}} | |||
===== Place updates ===== | |||
<div style="float:left;">[[File:wme_placemarker_new.png]] [[File:wme_placemarker_new_photo.png]] [[File:wme_placemarker_updated_details.png]] [[File:wme_placemarker_flagged.png]] | |||
<br/>[[File:PalePinkBalloon.png]][[File:PalePurpleBalloon.png]][[File:PurpleBalloon.png]][[File:GreenBalloon.png]]</div> | |||
Shortcut key: {{key press|Shift|P}} | |||
The Place Updates layer shows Place Update Requests (PURs) submitted by drivers and beginning editors. When an untrusted driver or editor creates a new place or makes changes to an existing place, a Place Update Request is created. Editors of rank 2 or higher decide whether to accept each request. The most recent requests are a pale pink. Older requests are darker. Accepted but not-yet-saved requests are green. | |||
See [[Places#Place Updates (Moderation)|Place Updates (Moderation)]] for more detail. | |||
{{clear}} | |||
===== Editable areas ===== | |||
[[File:Editable_area_skinny.png|260px]] Shortcut key: {{key press|Shift|E}} | |||
{{clear}} | |||
Where you can edit is determined primarily by where you have driven. [[Editing rank|Edit rights]] are initially granted within a [[Editing_rank#Rank_comparisons|one-mile radius]] of where you have driven with Waze running. Your editable area is shown in lighter-colored areas surrounded by a black border. Users who are Area Managers will also see their managed areas in a colored highlighted area. | |||
See [[Waze Map Editor#Editable Area|Editable area]] for more information. | |||
{{clear}} | |||
== | ===== Live Users ===== | ||
{| | [[File:wme_live_wazer.png|left]] Shortcut key: {{key press|Shift|V}} | ||
< | {{clear}} | ||
The Live Users layer will display other map editors with the icon above. Editors' locations are shown in real-time. | |||
-- | {{clear}} | ||
=====Road Closures===== | |||
<div style="float:left; margin-right: 1ex; margin-bottom: 1ex;">[[File:Closure.PNG]] [[File:Closure_Gray_TwoWay.png ]]</div>The Road Closures layer displays a closure symbol and direction when a closure has been placed, using either a WME Closure or the client's Report > Closure feature. A red circle indicates a currently active closure. A gray circle indicates either a scheduled, but not currently active, WME closure or an app-submitted closure. Black arrows show the closure direction(s). | |||
===Left Pane=== | |||
At the left side of the window, below your username, is an area which is both informational and functional. Depending on whether an object is selected, the type of object and how many, different tabs will be available which allow you to view and edit details. | |||
====Left Pane with No object selected -- tabs==== | |||
{| style="float:right" | |||
| [[File:wme31 hey username.jpg|left]] | |||
|- | |- | ||
| | | [[File:WME_Tabs.png|left]] | ||
|} | |||
| | When no objects are selected on the map, the Tabs Area displays user information. The top section greets you by name and is always visible regardless of what is showing or displayed on the map. Map Problems and Update Requests are not considered map objects, so the tabs below your name will display when a Map Problem or Update Request is selected. | ||
=====Me Tab===== | |||
[[File:Wazer-with-premission.png]][[File:permission_levels.png]] | |||
The '''Me''' tab displays your [[Your Rank and Points|map editing permission level and current points]] for the [[Banks of Servers|server]] on which you are editing (North America or World). | |||
A Wazer with a hard hat displays if you have editing permissions. To the right of that icon will be a highlighted cone with a number. This number is your [[Your_Rank_and_Points#Map_editing_rank|editing rank]]. Below those graphics is a sentence about your editing rank and permissions. | |||
Below this information is a graphic inviting you to view the introductory editing videos provided by the Waze team. | |||
=====Drives Tab===== | |||
[[File:DrivesTab2.png|right|border|255px]] | |||
<!-- Copied from FAQ; consider creating a transcludable subpage for both locations -->Drives are journeys or routes that you have driven with the Waze client running. While you drive, Waze monitors your journey (recording details like location, time, speed) and transfers this information to the [[Servers]]. This data is used to validate the existing map (roads, turns, directions) and to learn average journey times. Other Waze users and [[Area Manager]]s can also view the anonymous GPS tracks of many users when editing the map in the [[Waze Map Editor]]. This helps with map accuracy. | |||
[[File:DriveRoute.png|left|border|220px]] | |||
Clicking on one of the five visible entries will center the map along that route and will zoom out to try and fit your entire route on the screen. Routes over about 20 miles / 30 kilometers will usually not fit on the map display all at once due to scale limitations. Use the mouse or arrow keys to pan around on the map. Parts of the route that display in red are not currently paved roads. Consider [[Map_Editor_Interface_and_Controls#Zoom_Control|zooming]] into that area to determine if a road should be added. | |||
Select the highlighted numbers at the bottom of the tab window to select older routes in date order. | |||
<!-- Copied from FAQ; consider creating a transcludable subpage for both locations -->Drives are typically processed and available for viewing in the Waze Map Editor within an hour of completing the drive. For most short drives such as commutes between home and work (under about 35 miles / 50 kilometers), you will likely find them in the editor in under 15 minutes. If the servers are bogged down, or if your drive is significantly longer (over 100 miles / 150 kilometers), these drives may take up to a week to appear. If you don't see your drive after seven (7) days, open a ticket from the [[Support]] page, Quick Help box. Use the Email link and fill out the form and submit. | |||
{{clear}} | {{clear}} | ||
== | =====Areas Tab===== | ||
This shows the entire [[editable area]] -- the area in which you can perform edits. Click on your editable area. The view will be centered on the editable area. If your editable area is spread out, in several sections, it may be centered between areas you can edit. | |||
=====Settings Tab===== | |||
[[File:Just tabs settings.png|thumbnail|329px]]<small>This feature was added {{As of|January 2015|lc=y}}</small><br/> | |||
To access user-preference settings in WME, click the "Settings" tab in the left pane. Options include: | |||
* '''Draw new roads as two-way''' - determines whether any new road segments you draw start as two-way or one-way | |||
* '''Draw new roads with all turns allowed''' - when new roads are drawn with a connection to a junction, the junction can have all "turns" to or from the new segment allowed or disallowed | |||
*'''Select only on empty selection''' - affects editor behavior when you select an object (road segment, junction, or place) when there is already an object(s) selected | |||
** If not checked, then clicking on an object will automatically deselect any other objects already selected. This may cause accidental deselection | |||
** If checked, you are prevented from selecting a new object if there anything is already selected. Note that multi-select mode allows you to select additional segments when segment(s) are already selected; use the {{key press|ctrl}} key for momentary multi-select, or press the {{key press|M}} keyboard shortcut to toggle multi-select mode on/off. Also note that clicking an empty spot can still cause deselection. | |||
*'''Enable fullscreen mode''' - when checked, more screen space is given to the map (removes the menu header from the top of the page). Keyboard shortcut {{key press|Shift|F}} toggles this setting. | |||
*'''Units''' - Choose between Imperial (feet/miles) or Metric (meters/kilometers) | |||
====Left Pane with segment(s) selected==== | |||
{{Anchor|Segment_Edit_Detail}} | |||
<imagemap>Image:LeftSidePane.png|right| | |||
rect 119 15 216 30 [[User:Nzahn1/Map_Editor_Interface_and_Controls#Select_Entire_Street|Select street link]] | |||
rect 13 695 185 715 [[User:Nzahn1/Map_Editor_Interface_and_Controls#Select_Entire_Street|Multi st listing]] | |||
rect 9 66 250 135 [[User:Nzahn1/Map_Editor_Interface_and_Controls#Address_Box|Address box]] | |||
rect 4 308 291 346 [[Restrictions]] | |||
rect 11 148 93 189 [[https://wiki.waze.com/wiki/User:Nzahn1/Map_Editor_Interface_and_Controls#General_Tab|General tab]] | |||
rect 87 147 168 190 [[https://wiki.waze.com/wiki/User:Nzahn1/Map_Editor_Interface_and_Controls#Closure_Tab|Closure tab]] | |||
#<!-- Created by Online Image Map Editor (http://www.maschek.hu/imagemap/index) --> | |||
</imagemap>The area above the tabs will show how many segments are selected, and a link to "Select Entire Street". The example graphic to the right shows what the Tabs Area looks like when multiple segments are selected. | |||
=====Select Entire Street===== | |||
When you click the link "Select Entire Street," or use the keyboard shortcut {{key press|Ctrl|A}} the editor will select all segments connected to the current segment with the same primary name, city, state, and country information. It will also select some segments outside the current visible area. The "Select Entire Street" link and the multiple segment ID numbers are highlighted in yellow in the image to the right. | |||
{{Clear}} | |||
=====Address Box===== | |||
When you click on the Pencil button, or tap shortcut key {{key press|E}}, the address box displays more detail information and allows you to make changes to the country, state (US only), city and segment name. Next is where you can add or remove any alternate street name information. An alternate name, technically referred to as a "linked street," can be used for address searches, while primary name is used in navigation instructions. | |||
Be sure to review the [[Road names/USA|naming convention used in your area]] before changing names. | |||
If you run into an extreme case where you need to rename the city name on a large number of streets. Review the article [[Smudged city]]. The end of the article includes a link to a special form for converting a mass number of segments using the help of Waze staff in the database. | |||
=====General Tab===== | |||
On this tab, you can modify the road type, direction, speed limits, elevation, lock, and special properties "toll road" and "tunnel". Further down past a separator line are more general details about the segment(s) which is/are selected. | |||
Details on these tab settings can be found under [[Creating and editing road segments#Road Properties|Road Properties]] | |||
======Add Restrictions====== | |||
When you click the button titled '''Add restrictions''', or use the keyboard shortcut {{key press|T}}, WME enters the [[Scheduled Restrictions]] editing interface | |||
* | <u>TAKE NOTICE:</u> | ||
*The '''Add restrictions''' button appears when there is one or more segments selected. | |||
*If there are restrictions which already exist on any selected segment, the button name changes to '''Edit restrictions'''. | |||
{{clear}} | |||
======Edit House Numbers====== | |||
When you click the button titled '''Edit House Numbers''', or use the keyboard shortcut {{key press|H}}, WME enters the [[House Numbers in WME|House Number editing interface]]. | |||
<u>TAKE NOTICE:</u> | |||
*The '''Edit House Numbers''' button appears when there is only one segment selected. | |||
*The '''Edit House Numbers''' button isn't available to click when there are changes which need to be saved. The message, "Save your changes to edit house numbers" appears below the button. | |||
=====Closure Tab===== | |||
On this tab, senior editors can enable closures in real time. For more information, read the [[Closures#WME_closure_feature|WME Closure Feature]] page. | |||
== | ====Left Pane when a Camera is selected==== | ||
[[File:wme_camera_tab_speedcam.png|right]] When a camera is selected, there is a single '''General''' tab which allows you to set the alert speed for a Speed Camera, and also to approve the camera once it is placed in the correct location. Red Light Cameras only need to be placed and approved and have no speed set. | |||
{{clear}} | |||
====Left Pane when a Place is selected==== | |||
{| border="0" cellpadding="2" style="background:none;" | |||
|- style="vertical-align:top;" | |||
| With a Place selected, there are three tabs: General, More Info and Photos. Under the '''General''' tab, you set the Place category(ies), give it a name, a description, and a checkbox to lock the place to prevent changes by lower ranking editors, whether it is a Private or Public Place, the full address details, and open hours. | |||
| | |||
| Below that is an address details section which displays the Place's assigned Country, State (in the US) and City. ''Click'' the '''Edit''' button to change any values and ''click'' '''Apply''' when complete: | |||
|- style="vertical-align:top;" | |||
| [[File:wme_landmark_tab.png]] | |||
| | |||
| [[File:wme_landmark_address_details.png]] | |||
Setting the proper address details will allow Waze to utilize their own internal search for landmarks which appear only in Waze and not in other search provider results. | |||
|} | |||
{{clear}} | |||
== | ====Left Pane when a Gas Station is selected==== | ||
[[File:wme_place_gas_station_details.png|right]] | |||
When a gas or petrol station Place is selected, the '''General''' tab is very similar to that of all Places. When '''Gas Station''' is set as the primary Category (first), then there is an additional drop-down menu to select the Brand of gas sold at this station. | |||
For the Waze application to be as useful as possible to drivers, it is important to ensure all fields of information are fully and properly completed.{{clear}} | |||
===Map Display Area=== | |||
All the layers currently selected for display show up in the map display area. The map display areas takes up the majority of the browser window. Any object displayed is selectable and editable, depending on your editing rights in the area you are viewing. Select a street and change its geometry. Select a landmark and change its name. Add a road where one should be, or delete a road which should no longer appear. | |||
There are six main component controls or displays in the corners of the map display area: | |||
<div style="-webkit-column-count: 3; /* Chrome, Safari, Opera */ | |||
-moz-column-count: 3; /* Firefox */ | |||
column-count: 3;"> | |||
# Info Bar | |||
# Zoom Control | |||
# Street View Activator | |||
# Chat Window | |||
</div>{{clear}} | |||
== | [[File:Wme control elements highlighted.jpg|center|700px]]{{clear}} | ||
====Chat window==== | |||
[[File: | <div style="float: right; margin-left:3ex;"><div align="center">[[File:WME_Chat_minimized_visible_no_new.JPG|50px]] [[File:WME_Chat_minimized_invisible_no_new.JPG|50px]]</div><br/> | ||
[[File:Visible-Menu.png|350px]]</div> | |||
;Top bar | |||
The top bar tells which chat room you are connected to, and allows you to choose whether you will be visible or invisible in the map display area and the editor list. | |||
;Editor list | |||
All visible editors in this chat room are listed with their editor rank. Click the editors' username to jump to the editor's location. | |||
;Message box | |||
When you are visible, type your message in the message box to participate in chat. | |||
{{Details|Waze Map Editor/Chat}} | |||
{{clear}} | |||
====Info bar==== | |||
[[File:wme info bar.jpg|700px]] | |||
Just below the main toolbar, there wide area which runs the width of the map display area. | |||
* The left side will display the current city and state (US) or city and country (world). | |||
* The right side displays whether the editor is still loading any layers, such as road images or GPS points. | |||
{{clear}} | {{clear}} | ||
== | ====Zoom Control==== | ||
[[File:Zoom_controller.png|left]] Shortcut key: {{key press|Shift|up}}, {{key press|Shift|down}} | |||
In the upper left corner, the zoom control is one way to adjust the zoom level, or altitude, or the map display area. Clicking + will move in closer, showing more detail. Clicking - zooms out/higher and removes detail. You can also click and drag the selector in between the + and - buttons. | |||
The other methods for controlling the current zoom level is covered below in the section on [[#Moving around the map|Moving around the map]]. | |||
{{clear}} | |||
====Street View==== | |||
[[File:Wme sv lens blue.gif]] | |||
<u>To Activate Street View</u>, drag the blue lens icon from under the zoom control to the point where you want to see the street view. | |||
As you drag the lens around the map, it will change colors to indicate the presence of street view images: | |||
*[[File:waze_sv_noview.gif]] Street View is NOT available here | |||
*[[File:waze_sv_viewavail.gif]] Street View is available here | |||
[[File:Wme streetview directional arrow.gif|right]]Drop the lens. The map display shrinks by half to make room for the street view pane on the right. The lens has an arrow to show which way street view is pointing. | |||
To spin and and zoom the image, use the pan and zoom controls in the Street view pane, or drag the pane around with the mouse and use the scroll wheel to zoom. To change the street view position, use the arrows on the street in street view, or drag the lens by its small white handle. | |||
All editing operations are still available in the map display pane, but the space for editing is smaller. If you use the house number editor, it will cover some of the street view controls; use mouse and keyboard shortcuts. | |||
[[File:Wme streetview ur convo.jpg|700px]] | |||
<u>To Close Street View</u>, ''click'' the '''X''' at the top left-hand corner of the Street View pane, or press {{key press|shift|W}}. | |||
=== | ====Show my location==== | ||
[[File:Show my location.png|left]]. Zooms to the editor's approximate physical location.{{clear}} | |||
===Bottom Bar=== | |||
[[file:Bottom_bar.PNG]] | |||
====Wiki link==== | |||
Opens a new tab to the wiki map editing pages. | |||
====Forum link==== | |||
Opens a new tab to the Waze map editor forum | |||
== | ====Status link==== | ||
Opens a new tab to the status blog -- showing latest tile updates and any other status messages the Waze team might choose to post. | |||
====Keyboard shortcuts==== | |||
Opens a "pop-up" showing all the [[keyboard shortcuts|keyboard shortcuts that can be typed into the browser window]]. | |||
| | ====Scale==== | ||
| | <div style="float: right;">{{/ZoomLevel}}</div>[[File:scale_display.png]]In the lower right corner is a small graphic showing the current scale of the map display area. | ||
| | |||
| | The values in the scale relate to the [[zoom|zoom level]] you see in the URL address of the web browser. Changing the zoom level alters the displayed scale. | ||
| | {{clear}} | ||
| | |||
| | ====Lat/Lon==== | ||
| | [[File:lat-lon_display.png]] | ||
In the lower-right corner is a control showing the latitude and longitude of the mouse pointer as it moves over the map. | |||
====Permalink==== | |||
[[File:wme_permalink_icon.png]] In the lower right corner is a chain icon. | |||
{{:Waze Map Editor/Permalink/Core}} | |||
| | {{clear}} | ||
| | |||
| | ==Working with the map== | ||
===Panning and Zooming=== | |||
* The keyboard shortcut {{key press|shift|F}} will hide the Waze top banner bar and put the editor into "Fullscreen Mode" | |||
*There are two ways to pan the map (move around the map) | |||
*# Click and drag -- click on an empty point in the map, hold down the mouse button, and drag the map in any direction. | |||
*# Keyboard arrow keys -- {{key press|Up}}{{key press|Down}}{{key press|left}}{{key press|Right}} | |||
* There are several ways to zoom the map: | |||
*# {{key press|shift|Up}} and {{key press|shift|down}} | |||
*# The [[#Zoom Control|zoom control]] in the map. | |||
*# Double-clicking any point on the map to zoom in one level and center the map on that point. | |||
*# Using the mouse wheel "scroll up" to zoom in and "scroll down" to zoom out. | |||
*# On Macintosh with a track pad, drag left or right. | |||
*# Hold the {{key press|Shift}} key down and then click and drag a rectangle on the map to zoom in to the rectangle | |||
[[File:wme shift-zoom.jpg|700px|center]] | |||
==Working with objects== | |||
Objects are any of the things on the map that can be selected. They include point places, junctions, segments, area places, update requests, map problems, and place update requests. | |||
===Selecting objects=== | |||
====Selecting single objects==== | |||
A single click on any object will select it . | |||
*Selected segments, junctions, and places are highlighted in blue. Information about these objects appears in the Left Pane. | |||
*Selected segments will show A and B labels on their '''junction nodes''' | |||
*Selected Update Requests or Map Problems remain 100% opaque! while all other objects of the same type become partly transparent. | |||
*Selected Update Requests, Map Requests, and Place Update requests display information in a dialog box. | |||
====Selecting multiple segments==== | |||
Several road segments may be selected at once in order to change the properties of several segments at one time. There are several ways to select multiple segments.<br> | |||
* One way is to select the first segment, then use {{key press|ctrl|click}} (MAC users:{{Key press|command|click}}) to select additional segments. | |||
* A second way is to use multi-select mode. Use the [[Keyboard shortcuts|shortcut key]] {{Key press|m}} to enter multi-select mode. {{Key press|Click}} each segment to add or subtract it from the current segment grouping. To exit multi-select mode, press {{Key press|m}} again. | |||
* To select all segments between two other segments, first select a segment, then use {{key press|alt|click}} (Linux users:{{Key press|ctrl|alt|click}}) to select a second segment. The editor will add to the selection group the segments in-between the first and second segments, based mostly on the street name, but also on simple straight lines. | |||
* To select all segments within a box use {{key press|ctrl|shift|click}} (MAC users:{{Key press|command|shift|click}}) and then drag the cursor while holding the mouse button to form a box. When the mouse button is released, all the segments in the box are selected. | |||
* Segments having the same naming properties can be selected using the "Select entire street" function. See the description in the [[Map_Editor_Interface_and_Controls#Left_Pane_with_segment.28s.29_selected|Left Pane with segment(s) selected]] section for more information. | |||
===Geometry=== | |||
Segments and area places have '''geometry''', which means '''shape'''. You change the geometry by adding, deleting, or moving '''geometry nodes'''. | |||
* to create a new geometry node, select the object. Hover the mouse pointer over the object to show the geometry nodes in white. Between the nodes, there will be a smaller point where a new geometry node can be created. Click and drag this point to create a geometry node. | |||
* to delete a geometry node, select the object. Hover the mouse pointer over the object to display the geometry nodes. Press and hold {{key press|d}} and hover over the geometry node to be deleted. | |||
===Moving objects=== | |||
;point place | |||
:[[#Selecting single objects|select]] the point place, then click and drag to the new position and save.There is a limit on how far a place may be moved before saving. To move a place farther, make several short moves. | |||
;area place (entire area) | |||
:select the area. Click and drag the area place move handle to move the area without changing its shape. | |||
;segment nodes (end or geometry) | |||
:select the segment. Hover the pointer over the segment to display the geometry node. Click and drag either end node or any of the geometry nodes to move the ends or change the shape. | |||
;area place geometry node | |||
:select the area. Hover over the area to display the geometry nodes. Click and drag a geometry node to change the shape of the area. | |||
;junction node | |||
:select just the junction where two or more segments are connected. Click and drag the junction node. Any segment junction nodes connected to the junction will remain connected to the junction. This will change the shape of the segments. | |||
;junction node and some connected segments | |||
:multi-select several segments that connect to the same junction node. Click and drag the junction node. Only the selected segments will be dragged with the junction node. Any unselected segments will be disconnected from the node. | |||
===Joining segments=== | |||
When just two segments meet at one junction node, they can be joined into one segment. But only if they have identical information in the left pane. The resulting segment will have a new segment ID. There are three ways to do this: | |||
* [[File:wme_button_delete.png|20px]] Select the junction node only and use the trash can icon. | |||
* [[Image:Bridge_idle.png|20px]] Select the two segments and [[#Bridge_creator|bridge]] them. This will raise the elevation by 1. | |||
===Junction Arrows=== | |||
{{Anchor|Turn restrictions}}Select a segment to see all the turns leading '''out of ''' that segment, including u-turns. | |||
* [[File:Arrow Green-2.png|20px]] [[File:Wme u-turn allowed.png]] Green arrows are for allowed turns. [[File:Arrow Red-2.png|20px]] [[File:Wme u-turn restricted.png]] Red arrows (with "-" sign) are for forbidden turns. Click on the arrow to switch it from allowed to forbidden. | |||
* [[File:Arrow Red-2-question2.png|20px]]Unconfirmed or "soft" turns also have a small question mark. Click the arrow to confirm the turn. | |||
* [[File:Wme u-turn allowed hover clock.png]] Hover over the arrow to see a clock. Click on the clock to edit time based turn restrictions | |||
* [[File:Restriction arrow yellow mouseover.gif|20px]] [[File:Wme u-turn scheduled.png]]A yellow arrow means a time based turn restriction has already been applied. | |||
===Additional map controls=== | |||
;[[Image:Node_idle.png]] {{anchor|Junction_creator}}junction creator -- creates a junction where segments merely cross | |||
:Where two segments cross each other one time at the same elevation, but are not connected to each other, select the two segments at the same time. The junction creator icon will appear. Click this icon to create a junction. The two segments will be cut into four segments, all connected to the new junction. | |||
;[[Image:Bridge_idle.png]] {{anchor|Bridge_creator}}bridge creator -- creates a "bridge" from a four-way intersection. | |||
:At any junction, select two segments with identical information. The bridge creator icon will appear. Clicking the icon will join the two selected segments into a single segment, and increase the elevation of the new segment to one more than the max elevation of the two segments which were joined. If you apply the bridge creator to a 4-segment junction, it will also join the two unselected segments, if possible. | |||
==Permission== | |||
There are several types of permission. For a more detailed discussion, please see [[editing permissions]]. | |||
;Editing area permission | |||
:You can only edit objects within your editing area -- this includes segments, junctions, places. This also includes closing map problems and Update Requests. Your Editing area includes the area you gain by driving as well as any managed areas you have been granted as an area manager or map raid participant. | |||
;Lock level permission | |||
:Segments and places can be locked. You can only edit these objects if they have a lock level less than or equal to your editor rank. You can only set turn arrows is both segments involved have a lock level less than or equal to your editor rank. Even if a junction has a segment connected to it locked above your editing rank, you can add or remove any segment you can edit at that junction. You can set the lock level anywhere between 1 and your editor rank on any segment or place you can edit. | |||
;Staff place locks | |||
:Sometimes, Waze staff lock places, often in preparation for an ad campaign. The effect is as if the place is locked above the rank of all other wazers, but the lock is not visible in the Waze map editor. | |||
;Trusted place editor status | |||
:Rank 1 editors need approval from a rank 2 or higher editor even on all places, even if they are locked at level 1. After 10 place approvals, they become trusted editors and their places no longer need approvals. Rank 2 and higher editors never need approval for edits to places locked at or below their rank. | |||
;Closures permission | |||
:Editors receive permission to add and edit Real Time Closures in two ways. | |||
:# '''Rank''' -- upon achieving minimum RTC rank (5 in most countries), editors can add and edit Real Time Closures on any segment within their editable areas, on any segment that is not locked above their rank. | |||
:# '''RTC areas'''{{anchor|RTC area}} -- In addition, editors may be granted RTC areas. Within these areas, editors can add and edit Real Time Closures on any segments, no matter the lock level. | |||
;Closure locking | |||
{{ | :A segment that has a closure cannot be edited until the closure has been removed from the segment. So if a segment has lock level of 1, but a current closure, then it will require an editor with Real Time Closure permission for that segment to alter the closure so that a change can be made to the segment. In most countries, only rank 5 and higher editors can edit closures. | ||
{{ReturnTo | Editing manual | the editing manual}} | |||
[[Category:Waze Map Editor]] | [[Category:Waze Map Editor]] | ||
[[Category:Convert to Subpages]] | |||
[[Category:WME Interface]] | [[Category:WME Interface]] | ||
Revision as of 23:40, 24 August 2016

| New editors, please first visit our WME Welcome page. |
This is a comprehensive reference guide to the waze map editing interface. Best Practices and tutorials for beginners are available in other articles. Waze Map Editor was introduced in September 19, 2011 to replace the Cartouche map editor, and has been continuously modified since. The Waze Map Editor is officially supported only on the Chrome browser. It may or may not work on other browsers.
Starting the Editor
Begin at http://www.waze.com/editor. Choose the correct part of the world from the top bar.

Either log in or choose practice Mode.
Practice Mode
From the splash screen, click "practice mode". You can try out most of the features of the Waze Map Editor. WME chat will not be available. You cannot respond to map Update Requests. The edit count will not go up, and you will not be able to save.
Map Editor Layout
There are five main areas of the Map Editor:
![]()
Top Bar
- The very top-right corner of the window has two important drop-down menus:
- Language: The language you want the editor interface to display
- Where in the World: Select whether you are editing in Israel, US & Canada, or the rest of the World
Map Editor Tool Bar

At the top of the Waze Map Editor you will see the main tool bar. It includes the primary control buttons for the editor.
Search box

In the wide search box, you can enter an address, city, state, country, landmark, point of interest, or a combination of those. After hitting Enter or clicking the Find button, you will either be taken to the only result, or be given a list of matches from which to select.
For example, entering "757 Mohawk St, Columbus, OH" will center the map and drop a search marker directly on that address.

However, searching for "main st, new york" is less specific and will therefore give you a list of matches from which to select.

Hover over this button to show place categories. Hover over the place category you want, then choose the point ![]() or area
or area ![]() button to add the place. Use the left pane to change information about the place. For an area place, use geometry nodes of the place to change its shape. For an area place, set the stop point using the
button to add the place. Use the left pane to change information about the place. For an area place, use geometry nodes of the place to change its shape. For an area place, set the stop point using the ![]() .
.

Shortcut keys: I or O
Hover over this button to choose between a single segment and a roundabout.
I(a straight segment)- Road. Click on the map to start, click to add a geometry node. Double click to end.- O (a circle)- Roundabout. Click on the map at the center of the roundabout. Drag a circle of the correct size. Click to end the roundabout.
- Camera - Click on the map where the camera is to be located. See Speed Cameras for editing instructions.
See the Editing Manual Quick Start Guide for more information.
Save Button

 Shortcut key: Ctrl+S
The Save button serves two purposes: 1) it displays the current number of changes pending to be saved, and 2) when clicked, it saves all the current changes you have made.
As you make changes, the counter in the Save button increases. The number in the icon is shown to red as a warning that many unsaved changes may be difficult to save if there is a single error among the changes. (This counter is the number of changes you've made which can be undone, NOT the number of edits you get credit for.)
When the button is clicked (or the shortcut key used), the editor saves all of the current changes you have made. This process is a little more complex than this sounds, but that is what it does. In order to save properly, your browser receives messages back from the Waze server in the event of any errors. If there is an error when saving, the editor will try to give you a detailed error message and a suggestion to fix it. The map view will typically try to show the error area highlighted in a bright circle.
Once the save operation completes successfully, you cannot Undo previous changes with the Undo button.
Undo Button

Shortcut key: Ctrl+Z
The Undo button will undo unsaved successive previous changes with each click.
| IMPORTANT: Once the Save button is clicked and the save operation is complete, the Undo button has no affect on previous changes. |
A change can be deleting a geometry node from a segment or renaming a landmark. It can also be a change to multiple objects at once. For example, if you select 25 street segments at once and change them from one-way to 2-way, that is a single change. Therefore, one click on Undo will undo that change for all 25 segments.
Redo Button

Shortcut key: Ctrl+⇧ Shift+Z
The Redo button will re-apply any changes which have been recently undone with the Undo button.
Delete button

Shortcut key: Delete Del
The Delete (trashcan) button will delete, or trash, any currently selected objects. If you have multiple objects selected, you will be prompted to confirm the multiple deletion. The only object you can currently multi-select is segments.
Objects are not actually deleted until the Save button is clicked. Once the save button is pressed, you cannot Undo any edits or deletes.
Layers

![]() Hover or click to show the layers available for display on the main map. When the box next to the layer name is checked, then that layer is active and being displayed. There is a default shortcut key defined for each layer, and to make it easy to remember, with two exceptions: The shortcut is ⇧ Shift+X (first letter of the layer name). The two exceptions are the satellite/aerial imagery, which uses the letter
Hover or click to show the layers available for display on the main map. When the box next to the layer name is checked, then that layer is active and being displayed. There is a default shortcut key defined for each layer, and to make it easy to remember, with two exceptions: The shortcut is ⇧ Shift+X (first letter of the layer name). The two exceptions are the satellite/aerial imagery, which uses the letter I as the shortcut key for Imagery, and Places which uses the letter L because it was previously called Landmarks.
Refresh or Reload Layers
![]() The small curved arrow at the top right of the Layers list will reload all layers (excluding Satellite Imagery, Cities, and GPS layers) in the current view without reloading the whole page. This is a great way to see changes recently made by another editor in the area without losing the Chat history.
The small curved arrow at the top right of the Layers list will reload all layers (excluding Satellite Imagery, Cities, and GPS layers) in the current view without reloading the whole page. This is a great way to see changes recently made by another editor in the area without losing the Chat history.
Reorder

The six small dots to the left of a layer selector box is a drag handle which enables those layers to be reordered changing the visibility of one layer above another. Only a few layers can be reordered. PLEASE NOTE: The layer order is reversed so layers at the bottom of the list appear above layers higher up in the list. Therefore Satellite Imagery will always appear below all other layers.
Satellite Imagery
![]() Shortcut key: ⇧ Shift+
Shortcut key: ⇧ Shift+I
Waze uses aerial and satellite photography provided by Google.
Cities
 Shortcut key: ⇧ Shift+C
City boundaries as defined by segments assigned to that city are shown in different colors. This layer is helpful in finding segments which are set to the wrong city. Until an area is heavily edited an updated, some city boundaries are likely to be overlapping or appear to be unassociated with any segments.
Changing the name of the city for a road is done through the WME interface documented in segment edit detail. If after fixing the city names you still have incorrect city boundaries, review the article on Updating the city layer.
Roads
 Shortcut key: ⇧ Shift+R
Roads are all of the streets, alleys, highways, and freeways which make up the drivable street system in Waze. Depending on the zoom level, some street types are not displayed so that the map is not too cluttered.
GPS points
 Shortcut key: ⇧ Shift+G
This layer will show tracks from Waze users as they drive with Waze running. Waze records and plots the GPS coordinate of drivers. This layer is useful for relatively accurate placement of new or moved roads when aerial photography is not yet updated. GPS points appear in the map editor as colored arrows. The direction of travel for a GPS point determine its color, so that all drivers going the same direction will show their points in the same color. This makes it easier to determine errant GPS points, or where a road on the map doesn't follow the actual path of vehicles.
Area Managers
 Shortcut key: ⇧ Shift+A
The Area Managers layer shows overlapping colored, named rectangles. These areas represent the areas those users have Area Manager permissions. This layer allows you to identify a user you may wish to send a PM in the forums about a specific issue you noticed in their area, but do not have rights to fix.
Places
 Shortcut key: ⇧ Shift+L
Places are also known as POIs (Points of Interest). These can really be just about anything, but tend to be things like parks, gas stations, cemeteries, transit stations, etc. There are two types of Places: Area and Point. Point Places are for most small business, shops, etc. Area Places are for large stores, malls, parks, etc.
See Places for more information on this topic.
(Speed) Cameras


 Shortcut key: ⇧ Shift+S
Speed cameras, red-light cameras and dummy cameras are shown on this layer. Drivers report camera location and type, and a map editor is required to confirm the existence of the camera, precise location and direction the camera is point before it will appear on the client. Confirmed cameras will pop up a visual and audible alert in the Waze app when approaching a speed or red light camera.
See Cameras for more information.
Map Problems

![]()
![]()
![]() Shortcut key: no default
Shortcut key: no default
The Waze servers are constantly analyzing driver's GPS tracks to determine when there might be a problem with the map and uses the Problems layer to alert the editors. Some types of problems tracked are missing roads, incorrect turns allowed at intersection, wrong direction of road.
You can toggle visibility of closed Map Problems by using the "Show/Hide closed" link next to the Map Problems text.
See Map problems for more information.
Update Requests

![]()
![]()
![]() Shortcut key: ⇧ Shift+U
Shortcut key: ⇧ Shift+U
These are user-submitted map issues while on the road or from LiveMap. This marker shows the location the user reported the issue from. The user's driven route for a distance before and after the reported location will be shown in bright green. If Waze was in navigation mode at the time of the report, the requested route for a distance before and after the reported location will be shown in purple, with markers along the route with the turn direction given to the user.
You can toggle visibility of closed Update Requests by using the "Show/Hide closed" link next to the Update Requests text.
See Update requests for more information.
Place updates
Shortcut key: ⇧ Shift+P
The Place Updates layer shows Place Update Requests (PURs) submitted by drivers and beginning editors. When an untrusted driver or editor creates a new place or makes changes to an existing place, a Place Update Request is created. Editors of rank 2 or higher decide whether to accept each request. The most recent requests are a pale pink. Older requests are darker. Accepted but not-yet-saved requests are green.
See Place Updates (Moderation) for more detail.
Editable areas
 Shortcut key: ⇧ Shift+E
Where you can edit is determined primarily by where you have driven. Edit rights are initially granted within a one-mile radius of where you have driven with Waze running. Your editable area is shown in lighter-colored areas surrounded by a black border. Users who are Area Managers will also see their managed areas in a colored highlighted area. See Editable area for more information.
Live Users

Shortcut key: ⇧ Shift+V
The Live Users layer will display other map editors with the icon above. Editors' locations are shown in real-time.
Road Closures
The Road Closures layer displays a closure symbol and direction when a closure has been placed, using either a WME Closure or the client's Report > Closure feature. A red circle indicates a currently active closure. A gray circle indicates either a scheduled, but not currently active, WME closure or an app-submitted closure. Black arrows show the closure direction(s).
Left Pane
At the left side of the window, below your username, is an area which is both informational and functional. Depending on whether an object is selected, the type of object and how many, different tabs will be available which allow you to view and edit details.
Left Pane with No object selected -- tabs
 |
 |
When no objects are selected on the map, the Tabs Area displays user information. The top section greets you by name and is always visible regardless of what is showing or displayed on the map. Map Problems and Update Requests are not considered map objects, so the tabs below your name will display when a Map Problem or Update Request is selected.
Me Tab
![]()
![]()
The Me tab displays your map editing permission level and current points for the server on which you are editing (North America or World).
A Wazer with a hard hat displays if you have editing permissions. To the right of that icon will be a highlighted cone with a number. This number is your editing rank. Below those graphics is a sentence about your editing rank and permissions.
Below this information is a graphic inviting you to view the introductory editing videos provided by the Waze team.
Drives Tab

Drives are journeys or routes that you have driven with the Waze client running. While you drive, Waze monitors your journey (recording details like location, time, speed) and transfers this information to the Servers. This data is used to validate the existing map (roads, turns, directions) and to learn average journey times. Other Waze users and Area Managers can also view the anonymous GPS tracks of many users when editing the map in the Waze Map Editor. This helps with map accuracy.

Clicking on one of the five visible entries will center the map along that route and will zoom out to try and fit your entire route on the screen. Routes over about 20 miles / 30 kilometers will usually not fit on the map display all at once due to scale limitations. Use the mouse or arrow keys to pan around on the map. Parts of the route that display in red are not currently paved roads. Consider zooming into that area to determine if a road should be added.
Select the highlighted numbers at the bottom of the tab window to select older routes in date order.
Drives are typically processed and available for viewing in the Waze Map Editor within an hour of completing the drive. For most short drives such as commutes between home and work (under about 35 miles / 50 kilometers), you will likely find them in the editor in under 15 minutes. If the servers are bogged down, or if your drive is significantly longer (over 100 miles / 150 kilometers), these drives may take up to a week to appear. If you don't see your drive after seven (7) days, open a ticket from the Support page, Quick Help box. Use the Email link and fill out the form and submit.
Areas Tab
This shows the entire editable area -- the area in which you can perform edits. Click on your editable area. The view will be centered on the editable area. If your editable area is spread out, in several sections, it may be centered between areas you can edit.
Settings Tab

This feature was added as of January 2015[update]
To access user-preference settings in WME, click the "Settings" tab in the left pane. Options include:
- Draw new roads as two-way - determines whether any new road segments you draw start as two-way or one-way
- Draw new roads with all turns allowed - when new roads are drawn with a connection to a junction, the junction can have all "turns" to or from the new segment allowed or disallowed
- Select only on empty selection - affects editor behavior when you select an object (road segment, junction, or place) when there is already an object(s) selected
- If not checked, then clicking on an object will automatically deselect any other objects already selected. This may cause accidental deselection
- If checked, you are prevented from selecting a new object if there anything is already selected. Note that multi-select mode allows you to select additional segments when segment(s) are already selected; use the ctrl key for momentary multi-select, or press the M keyboard shortcut to toggle multi-select mode on/off. Also note that clicking an empty spot can still cause deselection.
- Enable fullscreen mode - when checked, more screen space is given to the map (removes the menu header from the top of the page). Keyboard shortcut ⇧ Shift+F toggles this setting.
- Units - Choose between Imperial (feet/miles) or Metric (meters/kilometers)
Left Pane with segment(s) selected
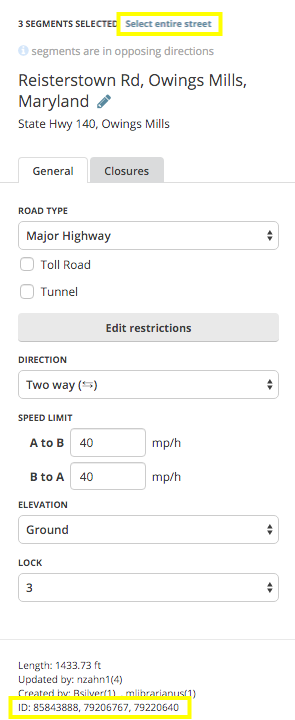
The area above the tabs will show how many segments are selected, and a link to "Select Entire Street". The example graphic to the right shows what the Tabs Area looks like when multiple segments are selected.
Select Entire Street
When you click the link "Select Entire Street," or use the keyboard shortcut Ctrl+A the editor will select all segments connected to the current segment with the same primary name, city, state, and country information. It will also select some segments outside the current visible area. The "Select Entire Street" link and the multiple segment ID numbers are highlighted in yellow in the image to the right.
Address Box
When you click on the Pencil button, or tap shortcut key E, the address box displays more detail information and allows you to make changes to the country, state (US only), city and segment name. Next is where you can add or remove any alternate street name information. An alternate name, technically referred to as a "linked street," can be used for address searches, while primary name is used in navigation instructions.
Be sure to review the naming convention used in your area before changing names.
If you run into an extreme case where you need to rename the city name on a large number of streets. Review the article Smudged city. The end of the article includes a link to a special form for converting a mass number of segments using the help of Waze staff in the database.
General Tab
On this tab, you can modify the road type, direction, speed limits, elevation, lock, and special properties "toll road" and "tunnel". Further down past a separator line are more general details about the segment(s) which is/are selected.
Details on these tab settings can be found under Road Properties
Add Restrictions
When you click the button titled Add restrictions, or use the keyboard shortcut T, WME enters the Scheduled Restrictions editing interface
TAKE NOTICE:
- The Add restrictions button appears when there is one or more segments selected.
- If there are restrictions which already exist on any selected segment, the button name changes to Edit restrictions.
Edit House Numbers
When you click the button titled Edit House Numbers, or use the keyboard shortcut H, WME enters the House Number editing interface.
TAKE NOTICE:
- The Edit House Numbers button appears when there is only one segment selected.
- The Edit House Numbers button isn't available to click when there are changes which need to be saved. The message, "Save your changes to edit house numbers" appears below the button.
Closure Tab
On this tab, senior editors can enable closures in real time. For more information, read the WME Closure Feature page.
Left Pane when a Camera is selected

When a camera is selected, there is a single General tab which allows you to set the alert speed for a Speed Camera, and also to approve the camera once it is placed in the correct location. Red Light Cameras only need to be placed and approved and have no speed set.
Left Pane when a Place is selected
| With a Place selected, there are three tabs: General, More Info and Photos. Under the General tab, you set the Place category(ies), give it a name, a description, and a checkbox to lock the place to prevent changes by lower ranking editors, whether it is a Private or Public Place, the full address details, and open hours. | Below that is an address details section which displays the Place's assigned Country, State (in the US) and City. Click the Edit button to change any values and click Apply when complete: | |

|

|
Left Pane when a Gas Station is selected

When a gas or petrol station Place is selected, the General tab is very similar to that of all Places. When Gas Station is set as the primary Category (first), then there is an additional drop-down menu to select the Brand of gas sold at this station.
For the Waze application to be as useful as possible to drivers, it is important to ensure all fields of information are fully and properly completed.
Map Display Area
All the layers currently selected for display show up in the map display area. The map display areas takes up the majority of the browser window. Any object displayed is selectable and editable, depending on your editing rights in the area you are viewing. Select a street and change its geometry. Select a landmark and change its name. Add a road where one should be, or delete a road which should no longer appear.
There are six main component controls or displays in the corners of the map display area:
- Info Bar
- Zoom Control
- Street View Activator
- Chat Window

Chat window

- Top bar
The top bar tells which chat room you are connected to, and allows you to choose whether you will be visible or invisible in the map display area and the editor list.
- Editor list
All visible editors in this chat room are listed with their editor rank. Click the editors' username to jump to the editor's location.
- Message box
When you are visible, type your message in the message box to participate in chat.
- For more details on this topic, see Waze Map Editor/Chat.
Info bar

Just below the main toolbar, there wide area which runs the width of the map display area.
- The left side will display the current city and state (US) or city and country (world).
- The right side displays whether the editor is still loading any layers, such as road images or GPS points.
Zoom Control

Shortcut key: ⇧ Shift+↑, ⇧ Shift+↓
In the upper left corner, the zoom control is one way to adjust the zoom level, or altitude, or the map display area. Clicking + will move in closer, showing more detail. Clicking - zooms out/higher and removes detail. You can also click and drag the selector in between the + and - buttons.
The other methods for controlling the current zoom level is covered below in the section on Moving around the map.
Street View
![]()
To Activate Street View, drag the blue lens icon from under the zoom control to the point where you want to see the street view.
As you drag the lens around the map, it will change colors to indicate the presence of street view images:
 Street View is NOT available here
 Street View is available here


Drop the lens. The map display shrinks by half to make room for the street view pane on the right. The lens has an arrow to show which way street view is pointing.
To spin and and zoom the image, use the pan and zoom controls in the Street view pane, or drag the pane around with the mouse and use the scroll wheel to zoom. To change the street view position, use the arrows on the street in street view, or drag the lens by its small white handle.
All editing operations are still available in the map display pane, but the space for editing is smaller. If you use the house number editor, it will cover some of the street view controls; use mouse and keyboard shortcuts.

To Close Street View, click the X at the top left-hand corner of the Street View pane, or press ⇧ Shift+W.
Show my location

. Zooms to the editor's approximate physical location.
Bottom Bar
![]()
Wiki link
Opens a new tab to the wiki map editing pages.
Forum link
Opens a new tab to the Waze map editor forum
Status link
Opens a new tab to the status blog -- showing latest tile updates and any other status messages the Waze team might choose to post.
Keyboard shortcuts
Opens a "pop-up" showing all the keyboard shortcuts that can be typed into the browser window.
Scale
![]() In the lower right corner is a small graphic showing the current scale of the map display area.
In the lower right corner is a small graphic showing the current scale of the map display area.
The values in the scale relate to the zoom level you see in the URL address of the web browser. Changing the zoom level alters the displayed scale.
Lat/Lon
![]()
In the lower-right corner is a control showing the latitude and longitude of the mouse pointer as it moves over the map.
Permalink
![]() In the lower right corner is a chain icon.
In the lower right corner is a chain icon.
The permalink icon is used to create a Permalink to share and communicate with other editors. A permalink is a URL used to take you or someone else directly to a specific map location. It contains latitude, longitude, zoom level, visible layers, and any objects that are selected. Objects that can be selected may include a junction, a place, or one or more segments.

Before using the permalink button, zoom and pan the map to show what you want to show. If you wish to, select one place, one junction, or one or more segments. To include a single place, junction, or segment in the permalink, click on it before using the permalink icon. To include several segments, use ctrl+click (MAC: ⌘ Command+click).To generate a permalink, click the ![]() permalink button on the top right part of the Map Display Area.
permalink button on the top right part of the Map Display Area.
The first text box in the pop up contains the permalink to the visible area and the item(s) you have selected. By default, the permalink will also include your layers settings. It is best practice to uncheck the Include layers settings box when sharing a link with other editors. Click on the copy icon at the end of the textbox to copy the permalink to the clipboard.
The second text box contains the current latitude and longitude for the center of the visible map. Click on the copy icon at the end of the textbox to copy the coordinates to the clipboard.
To quickly share your permalink on the Waze forum, click the Open sharing options link. Select which forum you would like to post to and click share. A new page will open for you to compose your forum post explaining your request.
Working with the map
Panning and Zooming
- The keyboard shortcut ⇧ Shift+F will hide the Waze top banner bar and put the editor into "Fullscreen Mode"
- There are two ways to pan the map (move around the map)
- Click and drag -- click on an empty point in the map, hold down the mouse button, and drag the map in any direction.
- Keyboard arrow keys -- ↑↓←→
- There are several ways to zoom the map:
- ⇧ Shift+↑ and ⇧ Shift+↓
- The zoom control in the map.
- Double-clicking any point on the map to zoom in one level and center the map on that point.
- Using the mouse wheel "scroll up" to zoom in and "scroll down" to zoom out.
- On Macintosh with a track pad, drag left or right.
- Hold the ⇧ Shift key down and then click and drag a rectangle on the map to zoom in to the rectangle

Working with objects
Objects are any of the things on the map that can be selected. They include point places, junctions, segments, area places, update requests, map problems, and place update requests.
Selecting objects
Selecting single objects
A single click on any object will select it .
- Selected segments, junctions, and places are highlighted in blue. Information about these objects appears in the Left Pane.
- Selected segments will show A and B labels on their junction nodes
- Selected Update Requests or Map Problems remain 100% opaque! while all other objects of the same type become partly transparent.
- Selected Update Requests, Map Requests, and Place Update requests display information in a dialog box.
Selecting multiple segments
Several road segments may be selected at once in order to change the properties of several segments at one time. There are several ways to select multiple segments.
- One way is to select the first segment, then use ctrl+click (MAC users:⌘ Command+click) to select additional segments.
- A second way is to use multi-select mode. Use the shortcut key m to enter multi-select mode. Click each segment to add or subtract it from the current segment grouping. To exit multi-select mode, press m again.
- To select all segments between two other segments, first select a segment, then use alt+click (Linux users:ctrl+alt+click) to select a second segment. The editor will add to the selection group the segments in-between the first and second segments, based mostly on the street name, but also on simple straight lines.
- To select all segments within a box use ctrl+⇧ Shift+click (MAC users:⌘ Command+⇧ Shift+click) and then drag the cursor while holding the mouse button to form a box. When the mouse button is released, all the segments in the box are selected.
- Segments having the same naming properties can be selected using the "Select entire street" function. See the description in the Left Pane with segment(s) selected section for more information.
Geometry
Segments and area places have geometry, which means shape. You change the geometry by adding, deleting, or moving geometry nodes.
- to create a new geometry node, select the object. Hover the mouse pointer over the object to show the geometry nodes in white. Between the nodes, there will be a smaller point where a new geometry node can be created. Click and drag this point to create a geometry node.
- to delete a geometry node, select the object. Hover the mouse pointer over the object to display the geometry nodes. Press and hold d and hover over the geometry node to be deleted.
Moving objects
- point place
- select the point place, then click and drag to the new position and save.There is a limit on how far a place may be moved before saving. To move a place farther, make several short moves.
- area place (entire area)
- select the area. Click and drag the area place move handle to move the area without changing its shape.
- segment nodes (end or geometry)
- select the segment. Hover the pointer over the segment to display the geometry node. Click and drag either end node or any of the geometry nodes to move the ends or change the shape.
- area place geometry node
- select the area. Hover over the area to display the geometry nodes. Click and drag a geometry node to change the shape of the area.
- junction node
- select just the junction where two or more segments are connected. Click and drag the junction node. Any segment junction nodes connected to the junction will remain connected to the junction. This will change the shape of the segments.
- junction node and some connected segments
- multi-select several segments that connect to the same junction node. Click and drag the junction node. Only the selected segments will be dragged with the junction node. Any unselected segments will be disconnected from the node.
Joining segments
When just two segments meet at one junction node, they can be joined into one segment. But only if they have identical information in the left pane. The resulting segment will have a new segment ID. There are three ways to do this:
 Select the junction node only and use the trash can icon.
 Select the two segments and bridge them. This will raise the elevation by 1.
Junction Arrows
Select a segment to see all the turns leading out of that segment, including u-turns.

 Green arrows are for allowed turns.
 Red arrows (with "-" sign) are for forbidden turns. Click on the arrow to switch it from allowed to forbidden.
 Unconfirmed or "soft" turns also have a small question mark. Click the arrow to confirm the turn.
 Hover over the arrow to see a clock. Click on the clock to edit time based turn restrictions
 A yellow arrow means a time based turn restriction has already been applied.
Additional map controls
 junction creator -- creates a junction where segments merely cross
- Where two segments cross each other one time at the same elevation, but are not connected to each other, select the two segments at the same time. The junction creator icon will appear. Click this icon to create a junction. The two segments will be cut into four segments, all connected to the new junction.
 bridge creator -- creates a "bridge" from a four-way intersection.
- At any junction, select two segments with identical information. The bridge creator icon will appear. Clicking the icon will join the two selected segments into a single segment, and increase the elevation of the new segment to one more than the max elevation of the two segments which were joined. If you apply the bridge creator to a 4-segment junction, it will also join the two unselected segments, if possible.


Permission
There are several types of permission. For a more detailed discussion, please see editing permissions.
- Editing area permission
- You can only edit objects within your editing area -- this includes segments, junctions, places. This also includes closing map problems and Update Requests. Your Editing area includes the area you gain by driving as well as any managed areas you have been granted as an area manager or map raid participant.
- Lock level permission
- Segments and places can be locked. You can only edit these objects if they have a lock level less than or equal to your editor rank. You can only set turn arrows is both segments involved have a lock level less than or equal to your editor rank. Even if a junction has a segment connected to it locked above your editing rank, you can add or remove any segment you can edit at that junction. You can set the lock level anywhere between 1 and your editor rank on any segment or place you can edit.
- Staff place locks
- Sometimes, Waze staff lock places, often in preparation for an ad campaign. The effect is as if the place is locked above the rank of all other wazers, but the lock is not visible in the Waze map editor.
- Trusted place editor status
- Rank 1 editors need approval from a rank 2 or higher editor even on all places, even if they are locked at level 1. After 10 place approvals, they become trusted editors and their places no longer need approvals. Rank 2 and higher editors never need approval for edits to places locked at or below their rank.
- Closures permission
- Editors receive permission to add and edit Real Time Closures in two ways.
- Rank -- upon achieving minimum RTC rank (5 in most countries), editors can add and edit Real Time Closures on any segment within their editable areas, on any segment that is not locked above their rank.
- RTC areas -- In addition, editors may be granted RTC areas. Within these areas, editors can add and edit Real Time Closures on any segments, no matter the lock level.
- Closure locking
- A segment that has a closure cannot be edited until the closure has been removed from the segment. So if a segment has lock level of 1, but a current closure, then it will require an editor with Real Time Closure permission for that segment to alter the closure so that a change can be made to the segment. In most countries, only rank 5 and higher editors can edit closures.