No edit summary |
|||
| Line 66: | Line 66: | ||
====Second pop-up window attributes==== | |||
[[File:I-66E_AM_HOV.PNG|right|200px|border]] | |||
The second line will display '''Turning from [original segment] to [destination segment] is restricted on'''. There are several attributes that can be selected for the restriction: | |||
#Days | |||
#Hours | |||
#Applies | |||
#Restriction '''Type''' | |||
#Additional information text box | |||
[[ | =====Days (of week)===== | ||
[[File:Days selection.PNG|right|300px|border]]Select the applicable days of the week that the restriction will be active. Use the '''Select all''' or '''Select none''' link to more quickly change all the check boxes. The default is all days of the week. Your display order for the days will depend upon your country settings in your browser and may not exactly match the image above. '''Mon-Fri''' and '''Every day''' are the most common restriction groupings in USA. | |||
=====Hours (of day)===== | |||
[[File:Clock entry.PNG|right|300px|border]]Select the applicable hours of the day that the restriction will be active. For restrictions that apply all day long, use the default setting of '''All day'''. If the restriction is for only certain periods of time during the day, then deselect the '''All day''' radio button to allow the time to be changed. You can click the hours or minutes fields to enter times directly, or click the clock icon next to the time to enable input panels. The schedule uses a 24-hour notation. The restriction will start at the beginning of the minute designated in the start block. The restriction will go till the 59th second of the minute designated; so if you state an end time of 08:00 it goes till 08:00:59. So if a posted restriction ends at 08:00 it is advisable to end the waze restriction at 07:59; this will have the 08:00 time enacted vice carrying the restriction over for an additional minute. If the end time is selected after 23:59 then the restriction will carry over till the next day. | |||
{{:24-hour format}} | |||
For example, a schedule of 10:00 AM to 3:00 PM is entered as 10:00 to 15:00; a schedule of midnight to noon (12:00 AM to 12:00 PM) is entered as 0:00 to 12:00. A schedule of 3:00 PM to 5:00 AM is entered as 15:00 to 05:00. | |||
The time that should be entered is the local time of the road as on the local signs. The Waze server knows the local time zone and will schedule the restriction correctly. | |||
To | Daylight savings time is automatically accounted for as long as the Waze client app is properly set to the correct local time. | ||
======Entering midnight====== | |||
If a scheduled restriction is between 8:00 PM and Midnight, then enter "20:00 - 23:59". Technically if you enter "20:00 - 00:00" it will go to 00:00:59 but is more or less an equivalent result. | |||
======Crossing midnight====== | |||
If a restriction occurs only during nighttime hours and opens in the morning, e.g., restricted between 10 PM and 5 AM, then enter the From time as 22:00 and the To time as 05:00. You will notice an information box that says the restriction will end of the following day. If this restriction is only on a certain day of the week, e.g., Saturday night and Sunday night, then select the day of the week for Sat and Sun matching the ''start'' of the restriction. There is no need to include Monday because it is automatically covered. Including the Monday check box would add a third day starting at 10 PM Monday. | |||
=====Applies (to dates)===== | |||
[[File:Date selection.PNG|right|300px|border]]The default setting is '''Every week''' meaning there is no limit to the date range so as soon as you add the restriction it will be active every week until it is removed. Optionally you can select the radio button for '''Range''' of dates to limit the restriction to a certain number of days. Press the button displaying the date to display two calendars. The one one the left shows the start date and the calendar on the right shows the end date of the restriction. Note these date are inclusive meaning the restriction will include both dates (and all the ones in between) when determining the restriction. When you have selected the date range press the green '''Apply''' button. The date range is displayed in '''DD/MM/YYYY''' format. To remove the date range, simply select the '''Every week''' radio button again. | |||
Remember that the end date will consider the entire day based on any time settings also configured. If the time crosses midnight, the next day will automatically be included for that time period and so that the restriction ends at the appropriate time. | |||
=====Restriction types (Allowed/Toll free/Prohibited)===== | |||
This is where the three main three main '''Types''' of restrictions are selected that appear on the first pop-up window. Since only Allowable and Prohibited are used, Toll free is not selectable.[[File:Restriction Types.PNG|right|150px|border]] | |||
#The three Restriction '''Types''' displayed are: | |||
#*'''Allowable''' | |||
#*'''Toll free''' (not selectable) | |||
#*'''Prohibited''' | |||
#Restriction '''Types''' are added as '''Lines''' under the applicable direction of turning.[[File:Restriction Lines.PNG|right|200px|border]] | |||
#Restriction '''Lines''' contain '''Rules''' which are constructed here on the second pop-up window | |||
#Allowable restrictions have green backgrounds | |||
#Prohibited restrictions have red backgrounds | |||
#Restriction '''Rules''' combine the type of vehicle, number of passengers required, and toll transponder/pass required | |||
#Allowable and Prohibited rules have different ways of selecting vehicle types; most editors will use one or the other restriction type but not both. | |||
#Remember | |||
#* a) Each restriction '''Type''' on the first pop-up window is compared to other Types as an '''AND''' statement. | |||
#* b) Each restriction '''Line''' on the second pop-up window (within the '''Allowable''' restriction Type) is compared to other lines in that restriction line as an '''OR''' statement. | |||
#* c) Each restriction '''Rule''' within a single '''Allowable''' restriction '''Line''' is compared to other '''Allowable''' rules as an '''OR''' statement | |||
#Note that the restriction's background color should change to red for prohibited and green for allowed | |||
#Select the applicable Allowed '''Vehicle type''' by clicking on the '''+'''[[File:Toll free plus drop down.PNG|center|500px|border]] | |||
#'''Private car''' is added to the restriction '''Line'''[[File:Toll free plus drop down.PNG|center|500px|border]] | |||
#The vehicle type can be changed by clicking on '''Private car''' bubble[[File:HOV vehicle type drop down.PNG|center|250px|border]] | |||
#Only one vehicle type can be selected per Restriction '''Rule''' | |||
#If no vehicle type is selected then Waze defaults to have the restriction applicable to all vehicles | |||
#If there is more than one vehicle type that needs a restriction then clilck '''Add a new rule''' and then the '''+''' and '''Vehicle type''' till all applicable vehicles are added as a separate '''Rule''' in the one Restriction '''Line'''[[File:Three HOV rules.PNG|center|500px|border]] | |||
# For '''Prohibited''' restrictions you get to enter one '''Rule''' and mark all the prohibited vehicle types at the same time in the same rule. | |||
# Click '''Add''' button in bottom right corner of the second pop-up window | |||
# Click '''Apply''' button in bottom right corner of the first pop-up window | |||
# Click '''Save''' icon on the light blue Waze bar | |||
#Remember for '''Toll free''' restrictions, the vehicles listed as toll free much be covered by the '''Allowable''' restrictions to have proper routing. | |||
#'''Allowable''' restrictions are set up similarly to '''Toll free''' restrictions; '''Allowable''' restrictions will have a green background[[File:Driving_is_allowed_for.PNG|center|500px|border]] | |||
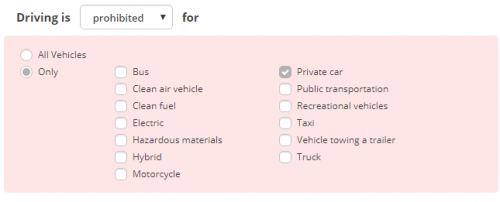
#'''Prohibited''' restrictions can only select the '''Vehicle type'''[[File:Prohibited restriction.PNG|center|500px|border]] | |||
#'''Prohibited''' restrictions have a red background | |||
#'''Prohibited''' restrictions default to '''All vehicles''' | |||
#Select '''Only''' to be able to pick what vehicle type(s) will be prohibited | |||
#Note '''DO NOT''' select conflicting restrictions. For example selecting a segment as a toll road with an allowable restriction line of any vehicle with Sunpass and a prohibited restriction line for any taxi will not preform properly since there is no prioritization of restrictions. A user that has designated the vehicle is a taxi with Sunpass will meet both the allowable restriction and the prohibited restriction. Until the programming has prioritization this restriction should be written as a toll road with an allowable restriction line of any private car with Sunpass. Since the taxi is not an allowable restriction then all taxis will not be routed on the toll road. This means it does not matter whether the taxi has designated Sunpass is in the vehicle or not. | |||
=== Difficult turn === | === Difficult turn === | ||
Revision as of 02:11, 16 October 2017
A partial restriction is entered on a segment or a turn restriction. A partial restriction is often referred to as a time-based restriction (TBR); specifically as a time-based segment restriction (TBSR) or time-based turn restriction (TBTR). They are used to allow or to restrict certain vehicle types to be routed or prevented from routing on that segment or turn. The TBSR or TBTR means the segment or turn will tell the routing algorithm that some vehicle type(s) are forbidden or allowed on a segment or turn; or some or all vehicles are forbidden at certain times, or on certain days or dates, or both; that certain special types of travel are allowed.
Note currently only private car and taxi are allowed to be selected in the app; therefore restrictions preventing trucks or buses from a segment or turn do not have any affect in the app. Setting a segment to be a bus only segment will prevent any user from being routed and is the equivalent of a prohibited all private cars and taxi restriction.
Partial restrictions are often used for bus lanes, turns that are forbidden during rush hour, segments that change direction for morning and evening rush hour, bridges and ferries that are only available during the day, and roads that are closed in winter.
If a turn is forbidden on all days, dates, and times, then use turn restriction or if the segment never allows travel in that direction then one-way road instead. If no traffic will ever be allowed to travel through an intersection, it should be disconnected. If no traffic will ever be allowed to travel on a segment, the segment should not be added to the map.
In some cases, the turn (typically left-hand) may simply be difficult to make at certain times of the day due to uncontrolled intersections during heavy traffic periods. The difficult turn should not be installed where there is a traffic light or a dedicated left turn lane.
For big road-closing events such as marathons and parades, please see Mega events For construction-related traffic closures, please see Real time closures.
Overview
This article covers how to create scheduled restrictions and vehicle type restrictions. Collectively, these can be termed Partial restrictions.
Partial restrictions can be based on:
- An entire segment controlling traffic flow for one or both directions TBSR
- Specific turns from one segment to another TBTR
Each of these restrictions can be further restricted based on combinations of:
- Vehicle type (trucks, buses, hazardous materials, etc.)
- Time of day, day of week, and date range.
Examples:
- No left turn 7a-9a and 4p-6p weekdays
- HOV lanes eastbound 5a-11a, westbound 3p-10p
- Flexible capacity lanes which are a single roadway, but run a different direction for morning and evening commutes (frequently found on congested freeways and some primary streets, sometimes with limited exit or turn options to create express traffic routes)
- Interstate truck-only ramp (not used in app at this time)
- No trucks allowed between 9a-3p weekends (not used in app at this time)
- Vehicle towing a trailer (not used in app at this time)
While this is a very flexible system, it can be a complex interface to manage the many combinations possible. It is certainly very important that any changes made to any current scheduled restrictions on the map be done with extreme caution so as not to destroy hours of work by prior map editors. Therefore be sure to only make changes to scheduled restrictions with careful consideration and patience.
For segments please see Segments
Turns
Time Based Turn Restrictions (TBTRs) are used when only certain turns are partially restricted from one segment to another. If the turn is always restricted then use a red turn restriction; TBTR are not to be set to 24/7.
All turning traffic restricted at all times
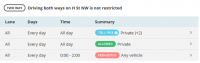
Turns that are restricted to all traffic (all vehicle types) are set with turn arrows—the arrows that appear at the end of a selected segment. A restricted turn is indicated by a red arrow with a red do not sign next to it (lower left arrow in picture below). A turn that is open (not restricted) to all traffic is indicated by a green arrow. A TBTR is indicated by the yellow arrow with a yellow "do not" sign next to it (upper right arrow in picture below)Turns

Scheduled turn restrictions
When not all times, days, dates, or vehicles are restricted from turning, you can set a scheduled turn restriction from one segment to another. Turns that are restricted to all traffic during certain times of the day are "time based turn restrictions".


To enter a TBTR:
- Select one segment
- Hover over a GREEN turn restriction
- Two icons appear
- a) A clock for a TBTR
- b) A speaker for a Turn override instruction
- Click the clock icon and the first TBTR popup window appears

- Note the Difficult turn (DT) attribute box in the lower left corner; the DT is described below
- Click on the Add new radio button under the description of the turn, the second popup window appears

Second pop-up window attributes

The second line will display Turning from [original segment] to [destination segment] is restricted on. There are several attributes that can be selected for the restriction:
- Days
- Hours
- Applies
- Restriction Type
- Additional information text box
Days (of week)

Select the applicable days of the week that the restriction will be active. Use the Select all or Select none link to more quickly change all the check boxes. The default is all days of the week. Your display order for the days will depend upon your country settings in your browser and may not exactly match the image above. Mon-Fri and Every day are the most common restriction groupings in USA.
Hours (of day)

Select the applicable hours of the day that the restriction will be active. For restrictions that apply all day long, use the default setting of All day. If the restriction is for only certain periods of time during the day, then deselect the All day radio button to allow the time to be changed. You can click the hours or minutes fields to enter times directly, or click the clock icon next to the time to enable input panels. The schedule uses a 24-hour notation. The restriction will start at the beginning of the minute designated in the start block. The restriction will go till the 59th second of the minute designated; so if you state an end time of 08:00 it goes till 08:00:59. So if a posted restriction ends at 08:00 it is advisable to end the waze restriction at 07:59; this will have the 08:00 time enacted vice carrying the restriction over for an additional minute. If the end time is selected after 23:59 then the restriction will carry over till the next day.
| 24-hour time | 12-hour time |
|---|---|
| 00:00 (midnight) | 12:00 AM |
| 01:00 | 1:00 AM |
| 02:00 | 2:00 AM |
| ... | ... AM |
| 10:00 | 10:00 AM |
| 11:00 | 11:00 AM |
| 12:00 (midday) | 12:00 PM |
| 13:00 | 1:00 PM |
| 14:00 | 2:00 PM |
| ... | ... PM |
| 22:00 | 10:00 PM |
| 23:00 | 11:00 PM |
In a 24-hour format, time is represented with unique hours of the day that do not require the AM and PM indicators. To convert from 24-hour time to 12-hour time (or vice versa), use the table on the right.
The minutes remain the same between the two formats.
Alternately, you can use the following math to convert from AM/PM to 24-hour format:
- For AM times, use the time directly: 8:45 AM = 8:45 (in 24-hour format)
- For PM times, add 12 hours to the time: 8:45 PM = 20:45 (in 24-hour format)
For example, a schedule of 10:00 AM to 3:00 PM is entered as 10:00 to 15:00; a schedule of midnight to noon (12:00 AM to 12:00 PM) is entered as 0:00 to 12:00. A schedule of 3:00 PM to 5:00 AM is entered as 15:00 to 05:00.
The time that should be entered is the local time of the road as on the local signs. The Waze server knows the local time zone and will schedule the restriction correctly.
Daylight savings time is automatically accounted for as long as the Waze client app is properly set to the correct local time.
Entering midnight
If a scheduled restriction is between 8:00 PM and Midnight, then enter "20:00 - 23:59". Technically if you enter "20:00 - 00:00" it will go to 00:00:59 but is more or less an equivalent result.
Crossing midnight
If a restriction occurs only during nighttime hours and opens in the morning, e.g., restricted between 10 PM and 5 AM, then enter the From time as 22:00 and the To time as 05:00. You will notice an information box that says the restriction will end of the following day. If this restriction is only on a certain day of the week, e.g., Saturday night and Sunday night, then select the day of the week for Sat and Sun matching the start of the restriction. There is no need to include Monday because it is automatically covered. Including the Monday check box would add a third day starting at 10 PM Monday.
Applies (to dates)

The default setting is Every week meaning there is no limit to the date range so as soon as you add the restriction it will be active every week until it is removed. Optionally you can select the radio button for Range of dates to limit the restriction to a certain number of days. Press the button displaying the date to display two calendars. The one one the left shows the start date and the calendar on the right shows the end date of the restriction. Note these date are inclusive meaning the restriction will include both dates (and all the ones in between) when determining the restriction. When you have selected the date range press the green Apply button. The date range is displayed in DD/MM/YYYY format. To remove the date range, simply select the Every week radio button again.
Remember that the end date will consider the entire day based on any time settings also configured. If the time crosses midnight, the next day will automatically be included for that time period and so that the restriction ends at the appropriate time.
Restriction types (Allowed/Toll free/Prohibited)
This is where the three main three main Types of restrictions are selected that appear on the first pop-up window. Since only Allowable and Prohibited are used, Toll free is not selectable.

- The three Restriction Types displayed are:
- Allowable
- Toll free (not selectable)
- Prohibited
- Restriction Types are added as Lines under the applicable direction of turning.
- Restriction Lines contain Rules which are constructed here on the second pop-up window
- Allowable restrictions have green backgrounds
- Prohibited restrictions have red backgrounds
- Restriction Rules combine the type of vehicle, number of passengers required, and toll transponder/pass required
- Allowable and Prohibited rules have different ways of selecting vehicle types; most editors will use one or the other restriction type but not both.
- Remember
- a) Each restriction Type on the first pop-up window is compared to other Types as an AND statement.
- b) Each restriction Line on the second pop-up window (within the Allowable restriction Type) is compared to other lines in that restriction line as an OR statement.
- c) Each restriction Rule within a single Allowable restriction Line is compared to other Allowable rules as an OR statement
- Note that the restriction's background color should change to red for prohibited and green for allowed
- Select the applicable Allowed Vehicle type by clicking on the +
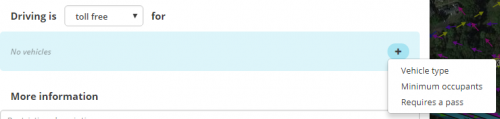
- Private car is added to the restriction Line
- The vehicle type can be changed by clicking on Private car bubble
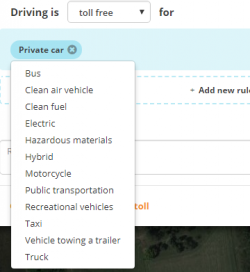
- Only one vehicle type can be selected per Restriction Rule
- If no vehicle type is selected then Waze defaults to have the restriction applicable to all vehicles
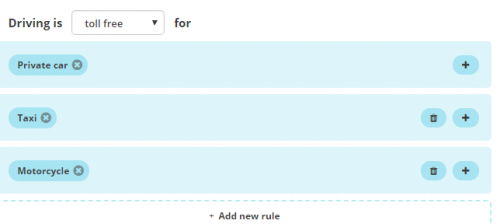
- If there is more than one vehicle type that needs a restriction then clilck Add a new rule and then the + and Vehicle type till all applicable vehicles are added as a separate Rule in the one Restriction Line
- For Prohibited restrictions you get to enter one Rule and mark all the prohibited vehicle types at the same time in the same rule.
- Click Add button in bottom right corner of the second pop-up window
- Click Apply button in bottom right corner of the first pop-up window
- Click Save icon on the light blue Waze bar
- Remember for Toll free restrictions, the vehicles listed as toll free much be covered by the Allowable restrictions to have proper routing.
- Allowable restrictions are set up similarly to Toll free restrictions; Allowable restrictions will have a green background

- Prohibited restrictions can only select the Vehicle type
- Prohibited restrictions have a red background
- Prohibited restrictions default to All vehicles
- Select Only to be able to pick what vehicle type(s) will be prohibited
- Note DO NOT select conflicting restrictions. For example selecting a segment as a toll road with an allowable restriction line of any vehicle with Sunpass and a prohibited restriction line for any taxi will not preform properly since there is no prioritization of restrictions. A user that has designated the vehicle is a taxi with Sunpass will meet both the allowable restriction and the prohibited restriction. Until the programming has prioritization this restriction should be written as a toll road with an allowable restriction line of any private car with Sunpass. Since the taxi is not an allowable restriction then all taxis will not be routed on the toll road. This means it does not matter whether the taxi has designated Sunpass is in the vehicle or not.


Difficult turn
| Update image above and also show here with a highlight on the difficult turn check box |
This setting tells the routing server to add a routing penalty to the turn, meaning when calculating the time to reach the destination, this turn will include extra time so that other routes are more likely to be selected if this turn is only marginally better than another nearby route.
A turn can be considered difficult for many reasons including but not limited to the following:
- Heavy traffic
- Turn left across traffic that may be continuously flowing or fully stopped and into traffic that may also be continuously flowing or stopped.
- Turn right into traffic that may be continuously flowing or fully stopped.
- Poor visibility
- Turn (left or right) into quickly moving traffic with poor visibility from:
- a crest in the road
- a sharp corner
- an obstacle
A turn can be identified as difficult by drivers submitting URs or by the direct knowledge of the editor.
| As of May 2016[update], the difficult turn box is a 24 hour every day setting and not related to any other time-based restriction. That could be something available in the future but not at this time. |