Aucun résumé des modifications |
mAucun résumé des modifications |
||
| (39 versions intermédiaires par 2 utilisateurs non affichées) | |||
| Ligne 1 : | Ligne 1 : | ||
A | A turn instruction is the combination of text, images, and speech that Waze provides to the user in providing route guidance, ideally with minimal thought and without confusion. | ||
This page covers the topic of turn instructions generally and includes guidance for modifying all editable aspects of a turn instruction | This page covers the topic of turn instructions generally and includes guidance for modifying all editable aspects of a turn instruction inside the Turn Instruction interface. This does not include [[usa:Lanes|lane guidance]], which has its own instructions. | ||
By default, the use of [[Road Shields|road shields]] in turn guidance is limited to editors of rank 4 and higher.{{TOC}} | |||
==Overview== | ==Overview== | ||
Turn instructions tell and show a user where and when to turn, keep, exit, continue, or make a U turn. Editors must take special care to ensure that turn instructions give Wazers clear and useful directions. | '''Note that customized turn instructions do not work at all in Waze in CarPlay or Android Auto. They only function in the mobile app.''' | ||
Turn instructions tell and show a user where and when to turn, keep, exit, continue, or make a U-turn. Editors must take special care to ensure that turn instructions give Wazers clear and useful directions. | |||
[[Fichier:Canada-15nord.PNG|bordure|droite|sans_cadre]] | |||
By default, a turn instruction will use the street name of the outbound segment for both display and spoken directions. If there is a 1) road shield associated with the primary street name on that outbound segment and 2) that street name is simple and contains the same number as the shield, then the turn instruction will display the shield in place of the street name. | |||
Currently, this can look poor in the app as only the highway number is replaced by a shield, as in the image at right. | |||
Reasonable people interpret this as "Autoroute Autoroute 15 Nord" since the shield implies "autoroute". As a result, using a customized turn instruction will look better right now. | |||
There is one special case in which the Waze app will modify what we feed it in WME. If the top line has only a single road shield with no text (and no other road shield, as "single" implies), then the app will pull up the text in the second line to the first line. | |||
It's more easily shown than described. Here is [https://waze.com/editor?env=usa&lat=45.47164&lon=-73.60585&zoomLevel=18&segments=518116270 this exit] in WME: | |||
[[Fichier:Sortie-64-WME.png|alt=|800x800px]] | |||
And this is how that appears in the Waze app, with that second line pulled up next to the shield: | |||
[[Fichier:Sortie-64-app.PNG|alt=|800x800px]] | |||
In a case like this, it is better to put one item of text next to the shield - it's still not good, but better. | |||
You can customize turn instructions with road shields, destinations, exit numbers, and more. This enhances the Waze experience and we encourage its use. | |||
==General Principles== | |||
You can the official Waze instructions [https://docs.google.com/document/d/1GVORIWdUQSrxUJwxDhjn53ZE6-wblC3H22BiBtierL8/ here]. | |||
Turn instructions should match signage as closely as possible within the limitations of the Waze interface, while remaining sensible. | Turn instructions should match signage as closely as possible within the limitations of the Waze interface, while remaining sensible. | ||
| Ligne 18 : | Ligne 40 : | ||
*for any numbered exit; | *for any numbered exit; | ||
*anywhere a shield is desired but won't be automatically displayed; and | *anywhere a road shield is desired but won't be automatically displayed; and | ||
*anywhere else that directional signage shows something other than the primary name (or shield) of the outbound segment such as most exit ramps and onramps, wayfinders, intersections with specialized signage for a turn. | *anywhere else that directional signage shows something other than the primary name (or road shield) of the outbound segment such as most exit ramps and onramps, wayfinders, intersections with specialized signage for a turn, and other occasions. | ||
Here are examples of those use cases.<gallery> | Here are examples of those use cases.<gallery> | ||
| Ligne 26 : | Ligne 48 : | ||
Fichier:Canada-Surface2.png|Turn instructions and a wayfinder on a major road in Montreal. Adding a wayfinder in this case is not recommended, but the turns should be implemented with turn instructions that indicate the cardinal direction. | Fichier:Canada-Surface2.png|Turn instructions and a wayfinder on a major road in Montreal. Adding a wayfinder in this case is not recommended, but the turns should be implemented with turn instructions that indicate the cardinal direction. | ||
</gallery> | </gallery> | ||
A good rule of thumb to use is that if there is a big green sign (BGS), then there should be a turn instruction. But that is not an absolute rule. | A good rule of thumb to use is that if there is a big green sign (BGS), then there should be a turn instruction. But that is not an absolute rule. | ||
Here is an example where a turn instruction should not be used, since this is a named street and having Waze mention the highways would be confusing rather than clear. | |||
[[Fichier:Canada-StJ.png|centré|Rue St-Jacques at the intersection of Boulevard Cavendish has directional signs to indicate how to get to highways, but users should more simply be directed left and right on Rue St-Jacques.|alt=]] | |||
==How to do this== | ==How to do this== | ||
To access the Turn Instructions dialogue, hover your cursor over a turn arrow and click on "Add instructions". | |||
===Basic layout=== | |||
As stated, the goal is to resemble the road signage as much as possible, but the functionality has limitations such as a lack of horizontal display space and a restriction to two lines of information (plus an exit sign). | As stated, the goal is to resemble the road signage as much as possible, but the functionality has limitations such as a lack of horizontal display space and a restriction to two lines of information (plus an exit sign). | ||
The best practice is therefore to use the top "Visual instructions" line of the turn instructions for road shields if there are any | The best practice is therefore to use the top "Visual instructions" line of the turn instructions for road shields (if there are any) and to put any text below that separated by forward slashes in a "Free text" box in the "Towards" field. The top of the interface displays what the turn instruction will look like in the app. You can see this in action here: | ||
[[Fichier:Canada-exit.png|centré|alt=]] | |||
If there are no road shields for a turn instruction, place the first line of text in the "Visual instructions" line with a "Free text" box and put any subsequent text in a "Free text" box in the Towards field, as follows: | |||
[[Fichier:Canada-exit2.png|centré|alt=]] | |||
Canadian signs are fairly straightforward. If you encounter an unusual case, please contact a [[Main Page#List of Senior Editors|senior editor]]. | |||
===Exit signs=== | |||
If the turn instruction is for an exit, choose the colour of exit polygon appropriate for the accompanying sign. Note that the colour of the polygon is not necessarily the same as the colour of the sign. In the examples from Quebec on this page, the sign is green but the exit polygon is yellow, and so these turn instructions in Quebec use a yellow polygon. | |||
The exit polygon is always displayed in the top right corner of the turn instruction panel. | |||
To use an exit polygon in a turn instruction, choose the correct colour and add the exit number in the box to your choice. | |||
Do not use an exit polygon to indicate the voice prompt for a turn direction such as "keep right", "exit right", etc. The exit polygon is purely a visual effect. | |||
===Voice prompt=== | |||
This is the same option that Waze editors can use in the dialogue box for turns in the WME. You may change it there or in the Turn instructions dialogue. It is an identical choice and will be duplicated from one to the other. | |||
===TTS=== | |||
TTS stands for "text to speech". | |||
If you make no changes here, Waze will speak the default turn instructions. There is rarely a reason to override the default instructions. | |||
Waze has implemented a limited set of pronunciations of words in small caps. Each of these must be added individual and this is not a general rule. The list of small-caps TTS that Waze has implemented so far is: | |||
{| class="wikitable" | |||
|+ | |||
!Small caps | |||
!English TTS | |||
!French TTS | |||
|- | |||
|ɴᴏʀᴛʜ | |||
|north | |||
|nord | |||
|- | |||
|ᴇᴀꜱᴛ | |||
|east | |||
|est | |||
|- | |||
|ꜱᴏᴜᴛʜ | |||
|south | |||
|sud | |||
|- | |||
|ᴡᴇꜱᴛ | |||
|west | |||
|ouest | |||
|- | |||
|ɴᴏʀᴅ | |||
|north | |||
|nord | |||
|- | |||
|ᴇꜱᴛ | |||
|east | |||
|est | |||
|- | |||
|ꜱᴜᴅ | |||
|south | |||
|sud | |||
|- | |||
|ᴏᴜᴇꜱᴛ | |||
|west | |||
|ouest | |||
|- | |||
|ᴄᴇɴᴛʀᴇ-ᴠɪʟʟᴇ | |||
|centre-ville | |||
|centre-ville | |||
|- | |||
|ᴄɪᴛʏ ᴄᴇɴᴛʀᴇ | |||
|city centre | |||
|city centre | |||
|- | |||
|ᴠɪᴀ | |||
|via | |||
|via | |||
|} | |||
==Best Practices== | |||
Turn guidance only applies to turns, not segments. If you have many segments joined at a node that requires turn guidance, you will have to create turn guidance for every turn arrow coming out of that node. | |||
There are two tricks you can use to reduce your work. | |||
.. | ===1) Avoid busy nodes=== | ||
You can create more node junctions in order to reduce the number of turns coming out of them. Look at this example, which should use turn guidance for the highlighted highway entry ramp: | |||
[[Fichier:Canada-busynode1.png|centré]] | |||
In this simple example, the turn from Boul Langelier and the turn from the parking-lot road would both require turn guidance. Users exiting the parking lot road will get the turn guidance for the highway ramp if you do this properly. | |||
You can modify this junction by creating a second junction for only the parking-lot road, like this: | |||
[[Fichier:Canada-busynode2.png|centré]] | |||
Now, you only need to create one turn guidance for the highway entrance ramp. Users exiting the parking lot road will get a "Turn left on boulevard Langelier" followed by the turn guidance for the ramp. | |||
This is more elegant and more accurate. Just remember that all road segments on the Waze map should be more than 5 metres long. | |||
===2) Use inheritance=== | |||
'''WHILE INHERITANCE IS A GREAT IDEA, IT DOESN'T CURRENTLY WORK WITH TURN INSTRUCTIONS.''' | |||
When you have two road segments that attach at a common node, it is easier to create one turn guidance rather than multiples. Waze road name inheritance will pull and use the later instruction if there is no name on intervening segments. | |||
That sounds complicated. It is much easier to understand visually. Here we have two roads leading to a highway entrance ramp. We could create turn guidance for each, as indicated by the two red arrows: | |||
[[Fichier:Canada-double-tg.png|centré]] | |||
However, we can use only one turn guidance if we put it here, as long as that crossing segment has no name: | |||
[[Fichier:Canada-single-tg.png|centré]] | |||
Both previous segments will "inherit" this single turn guidance. You have cut your workload in half. | |||
Note that you will still have to create a separate turn guidance for users turning right from boulevard Langelier onto the entrance ramp. | |||
==== | ==What to Watch Out for== | ||
=== | ==="Towards" field=== | ||
The "Towards" field is simply the name of the field in the Turn Instructions interface. It does not add any visual representation of the word "towards" and it does not pronounce the word "towards" in the app. | |||
The | |||
== | ''If you require the pronunciation of "towards" in your TTS, please use a guillemet, which is the French quotation mark: <big>»</big>. The symbol works for both French and English. But there is '''no good reason''' to add that "towards". It increases the time to pronounce TTS when we should be trying to reduce that.'' | ||
===Slashes versus bullets=== | |||
Parts of the United States use bullets (dots) to separate multiple street names. Canada uses slashes. Note that some extensions like the Shields Helper script are set to use bullets by default. If you would like to move to bullets in Canada, open a discussion on the Waze Canada Discord server. | |||
Canada style: Sortie 6: Rte 202 / Hemmingford / St-Bernard-de-Lacolle / Lacolle | |||
United States style (not consistent): Exit 276A: US-460 E • Granby St | |||
The United States also makes more use of guillemets than we do in Canada. | |||
The | |||
===Road shields=== | |||
==== | ====Road shields not appearing in list==== | ||
Often, you will need to use a road shield in a turn instruction but because that road shield is too far away in WME, the Turn Instruction interface will not present the shield you need as an option. | |||
There are a few ways to solve this problem. | |||
#Create a new road segment in WME near where you are adding your turn instruction. Give it a name, then de-select it and reselect it. Once you have reselected it, assign the road shield you require to that new segment. Hit the Apply button. You do not have to save the new segment. The road shield you have just created will now appear as an option in the list of road shields in the Turn Instructions interface. Once you have created the road shield, delete the new segment you created and save your work. The road shield will continue to be available nearby for future turn instructions even after the new road segment has been deleted. | |||
#Put the road shield you need on a nearby existing street. Hit the Apply button and follow the rest of the instructions given in the previous method. Don't forget to delete this road shield when you are done. | |||
#Zoom out in WME so that the road shield you require appears in your field of view. Reload the WME webpage. Zoom back in to you turn instruction and the road shield you need may now appear in the list. It also may continue to be absent. | |||
====Using "foreign" road shields==== | |||
Sometimes, you may need to use a road shield from another province or from the USA. For example, if you are in Ontario, you may need to use a road shield of a Quebec autoroute or an American Interstate. You cannot create those shields in Ontario, but there is a workaround that will let you "import" them to your province. | |||
To get the shields into your turn guidance, you must create a new segment with one end in the province/country whose shield you need and the other end where you need to use it. Then follow the instructions in step 1 in the previous section. | |||
Here's an example that placed an American road shield in Saint-Jean-sur-Richelieu, QC, as seen here: | |||
[[Fichier:Canada-I-89.png|centré]] | |||
To get that American shield, follow these steps: | |||
#Create a road segment that stretches from the US to Saint-Jean-sur-Richelieu. In this example, this segment was 42 kilometres long. Assign the new road to the US and an American state in the Address fields. You can assign a city name or click the "None" box. Name the road something relevant. | |||
#Give this segment a road type of freeway. This is not important for the shield, but it may save you time if you saved it and you have to hunt for it to delete it. Freeways show up at all zoom levels. | |||
#De-select and reselect the segment. Because the road is assigned to the US, you get your choice of US shields! | |||
#Once the road shield is assigned and applied to the new segment, you can use it anywhere within range. | |||
This image shows the segment created to bring the US I-89 shield to Saint-Jean-sur-Richelieu: | |||
This | [[Fichier:Canada-use-Fwy.png|centré]] | ||
And here is the turn guidance that uses it: | |||
[[Fichier:Canada-USshield.png|centré]] | |||
(Note that we should probably spell out "Interstate" in Canada.) | |||
====Road shields and cities==== | |||
Road shields are assigned to Waze cities, but the city you choose for your road shield in a turn instruction is completely irrelevant. | |||
====Road shields and cardinal directions==== | |||
Once an editor selects a road shield, it will appear with the cardinal direction assigned to it when it was created. You may freely change or delete this cardinal direction. It is completely modifiable, which leads this discussion to... | |||
====Road shields and small-caps font==== | |||
[[Fichier:Canada-smcaps.png|bordure|droite|sans_cadre|649x649px]] | |||
Rigorous testing has led us to conclude that using small caps not only better emulates what drivers see on any BGS, but also that it just looks so darned refined in the app (see image at right). As a result, we have established the use of small caps as a standard in Canada for turn instructions. '''We have also expanded this to include the directions on all road shields.''' | |||
However, it is not trivial to get small caps to appear. The following characters can be copied and pasted into WME: ᴀʙᴄᴅᴇꜰɢʜɪᴊᴋʟᴍɴᴏᴘʀꜱᴛᴜᴠᴡʏᴢ (there are no glyphs for small-caps Q or X). | |||
Or you can copy and paste these samples of the four cardinal directions: | |||
{| class="wikitable" | |||
|ɴᴏʀᴛʜ | |||
|ᴇᴀꜱᴛ | |||
|ꜱᴏᴜᴛʜ | |||
|ᴡᴇꜱᴛ | |||
|- | |||
|ɴᴏʀᴅ | |||
|ᴇꜱᴛ | |||
|ꜱᴜᴅ | |||
|ᴏᴜᴇꜱᴛ | |||
|} | |||
Once you have access to these copyable/pastable samples, you can set up your computer to automatically provide them as a keyboard shortcut. | |||
*On macOS, you can set up automatic text substitutions in the Text tab of the Keyboard pane in System Preferences. | |||
*On Windows, you can use AutoHotkey. | |||
The [https://github.com/TheCre8r/WME-Road-Shield-Helper WME Road Shield Helper script] also has built-in shortcuts for the correct text. | |||
===Punctuation=== | |||
Space is the biggest limitation in the app's turn instructions. While there is a valid argument to be made that the visual turn instructions should exactly imitate the BGS and its punctuation (while the TTS follows the established rules in place), that will cost the turn instructions some valuable characters. As a result, we feel it is best to not use punctuation despite its presence on a BGS or other road sign. | |||
== | ==Other Resources== | ||
[ | You may want these quick links to the [[usa:Turn_instruction|guidance for turn instructions in the US]]. | ||
Dernière version du 8 juin 2023 à 14:39
A turn instruction is the combination of text, images, and speech that Waze provides to the user in providing route guidance, ideally with minimal thought and without confusion.
This page covers the topic of turn instructions generally and includes guidance for modifying all editable aspects of a turn instruction inside the Turn Instruction interface. This does not include lane guidance, which has its own instructions.
By default, the use of road shields in turn guidance is limited to editors of rank 4 and higher.
Overview
Note that customized turn instructions do not work at all in Waze in CarPlay or Android Auto. They only function in the mobile app.
Turn instructions tell and show a user where and when to turn, keep, exit, continue, or make a U-turn. Editors must take special care to ensure that turn instructions give Wazers clear and useful directions.

By default, a turn instruction will use the street name of the outbound segment for both display and spoken directions. If there is a 1) road shield associated with the primary street name on that outbound segment and 2) that street name is simple and contains the same number as the shield, then the turn instruction will display the shield in place of the street name.
Currently, this can look poor in the app as only the highway number is replaced by a shield, as in the image at right.
Reasonable people interpret this as "Autoroute Autoroute 15 Nord" since the shield implies "autoroute". As a result, using a customized turn instruction will look better right now.
There is one special case in which the Waze app will modify what we feed it in WME. If the top line has only a single road shield with no text (and no other road shield, as "single" implies), then the app will pull up the text in the second line to the first line.
It's more easily shown than described. Here is this exit in WME:

And this is how that appears in the Waze app, with that second line pulled up next to the shield:

In a case like this, it is better to put one item of text next to the shield - it's still not good, but better.
You can customize turn instructions with road shields, destinations, exit numbers, and more. This enhances the Waze experience and we encourage its use.
General Principles
You can the official Waze instructions here.
Turn instructions should match signage as closely as possible within the limitations of the Waze interface, while remaining sensible.
Visually, the elements of the turn instruction should match the visual order of elements on the sign as closely as possible.
Custom turn instructions should be added any time signage for a particular turn includes more than just the primary street name (or associated shield) of the outbound segment. In particular, custom turn instructions should be added:
- for any numbered exit;
- anywhere a road shield is desired but won't be automatically displayed; and
- anywhere else that directional signage shows something other than the primary name (or road shield) of the outbound segment such as most exit ramps and onramps, wayfinders, intersections with specialized signage for a turn, and other occasions.
Here are examples of those use cases.
-

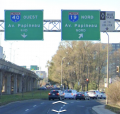
An exit and wayfinder on Autoroute 40 Ouest in Montreal.
-
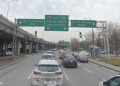
Turn instructions on a major road in Montreal.
-
Turn instructions and a wayfinder on a major road in Montreal. Adding a wayfinder in this case is not recommended, but the turns should be implemented with turn instructions that indicate the cardinal direction.


A good rule of thumb to use is that if there is a big green sign (BGS), then there should be a turn instruction. But that is not an absolute rule.
Here is an example where a turn instruction should not be used, since this is a named street and having Waze mention the highways would be confusing rather than clear.

How to do this
To access the Turn Instructions dialogue, hover your cursor over a turn arrow and click on "Add instructions".
Basic layout
As stated, the goal is to resemble the road signage as much as possible, but the functionality has limitations such as a lack of horizontal display space and a restriction to two lines of information (plus an exit sign).
The best practice is therefore to use the top "Visual instructions" line of the turn instructions for road shields (if there are any) and to put any text below that separated by forward slashes in a "Free text" box in the "Towards" field. The top of the interface displays what the turn instruction will look like in the app. You can see this in action here:

If there are no road shields for a turn instruction, place the first line of text in the "Visual instructions" line with a "Free text" box and put any subsequent text in a "Free text" box in the Towards field, as follows:

Canadian signs are fairly straightforward. If you encounter an unusual case, please contact a senior editor.
Exit signs
If the turn instruction is for an exit, choose the colour of exit polygon appropriate for the accompanying sign. Note that the colour of the polygon is not necessarily the same as the colour of the sign. In the examples from Quebec on this page, the sign is green but the exit polygon is yellow, and so these turn instructions in Quebec use a yellow polygon.
The exit polygon is always displayed in the top right corner of the turn instruction panel.
To use an exit polygon in a turn instruction, choose the correct colour and add the exit number in the box to your choice.
Do not use an exit polygon to indicate the voice prompt for a turn direction such as "keep right", "exit right", etc. The exit polygon is purely a visual effect.
Voice prompt
This is the same option that Waze editors can use in the dialogue box for turns in the WME. You may change it there or in the Turn instructions dialogue. It is an identical choice and will be duplicated from one to the other.
TTS
TTS stands for "text to speech".
If you make no changes here, Waze will speak the default turn instructions. There is rarely a reason to override the default instructions.
Waze has implemented a limited set of pronunciations of words in small caps. Each of these must be added individual and this is not a general rule. The list of small-caps TTS that Waze has implemented so far is:
| Small caps | English TTS | French TTS |
|---|---|---|
| ɴᴏʀᴛʜ | north | nord |
| ᴇᴀꜱᴛ | east | est |
| ꜱᴏᴜᴛʜ | south | sud |
| ᴡᴇꜱᴛ | west | ouest |
| ɴᴏʀᴅ | north | nord |
| ᴇꜱᴛ | east | est |
| ꜱᴜᴅ | south | sud |
| ᴏᴜᴇꜱᴛ | west | ouest |
| ᴄᴇɴᴛʀᴇ-ᴠɪʟʟᴇ | centre-ville | centre-ville |
| ᴄɪᴛʏ ᴄᴇɴᴛʀᴇ | city centre | city centre |
| ᴠɪᴀ | via | via |
Best Practices
Turn guidance only applies to turns, not segments. If you have many segments joined at a node that requires turn guidance, you will have to create turn guidance for every turn arrow coming out of that node.
There are two tricks you can use to reduce your work.
1) Avoid busy nodes
You can create more node junctions in order to reduce the number of turns coming out of them. Look at this example, which should use turn guidance for the highlighted highway entry ramp:

In this simple example, the turn from Boul Langelier and the turn from the parking-lot road would both require turn guidance. Users exiting the parking lot road will get the turn guidance for the highway ramp if you do this properly.
You can modify this junction by creating a second junction for only the parking-lot road, like this:

Now, you only need to create one turn guidance for the highway entrance ramp. Users exiting the parking lot road will get a "Turn left on boulevard Langelier" followed by the turn guidance for the ramp.
This is more elegant and more accurate. Just remember that all road segments on the Waze map should be more than 5 metres long.
2) Use inheritance
WHILE INHERITANCE IS A GREAT IDEA, IT DOESN'T CURRENTLY WORK WITH TURN INSTRUCTIONS.
When you have two road segments that attach at a common node, it is easier to create one turn guidance rather than multiples. Waze road name inheritance will pull and use the later instruction if there is no name on intervening segments.
That sounds complicated. It is much easier to understand visually. Here we have two roads leading to a highway entrance ramp. We could create turn guidance for each, as indicated by the two red arrows:

However, we can use only one turn guidance if we put it here, as long as that crossing segment has no name:

Both previous segments will "inherit" this single turn guidance. You have cut your workload in half.
Note that you will still have to create a separate turn guidance for users turning right from boulevard Langelier onto the entrance ramp.
What to Watch Out for
"Towards" field
The "Towards" field is simply the name of the field in the Turn Instructions interface. It does not add any visual representation of the word "towards" and it does not pronounce the word "towards" in the app.
If you require the pronunciation of "towards" in your TTS, please use a guillemet, which is the French quotation mark: ». The symbol works for both French and English. But there is no good reason to add that "towards". It increases the time to pronounce TTS when we should be trying to reduce that.
Slashes versus bullets
Parts of the United States use bullets (dots) to separate multiple street names. Canada uses slashes. Note that some extensions like the Shields Helper script are set to use bullets by default. If you would like to move to bullets in Canada, open a discussion on the Waze Canada Discord server.
Canada style: Sortie 6: Rte 202 / Hemmingford / St-Bernard-de-Lacolle / Lacolle
United States style (not consistent): Exit 276A: US-460 E • Granby St
The United States also makes more use of guillemets than we do in Canada.
Road shields
Road shields not appearing in list
Often, you will need to use a road shield in a turn instruction but because that road shield is too far away in WME, the Turn Instruction interface will not present the shield you need as an option.
There are a few ways to solve this problem.
- Create a new road segment in WME near where you are adding your turn instruction. Give it a name, then de-select it and reselect it. Once you have reselected it, assign the road shield you require to that new segment. Hit the Apply button. You do not have to save the new segment. The road shield you have just created will now appear as an option in the list of road shields in the Turn Instructions interface. Once you have created the road shield, delete the new segment you created and save your work. The road shield will continue to be available nearby for future turn instructions even after the new road segment has been deleted.
- Put the road shield you need on a nearby existing street. Hit the Apply button and follow the rest of the instructions given in the previous method. Don't forget to delete this road shield when you are done.
- Zoom out in WME so that the road shield you require appears in your field of view. Reload the WME webpage. Zoom back in to you turn instruction and the road shield you need may now appear in the list. It also may continue to be absent.
Using "foreign" road shields
Sometimes, you may need to use a road shield from another province or from the USA. For example, if you are in Ontario, you may need to use a road shield of a Quebec autoroute or an American Interstate. You cannot create those shields in Ontario, but there is a workaround that will let you "import" them to your province.
To get the shields into your turn guidance, you must create a new segment with one end in the province/country whose shield you need and the other end where you need to use it. Then follow the instructions in step 1 in the previous section.
Here's an example that placed an American road shield in Saint-Jean-sur-Richelieu, QC, as seen here:

To get that American shield, follow these steps:
- Create a road segment that stretches from the US to Saint-Jean-sur-Richelieu. In this example, this segment was 42 kilometres long. Assign the new road to the US and an American state in the Address fields. You can assign a city name or click the "None" box. Name the road something relevant.
- Give this segment a road type of freeway. This is not important for the shield, but it may save you time if you saved it and you have to hunt for it to delete it. Freeways show up at all zoom levels.
- De-select and reselect the segment. Because the road is assigned to the US, you get your choice of US shields!
- Once the road shield is assigned and applied to the new segment, you can use it anywhere within range.
This image shows the segment created to bring the US I-89 shield to Saint-Jean-sur-Richelieu:

And here is the turn guidance that uses it:

(Note that we should probably spell out "Interstate" in Canada.)
Road shields and cities
Road shields are assigned to Waze cities, but the city you choose for your road shield in a turn instruction is completely irrelevant.
Road shields and cardinal directions
Once an editor selects a road shield, it will appear with the cardinal direction assigned to it when it was created. You may freely change or delete this cardinal direction. It is completely modifiable, which leads this discussion to...
Road shields and small-caps font

Rigorous testing has led us to conclude that using small caps not only better emulates what drivers see on any BGS, but also that it just looks so darned refined in the app (see image at right). As a result, we have established the use of small caps as a standard in Canada for turn instructions. We have also expanded this to include the directions on all road shields.
However, it is not trivial to get small caps to appear. The following characters can be copied and pasted into WME: ᴀʙᴄᴅᴇꜰɢʜɪᴊᴋʟᴍɴᴏᴘʀꜱᴛᴜᴠᴡʏᴢ (there are no glyphs for small-caps Q or X).
Or you can copy and paste these samples of the four cardinal directions:
| ɴᴏʀᴛʜ | ᴇᴀꜱᴛ | ꜱᴏᴜᴛʜ | ᴡᴇꜱᴛ |
| ɴᴏʀᴅ | ᴇꜱᴛ | ꜱᴜᴅ | ᴏᴜᴇꜱᴛ |
Once you have access to these copyable/pastable samples, you can set up your computer to automatically provide them as a keyboard shortcut.
- On macOS, you can set up automatic text substitutions in the Text tab of the Keyboard pane in System Preferences.
- On Windows, you can use AutoHotkey.
The WME Road Shield Helper script also has built-in shortcuts for the correct text.
Punctuation
Space is the biggest limitation in the app's turn instructions. While there is a valid argument to be made that the visual turn instructions should exactly imitate the BGS and its punctuation (while the TTS follows the established rules in place), that will cost the turn instructions some valuable characters. As a result, we feel it is best to not use punctuation despite its presence on a BGS or other road sign.
Other Resources
You may want these quick links to the guidance for turn instructions in the US.