O artigo abaixo contém informações muito importantes em como criar corretamente cruzamentos no Brasil. Por favor, leia atentamente este artigo antes de editar junções.
Simples é melhor
Quando se cria junções (interseções, encruzilhadas, junções em formato T, etc) às vezes temos que adaptar o formato real para que ele seja o mais útil possível no Waze. A ideia principal seria representar o cruzamento da maneira mais simples possível e somente incluir complexidade quando estiver lidando com um problema específico.
Dica: Quando a resposta de um problema que você tiver não for respondida por este artigo ou você ainda estiver com dúvidas, entre em contato no Forum da comunidade de Editores Brasileira.
O Básico
O que é uma junção?
Uma junção é composta de três coisas:
- Pelo menos duas ruas;
- Um ou mais locais onde esses ruas se encontram (nós de junção)
- Curvas - autorizadas ou não - nos nós de junção.
Se você não sabe como criar e modificar as vias, estradas, cruzamentos, etc. Por favor leia the Map Editing Quick-start Guide.
Encontro de vias
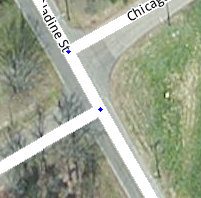
Vamos começar com a situação básica de final de rua. A rua que esta terminando vai acabar na rua principal em um ângulo de 90 graus. Esse é o exemplo mais simples no mapa já que o formato real da rua é desenhado exatamente igual no Waze.


Você achará muitas ruas que se encontram com ângulos diferentes. Até em áreas urbanas projetadas você encontrará ruas antigas que não seguem o projeto, passando no meio de centros urbanos em ângulos estranhos. A ideia inicial seria criar no mapa o mesmo ângulo que na vida real, mas isso deve ser feito com cuidado já que, na maioria dos casos, o ângulo de entrada ou saída influenciam diretamente as instruções de navegação.


Esse método possui algumas falhas. Dependendo do ângulo (mas não exclusivamente dele) o Waze poderá dar instruções de "Mantenha à Direita" enquanto a instrução "Vire à Direita" seria a mais indicada. Se as saídas forem de Minors, Major ou Freeway a instrução será "Saia à Direita" onde, em alguns casos, pode ser confusa. Em alguns casos nenhuma instrução será dada.
Para eliminar ambiguidade, nos precisamos desenhar o cruzamento aonde o algoritmo de roteamento funcione da melhor maneira possível.


Uma rampa saindo de uma auto estrada dará o comando Saia, então o seu ângulo de saída não é necessariamente um problema.


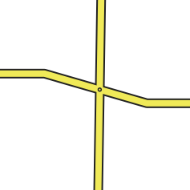
Encruzilhadas
Quando virar em uma encruzilhada, a ideia é receber as instruções "vire à esquerda" ou "vire à direita", neste caso esperaremos ângulos próximos a 90 graus.


Se tivermos uma rua cruzando em um ângulo muito diferente de 90 graus, nós precisamos fazer com que o algoritmo identifique que desejamos "vire" em vez de "mantenha".


Surface Streets
Intersecções em Y
When surface streets meet in a Y formation and we must carefully consider how they are mapped to provide useful navigation instructions. As the How Waze Determines turn/keep/exit maneuvers page explains, segment names and geometry are very important in determining what navigation instructions are given.
In the example below, the multi-lane surface street is known as Main Street to the west and Atlantic Ave to the east. The name change occurs when Main St branches off as a regular surface street.

The description above is how a human would probably describe the situation, but as you can see in the image above, a more technical description would be that Main St travels in a perfectly straight line and Atlantic Ave branches off of it. But if we map it that way in the editor, we create a major problem.

Since the multi-lane segment of Main St and the regular street segment of Main St have the same name, the routing engine automatically considers that to be "straight". If the two sections line up in a straight line the way they appear from the sky, then we are reinforcing the idea that "straight" is Main St. to Main St.
But as a typical driver would want, "straight" should be the path that remains on the multi-lane roadway, regardless of what the name is. To make sure the routing engine understands the proper treatment of the junction, we have to be deliberate with the segment geometry of all three involved segments. We end up with something like this:

Now the geometric definition of straight is the multi-lane portion of Main St. onto Atlantic Ave., since we have made that transition as close to zero degrees as possible. The regular street portion of Main St. now branches off at an angle close to 90 degrees. The routing engine should recognize that a turn is required. So the result is that Main St. to Atlantic Ave. has no announced turn, and multi-lane Main St. to surface road Main St. has a turn announced. Exactly what most drivers would expect in the real world.
Ruas Sem Saída
Ruas que só tem um nó para entrar e sair podem representar desafios para o servidor de rotas, apesar de serem bem simples no nosso entendimento.
Ruas Sem Saída são segmentos de vias que simplesmente terminam, sem continuação ou conexão em uma de suas pontas. Uma placa de "Sem saída" pode indicar que a rua tem uma conexão, mas leva apenas a ruas sem saída.
Dentro do Editor de Mapas não é possível representar uma Rua Sem Saída com múltiplos segmentos se existirem ruas privativas ou de estacionamento mapeadas e conectadas. Nesse caso somente o último segmento é considerado "sem saída".
Assegure-se de que ali exista um nó (não apenas uma "dobra") no extremo final do segmento. Isso é necessário para garantir o roteamento pra fora desse segmento. Veja a seção "Cul-de-sac" abaixo para saber quando e como corrigir.

This final junction node must be located near the end of the road but it should located where there is still pavement as not to negatively impact client routes. Waze only considers the road fully traversed if junctions at both ends are crossed. If the final junction happens to be at the edge of the pavement (or off of the road surface if aerials are not exactly aligned) it will be very difficult for a driver to cross that junction. A good rule of thumb is to have the end junction the same distance from the end of the pavement as it is from each side of the road.

With such a placement, the driver is given a chance to cross that final junction.
Cul-de-sacs
See also: Cul-de-sac article on Wikipedia
A Cul-de-sac (a.k.a. Court in the US) is a common treatment of a dead end street in a residential neighborhood.
In almost every situation, a cul-de-sac should be treated exactly as a dead end street, with the final junction node in the center of the bulb of the cul-de-sac. Be sure the free end of the final road segment has small blue diamond displayed at the tip (when not editing or selecting the segment.) If there is no blue diamond, please correct it by following the steps for fixing dead ends.

The junction node should be located close to the middle of the bulb and NOT near the outer edges. If the junction is located along the perimeter of the bulb, there may be difficulty in processing client routes. Waze only considers the road fully traversed if junctions at both ends are crossed. If the final junction happens to be on the curb (or off of the road surface if aerials are not exactly aligned) it will be very difficult for a driver to cross that junction. With the junction in the middle, we give a driver a good chance to cross the junction no matter where they drive within the bulb. The exception to this guidance is given in the next example.
The cul-de-sac below, with a small island, should be treated as a basic dead end with no loop. The island can be ignored, as there is no significant routing question for the driver once they get to the cul-de-sac.

As for placement of the final junction node, here we may get better results by moving the junction out from the true center and over to the outer perimeter of the central island. The shift ensures that the driver has a good opportunity to cross the final junction.

However, if the cul-de-sac has a very large bulb with a large island in the middle, it may better be treated as a Loop. A good rule of thumb is if you were standing at the end of the cul-de-sac, can you tell that it is just a cul-de-sac? Or does it look like two different roads? If you see an island, but are not sure if it is significant, leave the Loop out. If "Missing Road" errors occur then add a Loop.
Loops
Loops são estradas em que você pode entrar e, sem inverter a mão de direção, terminará no mesmo local onde você estava.
Uma regra importante do Editor de Mapas é: um segmento de via não deve começar e terminar na mesma junção.
Se essa regra não for seguida, o servidor de rotas terá dificuldades em fornecer trajetos para dentro e fora do loop. Qualquer loop partido em dois segmentos por uma junção não terá este problema.
Pode-se esperar que haverá outra estrada ao longo do loop a qual você possa mapear, e que irá quebrar o loop em duas partes. Se não houver esse tipo de quebra e todo o loop for representado por um segmento que se conecta consigo mesmo, devemos inserir uma junção supérflua em um dos segmentos que integram a estrutura. A posição da junção extra não importa, mas a maioria das pessoas colocam na metade de um dos segmentos.


Exemplo do problema causado: principalmente em vias em que rotas passam por elas, a não observação desta regra pode gerar instruções erradas e completamente sem sentido para o motorista, pois a rota desenhada no mapa mostra um caminho, mas a instrução, no passo-a-passo e falada, é outra. Veja o exemplo abaixo, onde a rota correta e desenhada passa pelo trecho à esquerda, mas a instrução, mostrada pela plaquinha (seta), mostra "manter à direita" (!):

NOTA É muito fácil um editor encontrar a junção extra, assumir que é supérflua e deletá-la! Esse problema é maior se a estrada que forma o loop for muito grande ou de forma irregular, logo o loop não será facilmente notado. Uma solução é identificar um caminho ou estrada que ramifique do loop e adicioná-la ao mapa, criando uma junção de três vias com menores chances de ser deletada.
NOTA O Editor de Mapas pode ser resistente em editar um loop que ainda não foi quebrado em dois. Caso ocorra erros ao salvar, tente uma das seguintes abordagens:
Se o loop e a estrada que chega até ele possuem o mesmo nome:
- Selecione a via e o loop
- clique no ícone de ponte que aparece (uma terminação do loop irá desconectar da outra)
- divida o loop
- reconecte as terminações desconectadas
- confirme conversões
Se o loop e o segmento que chega até ele têm nomes diferentes
- desenhe um novo segmento que se conecte ao loop/junção
- dê ao segmento novo o mesmo nome que o do loop
- selecione o loop e o novo segmento
- clique no ícone de ponte que aparece (uma terminação do loop irá desconectar da outra)
- divida o loop
- reconecte a terminação desconectada do loop
- confirme conversões
Este é um video no YouTube mostrando o segundo método (em inglês).
Rotatórias e Retornos Circulares

Por favor, veja a página Criando e Editando uma Rotatória, a qual contém uma descrição completa deste tipo de junção especial.
At-Grade Connectors

Don't set these segments as ramps! Watch out for all of the turns you need to restrict. For a full discussion, see the at-grade connectors page.
Rampas
Ramps have a very specific purpose in Waze. They are intended to connect segments of Minor Highways, Major Highways, and Freeways to roads where there are no at-grade crossings.
Quando usar rampas
The following conditions must be met for the use of ramps to be appropriate:
- Two roads cross over/under each other with no at-grade junction
- At least one of the roads are of these types
- Minor Highway
- Major Highway
- Freeway
- Ramp
If the above requirements are not satisfied, you may be dealing with an At-Grade Connector.
Quão complexas as rampas devem ser?
Rule #1 is still simpler is better. If there is no large distance between paths at the end of a ramp (either into or out of the ramp), a single segment connecting to a single junction node is all that is needed. The existence of a painted, concrete, or grass island is NOT enough of a reason to split a ramp into multiple ramps.

When paths at the end of the ramp deviate significantly in distance, regardless of the existence of any type of island, then multiple ramps should be used.

Highway/Freeway Junctions
These are junctions involving the three Highway/Freeway road types - Minor Highway, Major Highway, and Freeway -- as well as their Ramps.
Specific examples of how to handle common junction types are provided in later sections. All of those examples use the basic building blocks provided here.
If you are unsure what road type you should use, refer to the following pages for more information.
Highway/Freeway Exits
It is a basic Exit situation when a "straight" direction is obvious to a driver and navigation instructions are only needed for the non-straight direction (the exit.) If navigation instructions are required for both directions, see the Wayfinder Segments section below.
Structure


To be treated as a basic Exit, the following must be true:
- The entering segment and one exiting segment must be one of the three Highway/Freeway types
- The Highway/Freeway exiting segment must have close to a zero degree departure angle from the entering segment
- The other exiting segment must be of the type Ramp
- The Ramp exiting segment must have a departure angle of between 20 and 30 degrees from the entering segment
When those conditions are met, the navigation will present an "Exit Right/Left" instruction when the ramp is to be used, and will remain silent when the exiting Highway/Freeway segment is to be used.
Naming
The Highway/Freeway segments before and after the junction should be named the same. The ramp segments should be named in accordance with the best practices in your location.
Naming standards for other areas
Editors covering areas that do not have specific best practices should review the existing guides for other areas, and determine which best matches the roadways of your area.
Highway/Freeway Splits
A Highway/Freeway Split is when a Highway/Freeway segment meets at a junction with two other Highway/Freeway segments and there is no obvious straight through direction to a driver.
Structure

To receive a navigation instruction for both branches of a split, the following must be true:
- All segments must be one of the three Highway/Freeway Types
- All segments must have names which are different from each other
- The two exiting segments must have departure angles of 20 to 30 degrees from the entering segment
With those conditions met, the junction will present "Keep Left" and "Keep Right" navigation instructions using the name of the appropriate exiting segment.
Naming
The primary rule is that all 3 segments at the junction must have different names. That can be accomplished in one of two ways:
- Using road names alone - It is an easy situation if all three roads which connect have different names. If "Highway A" splits into "Highway B" and "Highway C", then that is all we need to have a properly functioning split.
- Using signs and Wayfinder Segments - If one of the branches of the split has the same name as the entering segment, we must create uniqueness at the junction. If "Highway X" splits off from "Highway Y" and "Highway X" continues as the other branch, the preferred approach is to use named Wayfinder Segments.
Wayfinder Segments
It may be necessary to provide additional information to a driver for complex or confusing Exits and Splits. Examples of such situations include:
- Lane Drops - Highway has been 3 lanes for miles and miles but only 2 lanes continue straight through at a certain point
- Inconsistent signage - Highway continues as a numbered route, but signs only call it by a name instead
- Non-obvious continuations - In a right-hand traffic country, exiting traffic is to the left and continuing traffic is to the right
In these cases we need to use short way-finder or path-finder segments which are named with the information displayed on the roadway signs. There are two methods to accomplish this: using Highway/Freeways or using Ramps.
- Highway/Freeways
- Pro: provide a consistently rendered line on the map with no breaks
- Pro: does not introduce a routing penalty for the transition to Ramp type (although we do not know how much of an impact, if any, this has in actuality)
- Con: the long name of the segment may be displayed on the map creating clutter
- Con: the segment may be hard to see in the editor since it may blend in with the main Freeway
- Note: will provide "Keep Left" and "Keep Right" instructions
- Ramps
- Pro: ensures any long names are hidden from display on the map
- Pro: forces the client to stay zoomed in for the length of the segment to give a close view of the split to the driver
- Con: introduces a routing penalty of the transition to Ramp type (although we do not know how much of an impact, if any, this has in actuality)
- Con: may render as a broken line on the map
- Note: will provide "Keep Left" and "Exit Right" instructions in right-hand traffic countries and "Exit Left" and "Keep Right" instructions in left-hand traffic countries.
In both cases, the two exiting segments MUST have identical road types and different names from themselves and the entering segment.
Here we show Highway Y splitting off from Highway X. By labeling segments with the information available on the road signs at the split, we have achieved uniqueness and provided additional useful information (the destination cities) to the driver. We can achieve the desired results using either approach. First as all Freeway segments:

And then using Ramps (which are named how they appear in the all Freeway example):

At times it is also necessary to use a way-finder at an Exit if a driver needs advance notice that only some lanes of the roadway continue straight through. Again we can accomplish this using either of the two methods. First using Freeway segments for the split:

And then using Ramps (again, named the same as above):

A rule of thumb for the way-finder segments is to make them 15 to 20 meters long. This keeps the segment small so we are less likely to see it in the client, but keeps it long enough to find and manipulate in the map editor.
Ramp to Ramp Splits
A ramp may itself split and branch into two directions. If this is the case, "Exit Right" and "Exit Left" will be announced using the name of the appropriate exiting segment in all cases.
Structure

Naming
If ramps are unnamed, the name of a subsequent ramp will propagate backwards. In the example above, if the two ramps exiting the junction are named, the ramp entering the junction can be left unnamed. Then any navigation instruction directing you onto the first ramp would use the name of the appropriate exiting ramp.
Example: The two ramps exiting the junction are named "DestinationLeft" and "DestinationRight". The ramp that enters the junction is unnamed. If you need to "Exit Right" onto the unnamed ramp. If you are headed to "DestinationLeft", navigation would tell you:
- Exit Right to Destination Left
- Exit Left to Destination Left
Using unnamed ramps is very useful to provide sufficient notification of an approaching decision point, as long as the names of both ramp splits are visible on signs at the start of the initial ramp.
Example of good use of unnamed ramps:
- Initial Exit Sign: to City A and City B
- Destination Left Sign: to City A
- Destination Right Sign: to City B
Result: An unnamed initial ramp will provide accurate and informative navigation instructions to the driver.
Example of poor use of unnamed ramps:
- Initial Exit Sign: to Downtown
- Destination Left Sign: to Downtown
- Destination Right Sign: to Center St
Result: An unnamed ramp may create confusion since both Destination ramp names are NOT listed on the initial exit sign. In this case the initial ramp should be named.
Example of modified use of unnamed ramps:
- Initial Exit Sign: Exit 70A-B to City A and City B
- Destination Left Sign: to City A
- Destination Right Sign: to City B
- Destination Left name in Waze: Exit 70A: City A
- Destination Right name in Waze: Exit 70B: City B
Result: By using a modified name for the destination ramps, we have combined information from two sets of signs to generate the advance notice a driver may need to prepare for a decision point.
Limited Access Interchanges
Please see the Limited Access Interchange Style Guide.
Special Cases
Transitions
A transition is a non-junction depicted using a junction node.
Valid examples of where to use a Transition node include:
- Road name changes
- City Limits
- Road Direction changes
- Part of a Loop Road
An old reason to use a transition node was to indicate segments of the road with different house numbering. With the new point numbering scheme being adopted by Waze, this is no longer a reason to use transition nodes.
There may be existing Transition nodes on the map for other reasons (left after a connecting road was deleted, inherited from to the original base map import when things such as rivers and streams created junctions, etc.).
As long as we are certain it is not a valid Transition node, a superfluous junction node may be deleted. Doing so will simplify the map, eliminate turn restrictions to maintain, and reduce computing resource needs. Also consider removing the geometry node which will replace the junction node you delete, if that geometry node is not needed.
Roads to Nowhere
In certain situations it may be necessary to add road segments that are un-drivable in order to provide accurate navigation instructions.
Actual
A valid use of this technique is at the temporary end of a freeway. As a freeway is built, it is often opened in sections, up to a certain exit. If we map this as a regular freeway segment leading to a ramp segment, no announcement will be made for that final exit, no matter what we name the exit ramp.
This can be confusing if the ramp is set up as a properly signed and numbered exit, especially if a driver is traveling a long distance on this freeway. Imagine traveling down a freeway and seeing your next instruction is "turn left at Main St." You would probably wonder if there was a map error since you shouldn't be making left turns off of a freeways.
If we map even just a little of the future path of the freeway, this gives the routing engine a junction which will generate an "exit" instruction at the end of the freeway, thus eliminating any confusion.
Conversely, if we do NOT want an exit instruction at the end of a freeway, ensure there are no road segments extending past the final exit, to ensure the final exit is the only path out of the final freeway segment.
Fake
(coming soon)
Offset Roads
Sometimes you will find two roads which cross, where one does not quite line up with the other.

There are a few things we need to look at in this situation.
- Do the roads actually line up in reality? If so we need to modify the junction to be a basic 4-way junction.
- Do the roads ALMOST line up in reality? If you were giving instructions to a person and would tell them to go straight with no mention of any slight turn or jog, then we want to make it into a 4-way junction. You may need to "split the difference" and not follow the centerline of either road to achieve this. The angles are exaggerated in this next example to show how the junction is forced to be close to 90 degrees, then we taper to the true centerlines of the roads. In practice this can be much more gradual and/or done while zoomed in very close.
- Finally, is there a true separation between the roads? Would you need to say for example "turn left then make an immediate right"? If so then we will want to leave the junction such that the two sides do not align.
Since we want to avoid very short segments of road (the GPS chips in consumer devices can be very inaccurate which may make it seem that a driver skipped right over a short segment. This will result in automated map errors and possible route recalculations in the client,) it may be wise to shift the side roads as far apart from each other as possible with them still in the proper location (along the far curb lines for a residential street for example). This will maximize the length of the short segment between the side roads.