| New editors, please first visit our WME Welcome page. |
This is a comprehensive reference guide to the waze map editing interface. Best Practices and tutorials for beginners are available in other articles. Waze Map Editor was introduced in September 19, 2011 to replace the Cartouche map editor, and has been continuously modified since. The Waze Map Editor is officially supported only on the Chrome browser. It may or may not work on other browsers.
Starting the editor
Begin at http://www.waze.com/editor. Choose the correct part of the world from the top bar.

Either log in or choose practice Mode.
Practice mode
From the splash screen, click "practice mode". You can try out most of the features of the Waze Map Editor. WME chat will not be available. You cannot respond to map Update Requests. The edit count will not go up, and you will not be able to save.
Map editor layout
There are four main areas of the Map Editor:

Map editor toolbar
![]()
At the top of the Waze Map Editor you will see the main toolbar. It includes the primary control buttons for the editor.
Search box

In the wide search box, you can enter an address, city, state, country, landmark, point of interest, or a combination of those. After hitting Enter or clicking the Find button, you will either be taken to the only result or be given a list of matches (maximum of six) from which to select.
For example, entering "757 Mohawk St, Columbus, OH" (image on the left) will center the map and drop a search marker directly on that address.

However, searching for "main st, new york" (image on the right) is less specific and therefore, will give you a list of matches from which to select. The maximum number of results for this list will be six items.
Editors can now place comments to other editors directly in WME. Use this button to add an area or point comment.

Hover over this button to choose the ![]() or
or ![]() button to add the comment. Use the to add information about the comment.
button to add the comment. Use the to add information about the comment.

Hover over this button to show place categories. Hover over the place category you want, then choose the point ![]() or area
or area ![]() button to add the place. Use the left pane to change information about the place. For an area place, use geometry nodes of the place to change its shape. For an area place or a point place, set the Entry-Exit Point using the menu.
button to add the place. Use the left pane to change information about the place. For an area place, use geometry nodes of the place to change its shape. For an area place or a point place, set the Entry-Exit Point using the menu. 
NOTE: At this point in time we can only set one Entry Point for a given place. A future update may enable more than one Entry Point to be entered.

Hover over this button ![]() to choose between road types:
to choose between road types:
- Roads
- Pedestrian path
- Roundabout
- Railroad crossing
- Camera
- Junction box (can only be created by editors of rank 4 and above)
View this page on how to not create red roads (segments with incomplete information).
Shortcut keys: I, O or J
- I (a straight segment)- Road. Click on the map to start. Click to add a geometry point. Double click to end.
- Pedestrian path. Click on the map to start. Click to add a geometry point. Double click to end.
- O (a circle)- Roundabout. Click on the map at the center of the roundabout. Drag a circle of the correct size. Click to end the roundabout.
- Camera. Click on the map where the camera is to be located. See Enforcement Cameras for editing instructions.
- J Junction box. Click on the map to start. Click to add vertices for the box. Double click to end. After creation, the shape of a junction box cannot be adjusted.
See the Editing Manual Quick Start Guide for more information.
Save button

![]() Shortcut key: Ctrl+S
Shortcut key: Ctrl+S
The Save button serves two purposes: 1) it displays the current number of changes pending to be saved, and 2) when clicked, it saves all the current changes you have made.
As you make changes, the counter in the Save button increases. Pending changes are shown in a blue superscript box. Note saving frequently is most strongly encouraged since one mistake will prevent all the others from saving. (This counter is the number of changes you've made which can be undone, NOT the number of edits you get credit for.)
When the save button (or the shortcut key) is clicked, then Waze checks all the pending edits with a regression checker. If there are no problems the edits are saved and will appear in the app after the next tile update. If there are problems, then you will get an error message and may be taken to the problem segment or place. If there are multiple problems you will just get an error message. You might have to undo edits till you have removed the error if you can't find it and fix it. This is why it is recommended to not have too many pending edits when you save as you start.
Once the save operation completes successfully, you cannot Undo previous changes with the Undo button.
Undo button

Shortcut key: Ctrl+Z
The Undo button will undo the most recent unsaved change with each click.
| IMPORTANT: Once the Save button is clicked and the save operation is complete, the Undo button has no affect on previous changes. |
A change can be deleting a geometry node from a segment or renaming a landmark. It can also be a change to multiple objects at once. For example, if you select 25 street segments at once and change them from one-way to 2-way, that is a single change. Therefore, one click on Undo will undo that change for all 25 segments.
Redo button

Shortcut key: Ctrl+⇧ Shift+Z
The Redo button will re-apply the most recent save that was undone with each click.
Delete button

Shortcut key: Delete Del
The Delete (trashcan) button will delete, or trash, any currently selected objects. If you have multiple objects selected, you will be prompted to confirm the multiple deletion. The only object you can currently delete using multi-select is segments.
Objects are not actually deleted until the Save button is clicked. Once the save button is pressed, you cannot Undo any edits or deletes.
Layers


![]() There is a second drop down menu for layers, which can be accessed by clicking the "More options" link at the top of the first drop down menu. Return by clicking the "Less options" link. When the box next to the layer name is checked, then that layer is active and being displayed. There is a default shortcut key defined for each layer, and to make it easy to remember, with two exceptions: The shortcut is ⇧ Shift+X (first letter of the layer name). The two exceptions are the satellite/aerial imagery, which uses the letter I as the shortcut key for Imagery, and Places which uses the letter L because it was previously called Landmarks.
There is a second drop down menu for layers, which can be accessed by clicking the "More options" link at the top of the first drop down menu. Return by clicking the "Less options" link. When the box next to the layer name is checked, then that layer is active and being displayed. There is a default shortcut key defined for each layer, and to make it easy to remember, with two exceptions: The shortcut is ⇧ Shift+X (first letter of the layer name). The two exceptions are the satellite/aerial imagery, which uses the letter I as the shortcut key for Imagery, and Places which uses the letter L because it was previously called Landmarks.
There are expanded options for the layers as well. As shown at the bottom of this section.
Map problems

![]()
![]()
![]() Shortcut key: no default
Shortcut key: no default
The Waze servers are constantly analyzing driver's GPS tracks to determine when there might be a problem with the map and uses the Problems layer to alert the editors. Some types of problems tracked are missing roads, incorrect turns allowed at intersection, wrong direction of road, missing parking lot places, and reports from Waze reporting partners.
You can toggle visibility of closed Map Problems by using the "Show/Hide closed" link next to the Map Problems text.
See Map problems for more information.
Update requests

![]()
![]()
![]() Shortcut key: ⇧ Shift+U
Shortcut key: ⇧ Shift+U
These are user-submitted map issues while on the road or from LiveMap. This marker shows the location the user reported the issue from. The user's driven route for a distance before and after the reported location will be shown in bright green. If Waze was in navigation mode at the time of the report, then the requested route for a distance before and after the reported location will be shown in purple, with markers along the route with the turn direction given to the user.
You can toggle visibility of closed Update Requests by using the "Show/Hide closed" link next to the Update Requests text when the "More Detail" expanded layer view is shown.
See Update requests for more information.
Place updates
Shortcut key: ⇧ Shift+P
The Place Updates layer shows Place Update Requests (PURs) submitted by drivers and beginning editors. When an untrusted driver or editor creates a new place or makes changes to an existing place, a Place Update Request is created. Editors of rank 2 or higher decide whether to accept each request. The most recent requests are a pale pink. Older requests are darker. Accepted but not-yet-saved requests are green.
If an editor is modifying a place that is above his/her editing level, then it will generate the PUR for a higher level editor to review before the changes go to the map.
See Place Updates (Moderation) for more detail.
Places
 Shortcut key: ⇧ Shift+L
Places are also known as POIs (Points of Interest). These can really be just about anything, but tend to be things like businesses, parks, gas stations, cemeteries, transit stations, etc. There are two types of Places: Area and Point. Point Places are for most small businesses, shops, etc. Area Places are for large stores, malls, parks, etc.
See Places for more information on this topic.
Roads
 Shortcut key: ⇧ Shift+R
Roads are all of the streets, alleys, highways, and freeways which make up the drivable street system in Waze. Depending on the zoom level, some street types are not displayed so that the map is not too cluttered.
Road closures


The Road Closures layer displays a closure symbol and direction when a closure has been placed, using either a WME Closure or the client's Report > Closure feature. A red circle indicates a currently active closure. A gray circle indicates either a scheduled, but not currently active WME closure. Black arrows show the closure direction(s).
App submitted closures from editors rank of R5+ go live to the map right away.
Enforcement Cameras


 Shortcut key: ⇧ Shift+S
Enforcement (Speed) cameras, red-light cameras, and dummy cameras are shown on this layer. Drivers can report camera location and type, and a map editor is required to confirm the existence of the camera. The precise location and direction that the camera is pointing is required before it will appear in the app. Confirmed cameras will pop up a visual and audible alert in the Waze app when approaching a speed or red light camera.
Note: Cameras are locked at the editor's level who last modified or added the camera. Due to this, new rank 1 editors are not able to modify cameras that have recently been modified or added by a rank 4 editor.
See Cameras for more information.
Satellite imagery
![]() Shortcut key: ⇧ Shift+
Shortcut key: ⇧ Shift+I
Waze uses aerial and satellite photography provided by Google.
Area managers (AM)
 Shortcut key: ⇧ Shift+A
The Area Managers layer shows overlapping colored, named rectangles. These areas represent the areas those users have Area Manager permissions. This layer allows you to identify a user you may wish to send a PM in the forums about a specific issue you noticed in their area, but do not have rights to fix.
GPS tracks
 Shortcut key: ⇧ Shift+G
This layer will show tracks from Waze users as they drive with Waze running. Waze records and plots the GPS coordinate of drivers. This layer is useful for relatively accurate placement of new or moved roads when aerial photography is not yet updated. GPS tracks appear in the map editor as colored arrows. The direction of travel for a GPS point determines its color, so that all drivers going the same direction will show their points in the same color. This makes it easier to determine errant GPS tracks, or where a road on the map doesn't follow the actual path of vehicles.

The meaning of the colors is covered in the color-by-azimuth page.
Editable areas
 Shortcut key: ⇧ Shift+E
Where you can edit is determined primarily by where you have driven. Edit rights are initially granted within a one-mile radius of where you have driven with the Waze app running. Your editable area is shown in lighter-colored areas surrounded by a black border. Users who are Area Managers will also see their managed areas in a colored highlighted area.
The editable areas based on drives are usually only available for roughly 90 days of time. These areas / drives sometimes will take a few days to show up rather than being instantaneously updated as soon as you drive in an area.
See Editable area for more information.
Live users

Shortcut key: ⇧ Shift+V
The Live Users layer will display other map editors with the icon above. Editors' locations are shown in real-time.
Disallowed Turns
- Note: Image needed*** Shortcut key: ⇧ Shift+Z
The Disallowed Turns layer will display all turn restrictions on the visible segments.
Map Comments
- Note: Image needed*** Shortcut key: ⇧ Shift+M
The Map Comments layer will display all Map Comment items that are in the visible area. Note: This layer is very useful to have on at all times, due to important info stored in map comments.
Cities
 Shortcut key: ⇧ Shift+C
With "More Details" and the cities layer enabled, select the "Names" item in the layers menu to show City names as selectable objects.
Shortcut key: ⇧ Shift+C
With "More Details" and the cities layer enabled, select the "Names" item in the layers menu to show City names as selectable objects.
City polygons are shown in different colors in WME. City names are shown in the Waze app within the boundaries of their polygons. Some polygon boundaries are defined by the segments which use the city in their primary address while some city polygons have been locked (their boundaries are not affected when changes are made to segment primary addresses); city boundaries will not exactly match the edges defined by the segments. When city boundaries are incorrect or overlapped, whether due to a locked polygon or due to city names being used on the map on the wrong segments, editors refer to this as city smudging.
- To change the name of a polygon in the city layer (and on all objects which use the associated city name in their primary and alternate addresses), please see City selected and Updating the city layer
- You can edit the city on a segment in the #Address box.
- Consult USA guidance on City names, as well as regional, state and local guidance, and always work with the local editing community on city naming/renaming projects.
Left pane
At the left side of the window is an area which is both informational and functional. Different tabs or single panes of information are displayed in this area based on whether an object is selected, the type of object and how many, which enable you to view and edit details of objects.
No object selected
When no objects are selected on the map, the tabs area displays user information. The top section is always visible regardless of what is showing or displayed on the map. Map Problems and Update Requests are not considered map objects, so the tabs will display when a Map Problem or Update Request is selected, if no map object is also selected.
Drives tab

Drives are journeys or routes that you have driven with the Waze client running. While you drive, Waze monitors your journey (recording details like location, time, speed) and transfers this information to the Servers. This data is used to validate the existing map (roads, turns, directions) and to learn average journey times.
Clicking on one of the visible entries will center the map along that route and will zoom out to try and fit your entire route on the screen. Routes over about 20 miles / 30 kilometers will usually not fit on the map display all at once due to scale limitations. Use the mouse or arrow keys to pan around on the map. Parts of the route that display in red are not currently paved roads. Consider zooming into that area to determine if a road should be added.
Select the highlighted numbers at the bottom of the tab window to select older routes in date order.
Drives are typically processed and available for viewing in the Waze Map Editor within an hour of completing the drive. For most short drives such as commutes between home and work (under about 35 miles / 50 kilometers), you will likely find them in the editor in under 15 minutes. If the servers are bogged down, or if your drive is significantly longer (over 100 miles / 150 kilometers), these drives may take up to a week to appear. If you don't see your drive after seven (7) days, open a ticket from the Support page, Quick Help box. Use the Email link and fill out the form and submit.
Areas tab

This shows the entire editable area -- the area in which you can perform edits. Click on your editable area. The view will be centered on the editable area. If your editable area is spread out, in several sections, it may be centered between areas you can edit.
Events tab
The Events tab displays Major Traffic Events for the current map display area and is where Major Traffic Events can be created or edited.
Settings tab

This feature was added as of January 2015[update]
To access user-preference settings in WME, click the "Settings" tab in the left pane. Options include:
- Draw new roads as two-way - determines whether any new road segments you draw start as two-way or one-way
- Draw new roads with all turns allowed - when new roads are drawn with a connection to a junction, the junction can have all "turns" to or from the new segment allowed or disallowed
- Select only on empty selection - affects editor behavior when you select an object (road segment, junction, or place) when there is already an object(s) selected
- If not checked, then clicking on an object will automatically deselect any other objects already selected. This may cause accidental deselection
- If checked, you are prevented from selecting a new object if there anything is already selected. Note that multi-select mode allows you to select additional segments when segment(s) are already selected; use the ctrl key for momentary multi-select, or press the M keyboard shortcut to toggle multi-select mode on/off. Also note that clicking an empty spot can still cause deselection.
- Enable fullscreen mode - when checked, more screen space is given to the map (removes the menu header from the top of the page). Keyboard shortcut ⇧ Shift+F toggles this setting.
- Units - Choose between Imperial (feet/miles) or Metric (meters/kilometers)
One or more segments selected
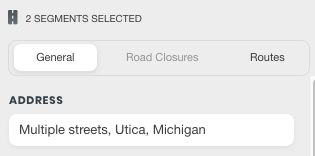
The area above the tabs will show how many segments are selected, and a link to "Select Entire Street". The example graphic to the right shows what the Tabs Area looks like when multiple segments are selected.
Select entire street

When you click the link "Select Entire Street," or use the keyboard shortcut Ctrl+A, the editor will select all segments which match the current segment's primary road name (including city and state). Note that the segments are not required to be physically touching each other, and some selected segments may fall outside the currently visible area.
The "Select Entire Street" link and the multiple segment ID numbers are in the images to the right.

Address box
When you click within the address box, or press the shortcut key E, the address box expands and displays more detail information, while also allowing you to make changes to the country, state (US only), city, and segment name.
Next is where you can add or remove any alternate street name information.
An alternate name, technically referred to as a "linked street," can be used for address searches, while primary name is used in navigation instructions. Alternate names can only be added if there is already a Primary name applied to the street segment(s).
Be sure to review the naming convention used in your area before changing names.
If you run into an extreme case where you need to rename the city name on a large number of streets. Review the article Smudged city. The end of the article includes a link to a special form for converting a mass number of segments using the help of Waze staff in the database.
NOTE: Make sure to click the blue 'Apply' button before leaving the address modification, otherwise, your changes will not be saved!
General tab
On this tab, you can modify the road type, direction, speed limits, elevation, lock, and special properties including "unpaved" and "tunnel". Further down past a separator line are more general details about the segment(s) which is/are selected.
Details on these tab settings can be found under Road Properties
Add restrictions
When you click the button titled Add restrictions, or use the keyboard shortcut T, WME enters the Scheduled Restrictions editing interface
TAKE NOTICE:
- The Add restrictions button appears when there is one or more segments selected.
- If there are restrictions which already exist on any selected segment, the button name changes to Edit restrictions.
Edit house numbers
When you click the button titled Edit House Numbers, or use the keyboard shortcut H, WME enters the House Number editing interface.
TAKE NOTICE:
- The Edit House Numbers button isn't available to click when there are changes which need to be saved. The message, "Save your changes to edit house numbers" appears below the button.
Closure tab
On this tab, senior editors can enable closures in real time. For more information, read the WME Closure Feature page.
Camera selected

When a camera is selected, there is a single General tab which allows you to set the alert speed for a Speed Camera, and also to approve the camera once it is placed in the correct location. Red Light Cameras only need to be placed and approved and have no speed set.
Place selected
| With a Place selected, there are three tabs: General, More Info and Photos. Under the General tab, you set the Place category(ies), give it a name, a description, and a checkbox to lock the place to prevent changes by lower ranking editors. Ensuring that place properties are set is crucial for the functionality of the app. Key items outside of the Name and Description, are the full address details and open hours. | Below that is an address details section which displays the Place's assigned Country, State (in the US) and City. Click the Edit button to change any values and click Apply when complete: | |

|

Residential Place Points (RPPs) are an important tool for helping to route drivers to specific addresses in certain cases. These RPPs are only used for addresses only, NO NAMES. Setting the proper address details will allow Waze to utilize their own internal search for landmarks which appear only in Waze and not in other search provider results. |
Gas station selected

When a gas or petrol station Place is selected, the General tab is very similar to that of all Places. When Gas Station is set as the primary Category (first), then there is an additional drop-down menu to select the Brand of gas sold at this station.
For the Waze application to be as useful as possible to drivers, it is important to ensure all fields of information are fully and properly completed.
City selected

When a city is selected, the city name is shown in the left pane. If you have permission to edit city names (editors of rank a CM or higher), click on the pencil icon to edit the name, then save. Changing the city name will change the name displayed in every address (primary or alternate) of every segment and every place using that name, without editing any of the segments or places. This is because there is no change to the City ID used on any of these objects, just in the way it is spelled. Because WME does not display the City ID, this can seem a little mysterious. WME will not permit you to save a city name that matches the current spelling of another city name or englishName in the same state.
Map display area
All the layers currently selected for display show up in the map display area.
There are four main component controls or displays in the corners of the map display area:
- Info Bar
- #Zoom Control
- Street View Activator
- Chat Window
Chat window


- Top bar
The top bar tells which chat room you are connected to, and allows you to choose whether you will be visible or invisible in the map display area and the editor list.
- Editor list
All visible editors in this chat room are listed with their editor rank. Click the editors' username to jump to the editor's location.
- Message box
When you are visible, type your message in the message box to participate in chat.
- For more details on this topic, see Waze Map Editor/Chat.
Info bar
![]()
Just below the main toolbar, there wide area which runs the width of the map display area.
- The left side will display the current city and state (US) or city and country (world).
- The right side displays whether the editor is still loading any layers, such as road images or GPS points.
Permalink
![]() In the top right corner is this icon.
In the top right corner is this icon.
The permalink icon is used to create a Permalink to share and communicate with other editors. A permalink is a URL used to take you or someone else directly to a specific map location. It contains latitude, longitude, zoom level, visible layers, and any objects that are selected. Objects that can be selected may include a junction, a place, or one or more segments.

Before using the permalink button, zoom and pan the map to show what you want to show. If you wish to, select one place, one junction, or one or more segments. To include a single place, junction, or segment in the permalink, click on it before using the permalink icon. To include several segments, use ctrl+click (MAC: ⌘ Command+click).To generate a permalink, click the ![]() permalink button on the top right part of the Map Display Area.
permalink button on the top right part of the Map Display Area.
The first text box in the pop up contains the permalink to the visible area and the item(s) you have selected. By default, the permalink will also include your layers settings. It is best practice to uncheck the Include layers settings box when sharing a link with other editors. Click on the copy icon at the end of the textbox to copy the permalink to the clipboard.
The second text box contains the current latitude and longitude for the center of the visible map. Click on the copy icon at the end of the textbox to copy the coordinates to the clipboard.
To quickly share your permalink on the Waze forum, click the Open sharing options link. Select which forum you would like to post to and click share. A new page will open for you to compose your forum post explaining your request.
Zoom control

Shortcut key: ⇧ Shift+↑, ⇧ Shift+↓
In the bottom right corner, the zoom control is one way to adjust the zoom level, or altitude, or the map display area. Clicking + will move in closer, showing more detail. Clicking - zooms out/higher and removes detail. You can also click and drag the selector in between the + and - buttons.
The other methods for controlling the current zoom level are covered below in the section on working with the map.
Street View
![]()
To Activate Street View, drag the blue lens icon from under the zoom control to the point where you want to see the street view.
As you drag the lens around the map, it will change colors to indicate the presence of street view images:
 Street View is NOT available here
 Street View is available here


Drop the lens. The map display shrinks by half to make room for the street view pane on the right. The lens has an arrow to show which way street view is pointing.
To spin and and zoom the image, use the pan and zoom controls in the Street view pane, or drag the pane around with the mouse and use the scroll wheel to zoom. To change the street view position, use the arrows on the street in street view, or drag the lens by its small white handle.
All editing operations are still available in the map display pane, but the space for editing is smaller. If you use the house number editor, it will cover some of the street view controls; use mouse and keyboard shortcuts.

To Close Street View, click the X at the top left-hand corner of the Street View pane, or press ⇧ Shift+W.
Ruler

To activate the ruler click the button, then click a starting point on the map (you can click multiple times to add vertices to the path), and then double click the ending point. Distance will be shown in the tool tip.
Show my location

. Zooms to the editor's approximate physical location.
Bottom bar
![]()
Wiki link
Opens a new tab to the Wazeopedia map editing pages.
Forum link
Opens a new tab to the Waze map editor forum
Status link
Opens a new tab to the status table -- showing the current tile updates, delays, server sync updates, editor point counts, and any other status messages the Waze team might choose to post.
Keyboard shortcuts
Opens a "pop-up" showing all the keyboard shortcuts that can be typed into the browser window.
Scale
| Zoom Level | Meter Scale | Foot Scale |
|---|---|---|
| 10 | 2 | 10 |
| 9 | 5 | 10 |
| 8 | 10 | 20 |
| 7 | 10 | 50 |
| 6 | 20 | 100 |
| 5 | 100 | 200 |
| 4 | 100 | 500 |
| 3 | 200 | 1000 |
| 2 | 500 | 2000 |
| 1 | 1000 | 5000 |
| 0 | 2000 | 1 mile |
![]() In the lower right corner is a small graphic showing the current scale of the map display area.
In the lower right corner is a small graphic showing the current scale of the map display area.
The values in the scale relate to the zoom level you see in the URL address of the web browser. Changing the zoom level alters the displayed scale.
Lat/Lon
![]()
In the lower-right corner is a control showing the latitude and longitude of the mouse pointer as it moves over the map. Waze displays the coordinates in Longitude / Latitude format unlike most other mapping services.
Working with the map
Panning and Zooming
- The keyboard shortcut ⇧ Shift+F will hide the Waze top banner bar and put the editor into "Fullscreen Mode"
- There are two ways to pan the map (move around the map)
- Click and drag -- click on an empty point in the map, hold down the mouse button, and drag the map in any direction.
- Keyboard arrow keys -- ↑↓←→
- There are several ways to zoom the map:
- ⇧ Shift+↑ and ⇧ Shift+↓
- The zoom control in the map.
- Double-clicking any point on the map to zoom in one level and center the map on that point.
- Using the mouse wheel "scroll up" to zoom in and "scroll down" to zoom out.
- On Macintosh with a track pad, drag left or right.
- Hold the ⇧ Shift key down and then click and drag a rectangle on the map to zoom in to the rectangle

Working with objects
Objects are any of the things on the map that can be selected. They include point places, junctions, segments, area places, update requests, map problems, and place update requests.
Selecting objects
Selecting single objects
A single click on any object will select it .
- Selected segments, junctions, and places are highlighted in blue. Information about these objects appears in the Left Pane.
- Selected segments will show A and B labels on their junction nodes
- Selected Update Requests or Map Problems remain 100% opaque! while all other objects of the same type become partly transparent.
- Selected Update Requests, Map Requests, and Place Update requests display information in a dialog box.
Selecting multiple segments
Several road segments may be selected at once in order to change the properties of several segments at one time. There are several ways to select multiple segments.
- One way is to select the first segment, then use ctrl+click (Mac users:⌘ Command+click) to select additional segments.
- A second way is to use multi-select mode. With one or more segments selected, use the shortcut key m to enter multi-select mode. Click each segment to add or subtract it from the current segment grouping. To exit multi-select mode, press m again.
- To select all segments between two segments, first select a segment, then use alt+click (Linux users:ctrl+alt+click) to select a second segment. WME will select all the segments in-between the first and second segments, based on the least number of segments and limited to 25 or less segments.
- To select all segments within a box use ctrl+⇧ Shift+click (MAC users:⌘ Command+⇧ Shift+click) and then drag the cursor while holding the mouse button to form a box. When the mouse button is released, all the segments in the box are selected.
- Segments having the same primary name (street, city, state) can be selected using the "Select entire street" function. See the description in the One or more segments selected section for more information.
Geometry
Segments and area places have geometry, which means shape. You change the geometry by adding, deleting, or moving geometry nodes.
- to create a new geometry node, select the object. Hover the mouse pointer over the object to show the geometry nodes in white. Between the nodes, there will be a smaller point where a new geometry node can be created. Click and drag this point to create a geometry node.
- to delete a geometry node, select the object. Hover the mouse pointer over the object to display the geometry nodes. Press and hold d and hover over the geometry node to be deleted.
Moving objects
- point place
- select the point place, then click and drag to the new position and save.There is a limit on how far a place may be moved before saving. To move a place farther, make several short moves.
- area place (entire area)
- select the area. Click and drag the area place move handle to move the area without changing its shape.
- segment nodes (end or geometry)
- select the segment. Hover the pointer over the segment to display the geometry node. Click and drag either end node or any of the geometry nodes to move the ends or change the shape.
- area place geometry node
- select the area. Hover over the area to display the geometry nodes. Click and drag a geometry node to change the shape of the area.
- junction node
- select just the junction where two or more segments are connected. Click and drag the junction node. Any segment junction nodes connected to the junction will remain connected to the junction. This will change the shape of the segments.
- junction node and some connected segments
- multi-select several segments that connect to the same junction node. Click and drag the junction node. Only the selected segments will be dragged with the junction node. Any unselected segments will be disconnected from the node.
Joining segments
When just two segments meet at one junction node, they can be joined into one segment. But only if they have identical information in the left pane. The resulting segment will have a new segment ID. There are three ways to do this:
 Select the junction node only and use the trash can icon.
 Select the two segments and bridge them. This will raise the elevation by 1.
Junction arrows
Select a segment to see all the turns leading out of that segment, including u-turns.

 Green arrows are for allowed turns.
 Red arrows (with "-" sign) are for prohibited turns. Click on the arrow to switch it from allowed to forbidden.
 Unconfirmed or "soft" turns also have a small question mark. Click the arrow to confirm the turn.
 Hover over a green or yellow arrow to see the turn restriction grey box. Turn instruction override instructions, time based turn restrictions, and difficult turn restrictions can be edited within the grey box.
 A yellow arrow means a time based turn restriction has already been applied.
Turn arrow tooltip
Hovering over a junction arrow will pop up the turn arrow tooltip. Editable sections in the turn arrow tooltip include Voice prompt, Instructions, Restrictions, Switch Route(only available on junction box exit arrows), and Difficult turn.
The turn arrow tooltip will move based upon the distance between the junction arrow and the edge of the WME editing area. Panning the map can be helpful if the turn arrow tooltip is covering other map objects you wish to view like segments or junction box paths.
![]()
Additional map controls
 junction creator -- creates a junction where segments merely cross
- Where two segments cross each other one time at the same elevation, but are not connected to each other, select the two segments at the same time. The junction creator icon will appear. Click this icon to create a junction. The two segments will be cut into four segments, all connected to the new junction.
 bridge creator -- creates a "bridge" from a four-way intersection.
- At any junction, select two segments with identical information. The bridge creator icon will appear. Clicking the icon will join the two selected segments into a single segment, and increase the elevation of the new segment to one more than the max elevation of the two segments which were joined. If you apply the bridge creator to a 4-segment junction, it will also join the two unselected segments, if possible.


Restriction
- For more details on this topic, see editing restrictions.
| This section is currently part of a larger effort to update the restrictions information across the wiki. Contact Kent Smith [Help] for more information |
There are several types of restrictions. This is an overview of each one.
- Editing area
- You can only edit objects within your editing area -- this includes segments, junctions, places. This also includes closing map problems and update requests. Your editing area includes the area you gain by driving as well as any managed areas you have been granted as an area manager or map raid participant.
- Lock rank
- Segments and places can be locked. You can only edit these objects if they have a lock rank less than or equal to your editor rank. You can only set turn arrows if both segments involved have a lock rank less than or equal to your editor rank. Even if a junction has a segment connected to it locked above your editing rank, you can add or remove any segment you can edit at that junction. You can set the lock rank anywhere between 1 and your editor rank on any segment or place you can edit.
- Staff place locks
- Sometimes, Waze staff lock places, often in preparation for an ad campaign. The effect is as if the place is locked above the rank of all other Waze editors, but the lock is not visible in WME.
- Trusted place editor status
- Editors below rank 2 and non-registered client users need approval from a rank 2 or higher editor for all places regardless of the lock rank, until they reach a trusted status. After currently unpublished place approvals, they become trusted editors and their places no longer need approvals. Rank 2 and higher editors never need approval for edits to places locked at or below their rank.
- Closure locking
- A segment that has a closure cannot be edited (with a few minor exceptions until the closure has been removed from the segment. So if a segment has a lock rank of 1 but a current closure, then it will require an editor with Real Time Closure permission for that segment to alter the closure so that a change can be made to the segment. In the USA, only rank 3 and higher editors can edit closures.
- Closures
- Editors receive permission to add and edit Real time closures (RTC) in two ways.
- Rank -- upon achieving minimum RTC rank (3 in the USA), editors can add and edit Real Time Closures on any segment within their editable areas that is not locked above their rank.
- RTC areas -- In addition, editors may be granted RTC areas. Within these areas, editors can add and edit Real Time Closures on any segments, no matter the lock rank.